
Have you ever wanted to add stylish storage to your space without bulky brackets showing? Building a floating shelf is a simple way to create a sleek, modern look that seems to defy gravity.
Imagine having a clean, clutter-free wall where your favorite books, plants, or decor appear to float effortlessly. In this guide, you’ll discover easy steps to build your own floating shelf, even if you’re new to DIY projects. By the end, you’ll have the skills and confidence to transform your walls and impress your guests.
Ready to make your space look sharper and more organized? Let’s dive in.

Credit: www.projectallendesigns.com
Materials And Tools Needed
Building a floating shelf requires careful selection of materials and tools. Choosing the right wood and having the essential tools ready makes the process easier. Finishing supplies help create a polished look. This section covers everything needed to start your project.
Choosing The Right Wood
Select wood that is strong and easy to work with. Pine, oak, and maple are popular choices. Pine is affordable and lightweight. Oak is sturdy and durable. Maple has a smooth finish and resists dents.
Consider the shelf’s purpose and weight capacity. Thicker wood holds more weight. Make sure the wood is straight and free of cracks.
Essential Tools List
- Measuring tape for accurate dimensions
- Level to ensure the shelf is straight
- Drill with bits for making holes
- Stud finder to locate wall studs
- Screwdriver for fixing screws
- Sandpaper or electric sander for smoothing edges
- Wood screws to secure the shelf
- Pencil for marking measurements
Optional Supplies For Finishing
- Wood stain to enhance the wood’s color
- Paint for a custom look
- Clear varnish or polyurethane for protection
- Brushes or rags for applying finishes
- Wood filler to cover holes or imperfections
Planning Your Shelf
Planning your floating shelf is the first key to a successful project. This stage sets the foundation for a shelf that looks great and holds strong. Careful planning saves time and avoids mistakes. Consider the space, size, and support before you start building.
Measuring The Space
Measure the wall area where the shelf will go. Use a tape measure and note the width, height, and depth available. Check for obstacles like light switches or outlets. Mark the exact spot where the shelf will hang. Accurate measurements ensure the shelf fits perfectly.
Selecting Shelf Dimensions
Choose shelf size based on the items you want to display. A wide shelf holds more but needs stronger support. Depth depends on the objects’ size, such as books or plants. Keep the height comfortable for easy access. Balance style and function in your selection.
Choosing Wall Anchors
Pick the right wall anchors for your wall type. Drywall, brick, or concrete require different anchors. Strong anchors prevent the shelf from falling. Use toggle bolts for drywall and masonry anchors for brick. Match the anchor size with the shelf weight for safety.
Cutting And Preparing Wood
Building a floating shelf starts with cutting and preparing the wood. This step is crucial. It sets the foundation for a strong and stable shelf. Proper preparation ensures the shelf looks polished and fits well. Let’s dive into the details of this process.
Marking Cut Lines
Start by measuring the wood. Use a measuring tape for accuracy. Mark the cut lines with a pencil. Ensure your lines are straight and clear. This prevents mistakes during cutting. Double-check measurements before proceeding.
Safe Cutting Techniques
Safety is key while cutting wood. Wear protective gear like goggles and gloves. Use a saw that suits your skill level. Hold the wood securely to avoid slips. Make slow, steady cuts along the marked lines. Keep fingers away from the blade.
Sanding For Smoothness
Sanding smooths the wood’s surface. Start with coarse sandpaper. Remove any rough edges and splinters. Switch to finer grit for a polished finish. Wipe away dust with a cloth. A smooth surface is essential for a neat appearance.
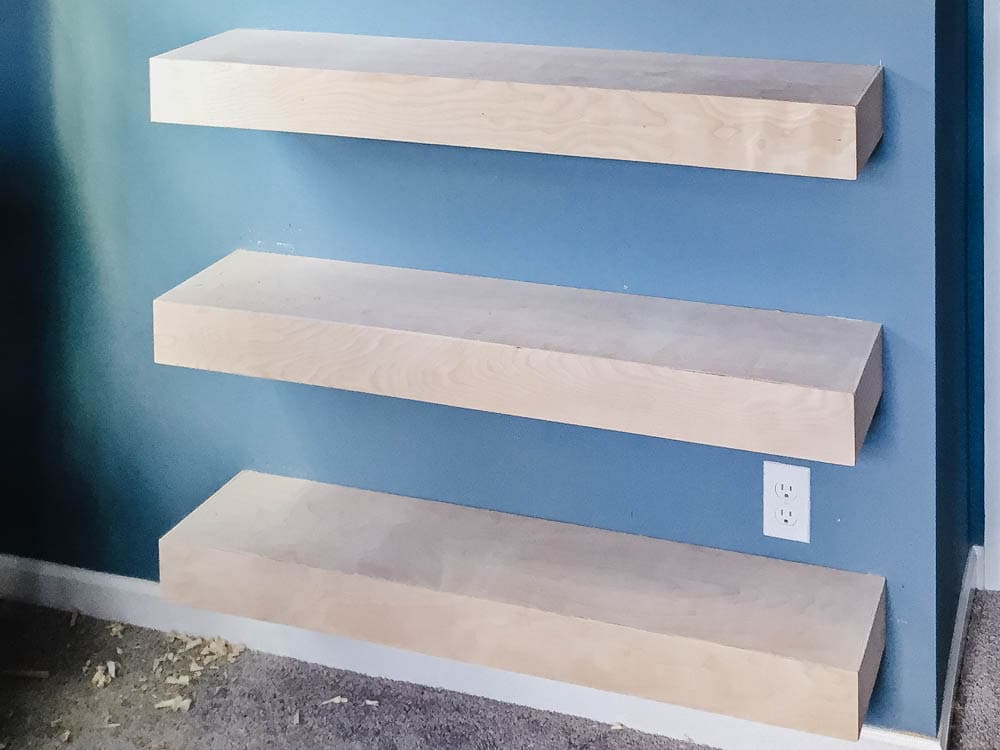
Credit: www.christeneholderhome.com
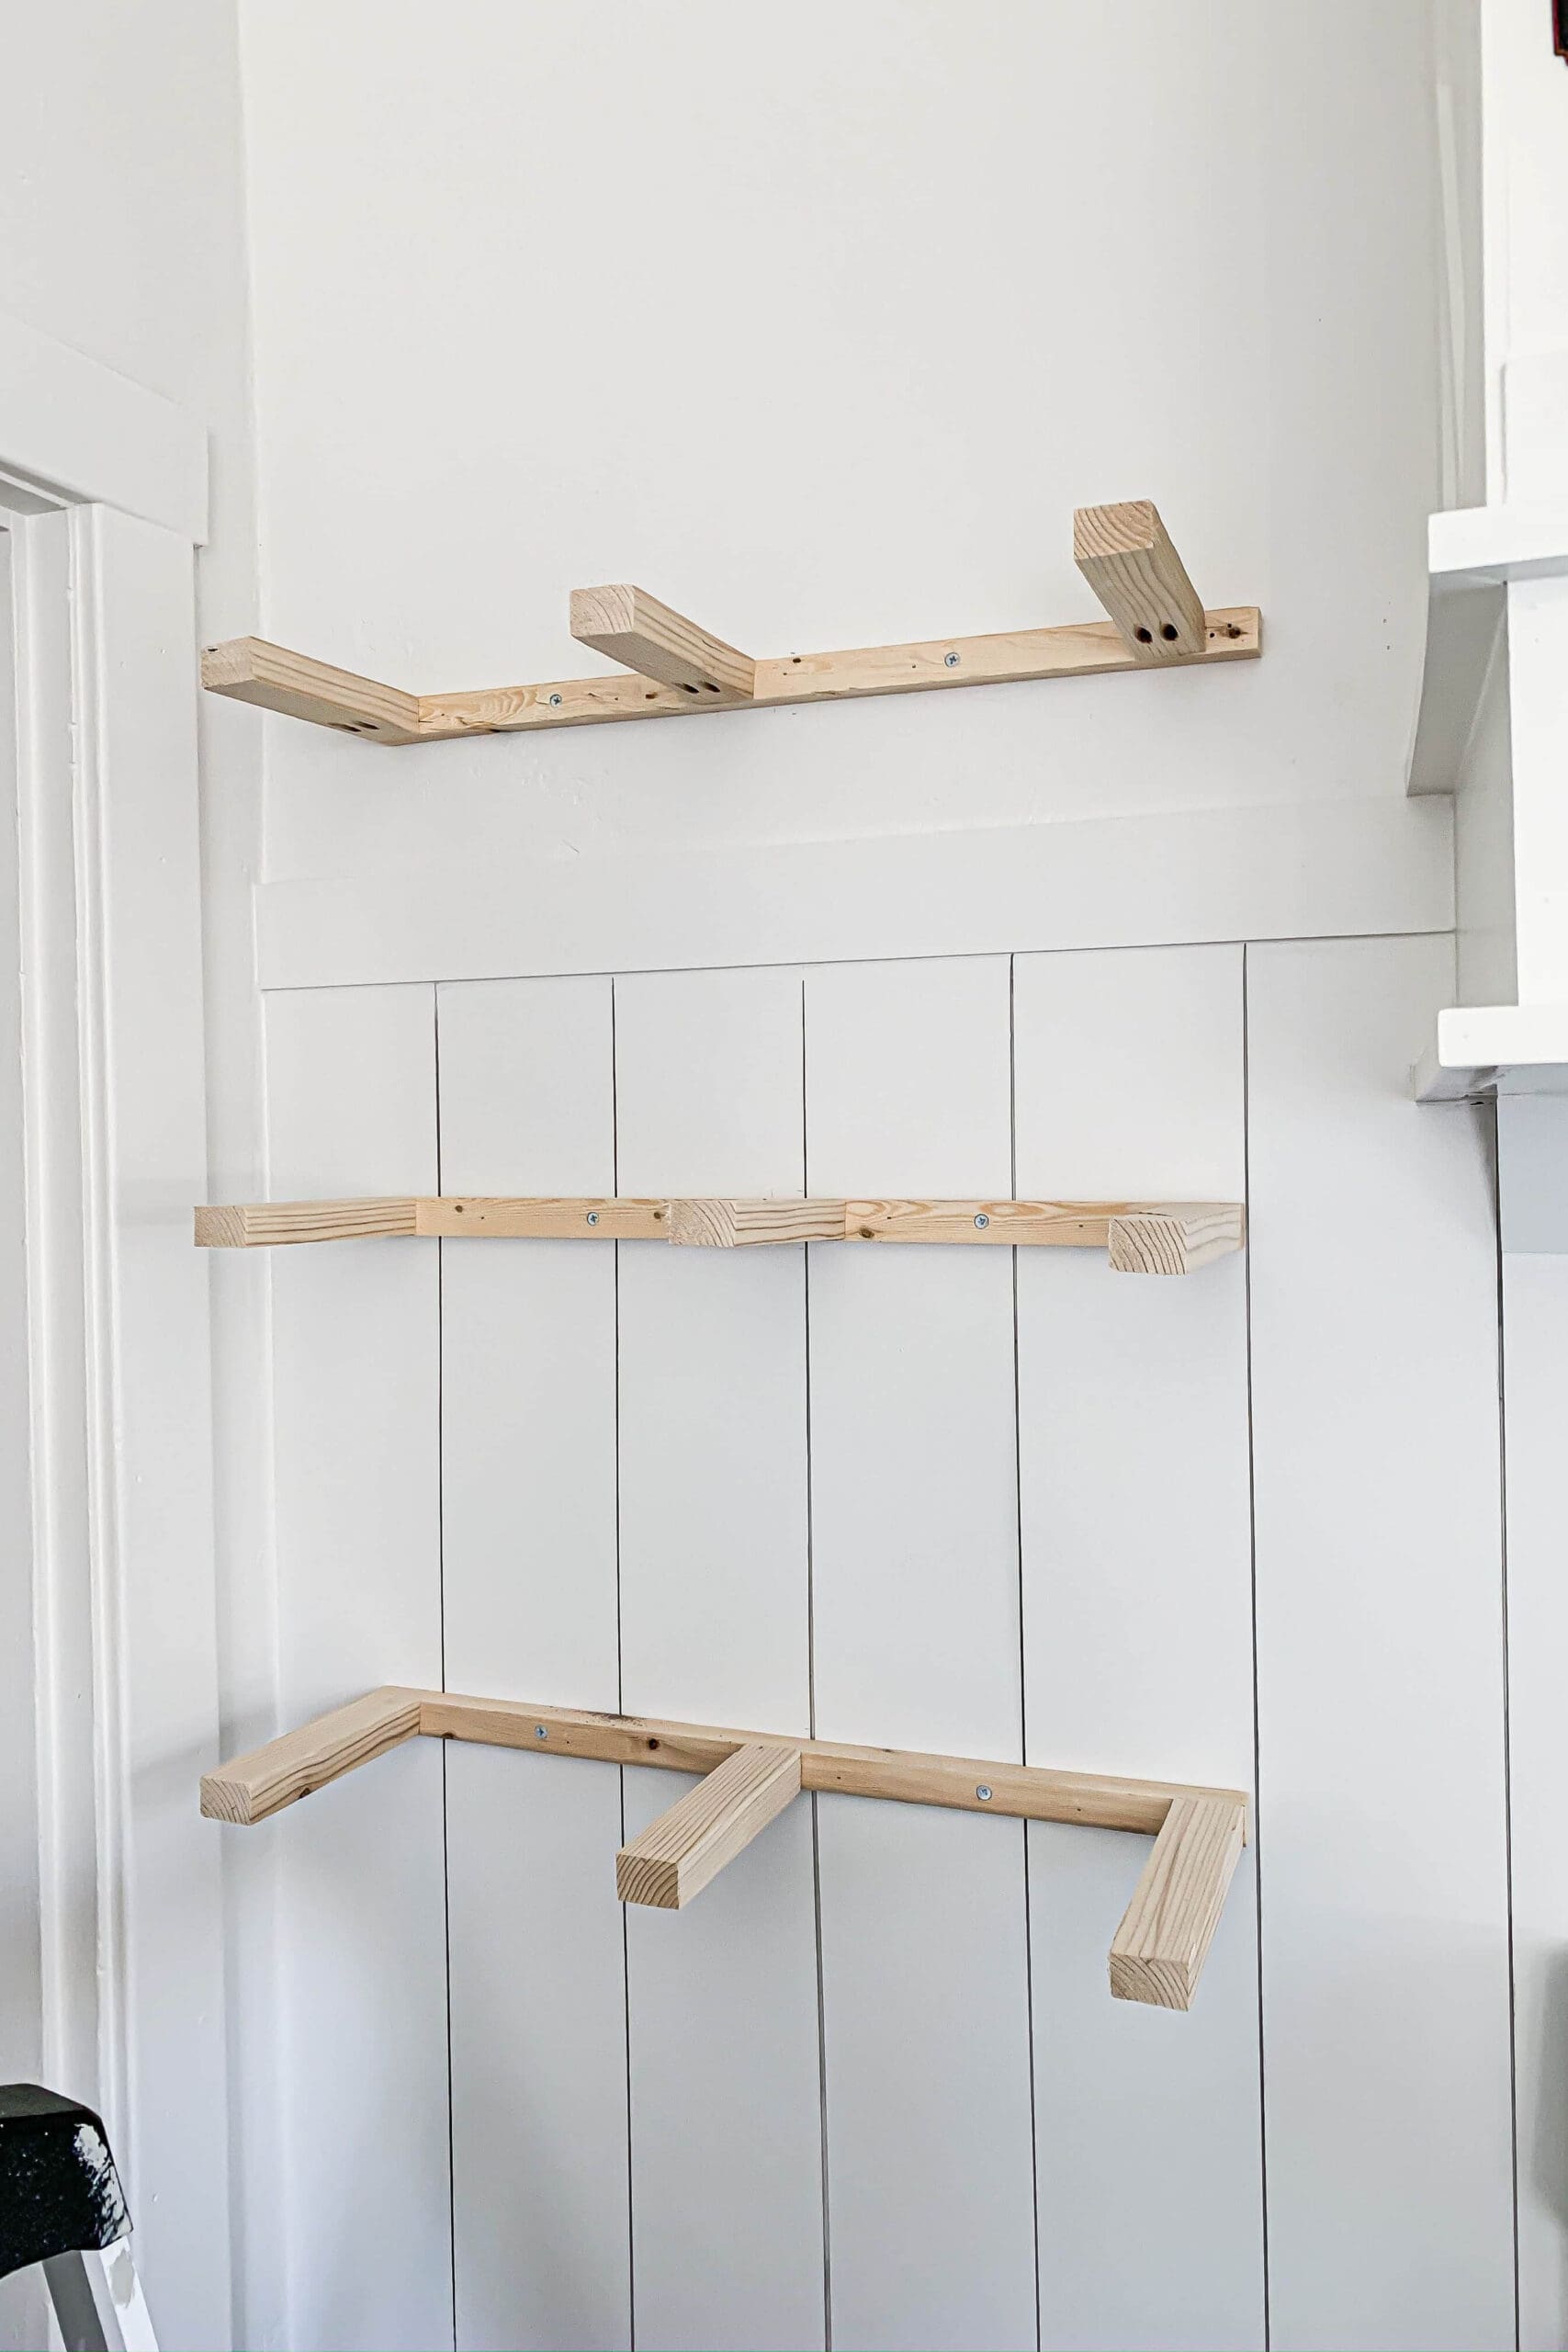
Installing The Brackets
Installing the brackets is a crucial part of building a floating shelf. This step ensures your shelf stays sturdy and can hold the weight of your items without sagging or falling. Paying close attention to how and where you install the brackets makes all the difference between a shelf that looks good and one that performs well.
Locating Wall Studs
Start by finding the wall studs behind your drywall. Use a stud finder to scan the wall—these wooden beams provide the strongest support. Mark the stud locations with a pencil to know exactly where to drill.
If you skip this step and attach brackets only to drywall, your shelf could come loose. Have you ever seen a shelf suddenly give way? That usually happens because it wasn’t anchored into studs.
Mounting Brackets Securely
Once you’ve marked the studs, position the brackets on the wall. Hold them steady and drill pilot holes through the bracket holes into the studs. This helps prevent the wood from splitting and ensures screws go in smoothly.
Use long screws designed for wood to secure the brackets tightly. Avoid using short or thin screws—they won’t hold the shelf’s weight. After tightening, give the bracket a firm tug to check it’s solid.
Leveling The Support
Before you attach the shelf, double-check that your brackets are level. Use a spirit level placed across the brackets to confirm they are perfectly horizontal. Even a small tilt can cause your shelf to look off and items to slide off.
If you notice the brackets aren’t level, adjust their position before securing them fully. Take your time here—this small effort prevents future headaches. Have you ever placed a shelf only to find it slanting? Avoid that by leveling carefully.
Attaching The Shelf
Attaching the shelf is a crucial step in building a floating shelf. This process ensures the shelf stays firmly in place and can hold items safely. Proper attachment prevents wobbling and potential damage to walls or objects placed on the shelf.
Aligning The Shelf
Start by positioning the shelf against the wall bracket or mounting plate. Make sure it is level and straight. Use a spirit level to check horizontal alignment. Adjust the shelf until it sits flush with the wall and bracket.
Securing With Screws
Once aligned, fix the shelf to the bracket using screws. Choose screws that fit the pre-drilled holes. Use a screwdriver or drill to tighten them firmly. Avoid over-tightening to prevent wood damage. Secure all screws evenly for balanced support.
Checking Stability
After securing, test the shelf’s stability. Gently press down and side to side to check for movement. The shelf should feel solid without wobbling. Tighten screws again if needed. A stable shelf will safely hold your items without shifting.
Finishing Touches
Finishing touches give your floating shelf a polished look and help it last longer. These final steps bring out the beauty of the wood and protect it from daily wear. How you finish your shelf can also reflect your personal style and the room’s vibe.
Staining Or Painting
Choosing between staining and painting depends on the look you want. Staining highlights the natural wood grain, adding warmth and character. Painting, on the other hand, lets you add a pop of color or match the shelf to your existing decor.
If you want a rustic feel, a dark stain works well. For a modern look, try a crisp white or bold color paint. Always test your stain or paint on a scrap piece of wood first to see how it will turn out.
Sealing For Protection
Sealing your shelf is crucial to protect it from moisture, dirt, and scratches. A clear polyurethane or varnish adds a durable layer without changing the color too much. This step is especially important if your shelf will hold heavy items or be in a humid room.
Apply the sealer with a brush, and let it dry completely between coats. Two or three coats usually offer the best protection. Imagine how much longer your shelf will stay looking fresh with just this simple step.
Decorating Ideas
Once your shelf is ready, think about what you want to display. Books, plants, or small art pieces can all bring life to the space. Mixing textures and heights creates visual interest and keeps the shelf from looking flat.
Try grouping items in odd numbers, like three or five, to make the arrangement more dynamic. You could also add small LED lights underneath to highlight your decorations at night. What items do you have that deserve a spotlight on your new floating shelf?
Troubleshooting Tips
Troubleshooting is a key part of building a floating shelf that looks great and stays secure. Small issues can turn into big problems if you ignore them. Let’s dive into some practical tips to fix common challenges and keep your shelf strong and stable.
Fixing Wobbly Shelves
If your shelf feels shaky, it usually means the brackets or anchors aren’t holding tight enough. Start by checking if the screws are fully tightened. Loose screws are often the culprit behind that annoying wobble.
Sometimes the wall anchors aren’t strong enough for the shelf’s weight. Try swapping plastic anchors for metal ones or use toggle bolts to grip better inside the wall. You want to make sure the shelf stays firm even when you place heavier items on it.
Dealing With Uneven Walls
Uneven walls can cause your shelf to tilt or not sit flush. Use a level to find out exactly where the wall dips or bulges. This helps you decide whether to shim the shelf or adjust the bracket placement.
A simple fix is to add thin wooden shims behind the bracket on the low spots. This evens out the surface and stops the shelf from leaning forward or backward. Have you checked your wall’s surface before installing? It can save you from unexpected gaps.
Maintaining Shelf Durability
Durability depends not just on installation but also on how you care for your shelf. Avoid overloading it beyond the weight limit of your brackets. This is a common mistake that leads to sagging or falling shelves.
Regularly inspect the screws and anchors for any signs of loosening or damage. Tighten them as needed to maintain stability. Think of your shelf as a small investment—you want it to last and look good for years.
Credit: crystelmontenegrohome.com
Frequently Asked Questions
What Tools Are Needed To Build A Floating Shelf?
You need a drill, level, stud finder, screws, anchors, a saw, and a measuring tape. These tools ensure precise and secure shelf installation.
How Do You Find Studs For Floating Shelf Installation?
Use a stud finder to locate studs behind drywall. Mark the stud positions with a pencil for accurate drilling and support.
What Materials Are Best For Building Floating Shelves?
Solid wood or plywood are ideal for durability. Choose quality brackets or hidden supports to ensure the shelf holds weight safely.
How Do You Secure A Floating Shelf To The Wall?
Attach the shelf bracket to wall studs using screws. Slide the shelf onto the bracket and tighten for stability.
Conclusion
Building a floating shelf takes some care and the right steps. Start by choosing strong materials and tools. Measure well to fit your space perfectly. Secure the shelf firmly to the wall for safety. A neat, simple shelf can hold many items and add style.
With patience and practice, anyone can make one. Try it yourself and see how it changes your room. Easy to build, useful, and nice to look at. A perfect project for home improvement.


