

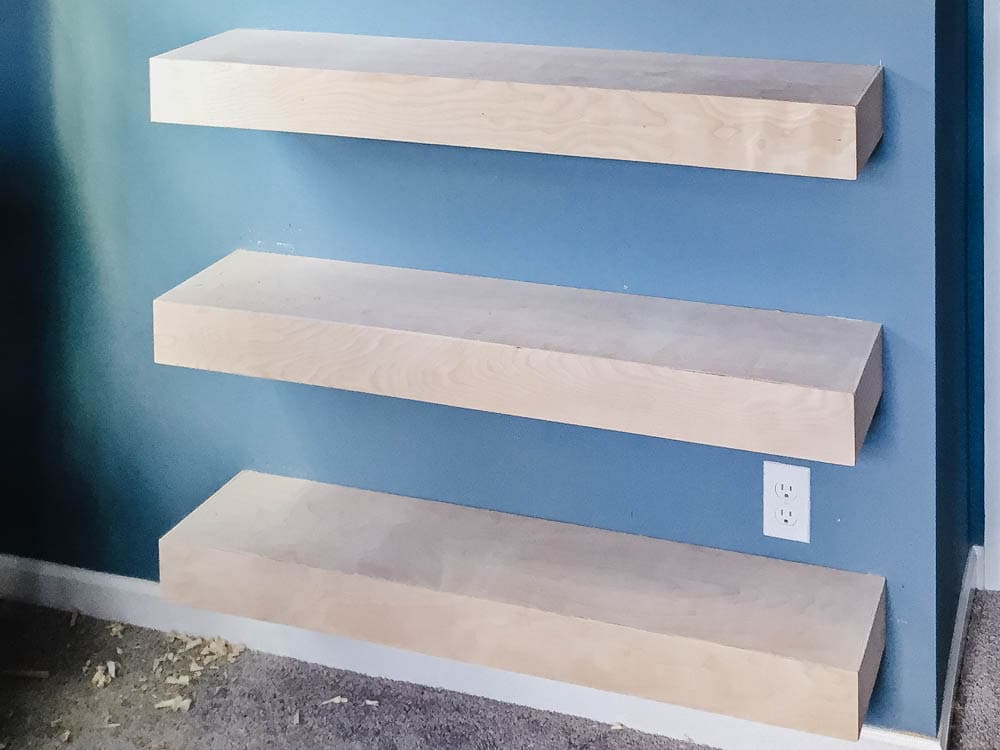
Are you ready to add style and storage to your space without bulky furniture? Building a strong floating shelf can be the perfect solution.
Imagine a sleek shelf that holds your favorite books, plants, or decor without visible brackets. But how do you make sure it’s sturdy and safe? In this guide, you’ll discover simple steps to create a floating shelf that looks great and supports all your essentials.
Keep reading, and you’ll soon have a shelf that not only saves space but also impresses everyone who sees it.
Credit: www.christeneholderhome.com
Choosing Materials
Choosing the right materials is the first step to building a strong floating shelf. Good materials ensure the shelf holds weight and lasts long. Quality materials also make the shelf look great in any room.
Focus on wood, brackets, and tools. Each part affects the shelf’s strength and appearance. Choosing wisely saves time and effort later.
Selecting The Right Wood
Wood type affects shelf strength and style. Hardwoods like oak, maple, and walnut are very strong. Softwoods such as pine are lighter but less durable.
Check for wood that is straight and free of cracks. Avoid wood with knots or warping. Smooth wood surfaces are easier to finish.
Picking Strong Brackets
Brackets hold the shelf to the wall. Metal brackets made of steel or iron offer excellent support. Choose brackets with a wide base for better weight distribution.
Look for brackets with multiple screw holes. This helps secure the shelf firmly. Powder-coated or painted brackets resist rust and last longer.
Essential Tools And Supplies
- Drill with various drill bits
- Level to ensure shelf is straight
- Screwdriver or power driver
- Stud finder to locate wall studs
- Measuring tape for accurate cuts
- Sandpaper to smooth the wood surface
- Wood screws and wall anchors
Having the right tools makes installation easier and safer. Prepare all supplies before starting the project.
Measuring And Planning
Measuring and planning are the foundation of a strong floating shelf. Without precise measurements and thoughtful preparation, your shelf could end up unstable or uneven. Taking time here saves effort and frustration later.
Determining Shelf Size
Start by deciding how much space you want the shelf to cover. Consider what items you’ll place on it—books need more depth than small plants or picture frames. A common depth is 8 to 12 inches, but adjust based on your needs.
Measure the wall area where the shelf will go. Don’t forget to leave some clearance from corners or adjacent fixtures. Ask yourself: will this size balance well with other elements in the room?
Locating Wall Studs
Floating shelves rely heavily on wall studs for support. Use a stud finder to locate these behind your drywall. Mark the stud locations clearly with a pencil.
Stud spacing is usually 16 or 24 inches apart. Placing the shelf brackets into studs ensures the shelf holds weight without pulling away from the wall. If you miss the studs, your shelf risks collapse.
Marking Drill Points
After locating studs, mark where you will drill pilot holes. Align these marks with the shelf bracket holes for a secure fit. Double-check your measurements to avoid mistakes.
Use a level to make sure your marks are perfectly horizontal. This small step helps your shelf sit straight and look professional. Have you ever installed something only to find it slanting? Avoid that by marking carefully.
Cutting And Preparing
Select sturdy wood and mark measurements carefully for precise cuts. Use a saw to cut pieces smoothly, ensuring edges are clean and even. Sand all surfaces to prepare the wood for assembly and finishing.
Building a strong floating shelf begins with the crucial phase of cutting and preparing your materials. This step is foundational, ensuring your shelf is not only aesthetically pleasing but also robust and reliable. Careful attention to detail here can make all the difference between a shelf that sags over time and one that stands the test of time.Cutting Wood To Size
Begin with precise measurements. Measure twice to ensure accuracy before making any cuts. Use a sharp saw for cleaner cuts and better edges. If you’re cutting multiple pieces, consistency is key—double-check each piece against the others. A small variance can lead to a noticeable tilt or gap.Sanding And Finishing
Sanding smooths the wood’s surface, preparing it for finishing. Start with a coarse grit sandpaper and gradually move to a finer grit. This will eliminate any rough patches and splinters. Once sanded, consider applying a wood finish or stain for protection and aesthetics. A well-finished shelf not only looks better but also resists wear and tear.Pre-drilling Holes
Pre-drilling is crucial to prevent wood from splitting. Use a drill bit slightly smaller than your screws. Mark your drill spots evenly to maintain balance when the shelf is mounted. This step ensures a seamless assembly process and adds to the shelf’s structural integrity. Have you ever noticed how the smallest details can make the biggest impact? In shelf-building, precision in cutting, sanding, and drilling is everything. Each meticulous step contributes to a final product that not only holds your items but also enhances your space.Installing Brackets
Installing brackets is a crucial step in building a strong floating shelf. This process holds the key to stability and safety for your shelf and everything you place on it. You want to make sure the brackets are mounted correctly so your shelf can hold weight without wobbling or falling.
Attaching Brackets To Wall
Start by locating the studs in your wall using a stud finder. Mounting brackets directly into studs provides the strongest support.
If you can’t find studs in the right spots, use heavy-duty wall anchors designed for your wall type. Avoid just screwing into drywall — it won’t hold much weight.
Mark your bracket positions carefully. Use a pencil to outline where the screws will go, ensuring the brackets sit exactly where you want your shelf.
Ensuring Level Alignment
Use a spirit level to check that your brackets are perfectly horizontal. Even a slight tilt can cause items to slide off or create stress on the shelf.
Try clamping the brackets in place and double-check with the level before drilling. This small extra step saves a lot of frustration later.
Ask yourself: Would a little imperfection bother you every time you look at your shelf? Taking time to level it now prevents long-term annoyance.
Securing Brackets Firmly
Use screws that are long enough to penetrate deep into the stud or anchor for maximum holding power. Short screws might feel secure at first but can loosen over time.
Tighten screws firmly but avoid over-tightening, which can strip the hole or damage the bracket.
After installing, give the bracket a firm shake. If it moves at all, remove the screws and try again with stronger anchors or repositioning. Your shelf’s safety depends on this solid foundation.
Mounting The Shelf
Mounting the shelf is a key part of building a strong floating shelf. It ensures the shelf holds weight safely and looks neat. Proper mounting avoids accidents and keeps your items secure.
Follow simple steps to position, fix, and check your shelf for stability. Each step helps create a solid hold on your wall.
Positioning The Shelf
Choose a spot on the wall where the shelf will be useful and look good. Use a pencil to mark the desired height. Check for wall studs using a stud finder to provide strong support. Avoid mounting on drywall alone, as it is weak. Use a level to make sure the shelf will be straight. Mark the points for brackets carefully.
Fixing Shelf To Brackets
Attach the brackets firmly to the wall at the marked points. Use screws that match the wall type for a secure fit. Drill pilot holes to make screwing easier and prevent wall damage. Place the shelf on the brackets and align it properly. Secure the shelf to the brackets with screws from underneath. Tighten all screws without overdoing to avoid damage.
Checking Stability
Test the shelf by applying gentle pressure down and sideways. Look for any wobbling or movement. Tighten screws if the shelf feels loose. Add wall anchors if extra support is needed. Ensure the shelf holds weight evenly without tilting. A stable shelf keeps your items safe and your wall unharmed.

Credit: www.youtube.com
Maintenance Tips
Maintaining your floating shelf ensures it stays sturdy and looks great over time. Regular care prevents damage and keeps your shelf safe to use. Let’s look at some practical tips to help you preserve the strength and appearance of your shelf.
Weight Limits To Follow
Every floating shelf has a weight capacity, often depending on the materials and mounting hardware used. Exceeding this limit risks damaging the wall or causing the shelf to fall.
Think about what you plan to display. Heavy books or large decor items may require a stronger shelf or additional support.
Ask yourself: Are you aware of your shelf’s weight limit? It’s better to stay well below that limit to avoid accidents.
Regular Tightening Checks
Over time, screws and brackets can loosen due to vibrations or regular use. Loose fittings reduce the shelf’s stability and safety.
Make it a habit to check and tighten all mounting hardware every few months. Even a quick glance can prevent major problems later.
Remember, a shelf that feels wobbly is a warning sign. Don’t ignore it—tighten those screws promptly.
Cleaning And Care
Dust and dirt build-up can affect the shelf’s surface and finish. Clean your floating shelf regularly with a soft cloth to maintain its look.
Avoid harsh chemicals that might damage the finish. Mild soap and water usually do the job well.
Have you noticed discoloration or scratches? Address these issues early by using appropriate wood or paint care products to extend your shelf’s life.

Credit: www.youtube.com
Frequently Asked Questions
What Materials Are Best For A Strong Floating Shelf?
Use solid wood or high-quality plywood for durability. Avoid particleboard as it may sag. Metal brackets add extra support and stability. Choose materials that can hold your intended weight safely.
How Do You Install A Floating Shelf Securely?
Locate wall studs using a stud finder. Attach a strong mounting bracket directly to studs. Use heavy-duty screws and anchors for added strength. Ensure the shelf is level before final tightening.
What Weight Can A Floating Shelf Typically Hold?
A well-installed floating shelf can hold 20 to 50 pounds. Weight depends on bracket type, wall material, and shelf thickness. Always check manufacturer guidelines to avoid overloading and damage.
How Do You Reinforce A Floating Shelf For Heavy Items?
Add extra brackets or use thicker wood for better support. Securely anchor brackets into wall studs. Consider metal support rods hidden inside the shelf for additional strength.
Conclusion
Building a strong floating shelf takes careful planning and the right tools. Choose sturdy materials and secure the brackets well. Measure twice, drill once to avoid mistakes. Keep weight limits in mind for safety. A well-made shelf adds style and function to any room.
With patience and care, anyone can create a reliable floating shelf. Start your project today and enjoy the results tomorrow. Small efforts bring big rewards. Ready to display your favorite items?


