
Are you looking to transform your space with a striking new look? Learning how to make 3D wall panels can be your secret weapon to add depth, style, and personality to any room.
Imagine turning a plain wall into a stunning feature that catches every eye. In this guide, you’ll discover simple steps and tips to create your own 3D wall panels without spending a fortune or needing expert skills. Ready to give your walls a fresh, modern vibe?
Keep reading and unlock the easy way to elevate your home’s design.
Materials Needed
Creating 3D wall panels requires specific materials to achieve a stunning look. Gather the right items before starting your project. This ensures smooth progress and a professional finish.
Choosing The Right Panels
Select panels based on your room’s style and budget. Common materials include:
- MDF (Medium-Density Fiberboard) – affordable and easy to paint
- PVC – lightweight and water-resistant
- Gypsum – smooth surface, ideal for detailed designs
- Wood – natural look, adds warmth
Pick panels with the thickness suitable for your wall and design depth.
Tools And Supplies
Prepare these tools for cutting, attaching, and finishing panels:
- Measuring tape for accurate dimensions
- Utility knife or saw for cutting panels
- Adhesive suitable for your panel type
- Level to ensure straight installation
- Sandpaper for smoothing edges
- Paint and brushes or rollers if painting
Safety Gear Essentials
Protect yourself while working with panels and tools. Use:
- Safety goggles to guard eyes from dust and debris
- Dust mask to avoid inhaling particles
- Gloves to protect hands from cuts and splinters
- Ear protection if using loud cutting tools
Wearing safety gear helps prevent injuries and keeps your project safe.
Preparing The Wall
Clean the wall surface thoroughly to remove dust, dirt, and grease. Repair any cracks or holes to ensure a smooth base for the 3D panels. Sand the wall lightly to help the panels stick better.
Preparing the wall is a crucial step in creating stunning 3D wall panels. A well-prepared surface ensures the panels adhere properly and last long. This process involves cleaning, measuring, and priming the wall. Let’s explore each step in detail.Cleaning And Smoothing
Start by cleaning the wall thoroughly. Remove any dust, dirt, or grease using a mild detergent and water. Use a sponge or cloth for wiping. Rinse with clean water and let it dry completely. Examine the wall for any bumps or rough spots. Use sandpaper to smooth these areas. A smooth surface ensures better adhesion of the panels.Measuring And Marking
Accurate measurements are essential for even panel placement. Use a measuring tape to find the height and width of the wall. Mark the center point with a pencil. This helps in aligning the panels symmetrically. Draw guidelines using a level and straightedge. These lines will guide panel placement, ensuring straight and even rows.Priming The Surface
Priming creates a better surface for adhesion. Choose a primer suitable for your wall type. Apply the primer using a roller or brush. Cover the entire wall evenly. Allow the primer to dry completely before moving to the next step. This will enhance the durability of the 3D wall panels.Cutting And Shaping Panels
Cutting and shaping 3D wall panels is an essential part of the installation process. It allows the panels to fit perfectly on your walls, creating a smooth and attractive finish. Precision in cutting ensures the design stays consistent and looks professional.
Understanding the right tools and techniques can make this task easier and safer. It also helps to customize the panels to match your room’s unique dimensions and style.
Using Power Tools
Power tools make cutting 3D wall panels faster and more accurate. A jigsaw, circular saw, or rotary tool works well depending on the panel material. Always use a fine-toothed blade for smooth cuts. Wear safety goggles and gloves for protection. Secure the panel firmly before cutting to prevent slips. Take your time to follow the marked lines carefully.
Customizing Panel Shapes
Customizing shapes helps the panels fit corners, edges, and outlets perfectly. Start by measuring the wall area precisely. Mark the panel with a pencil to show where to cut. Use templates or stencils for complex shapes to maintain consistency. Small adjustments can make a big difference in the final look. Keep the shapes simple to avoid weakening the panel structure.
Handling Curves And Angles
Curves and angles add depth to your wall design but need careful cutting. Flexible panels are easier to shape around curves. Score the panel surface lightly before cutting to prevent cracking. Use a jigsaw with a narrow blade for tight curves. For angles, measure the exact corner degrees. Cut slowly and check the fit often. Sand rough edges for a clean finish.
Credit: www.vevor.ca
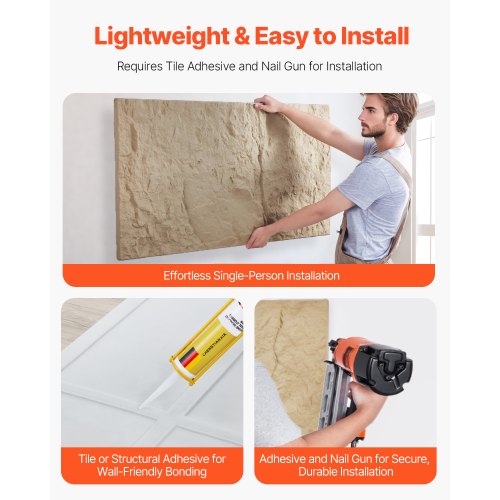
Installing The Panels
Installing 3D wall panels is where your creative vision starts to take physical shape. The process requires attention to detail to ensure each panel fits perfectly and stays secure over time. Whether you prefer adhesives or nails, understanding the best approach will save you frustration and improve the final look.
Adhesive Options
Choosing the right adhesive is crucial for a strong, lasting bond. Construction adhesive is popular because it works well with most panel materials and sticks firmly to drywall or wood.
For lightweight panels, you might try double-sided mounting tape as a cleaner, less messy alternative. However, test a small piece first to make sure it holds without damaging your wall.
Hot glue can also work for temporary installations or for panels made of foam, but it’s less durable than other adhesives. Consider the environment too—high humidity may affect some glues.
Nailing And Screwing Techniques
If you prefer mechanical fasteners, small finishing nails or screws provide excellent stability. Use a nail gun or drill to speed up the process and ensure consistent depth.
Pre-drill holes in the panels to prevent cracking, especially if the material is dense or brittle. Countersink screws slightly so they sit flush or just below the panel surface.
Think about how to conceal the fasteners afterward. Wood filler or paint can hide nail heads, keeping your installation smooth and seamless.
Aligning And Spacing
Perfect alignment can be tricky but makes a huge difference in appearance. Start by measuring and marking guidelines on your wall to keep panels straight and evenly spaced.
Leave a small gap between panels if your design calls for it—this can enhance the 3D effect and allow for slight expansion or contraction of materials. Use spacers or shims for consistent gaps.
Check your work frequently during installation. Step back often to see the overall pattern and catch any misalignment early before adhesives or nails set.
Finishing Touches
Finishing touches bring your 3D wall panels to life. They hide imperfections and enhance the overall look. These final steps make the panels look professional and polished. Careful attention here boosts the impact of your design.
Filling Gaps And Seams
Use a high-quality filler or caulk to close gaps between panels. Smooth the filler with a putty knife for a seamless finish. Let the filler dry completely before any painting. This step prevents cracks and uneven surfaces from showing.
Painting And Staining
Choose paint or stain that matches your room’s style. Use a primer first for better adhesion and color. Apply thin, even coats to avoid drips and streaks. Allow each coat to dry fully before applying the next. This creates a durable and attractive surface.
Adding Texture And Effects
Enhance panels with texture for a unique look. Try sponging, rag-rolling, or dry brushing techniques. Metallic paints or glazes add depth and shine. Test effects on a sample piece before applying to the wall. This adds personality without overwhelming the design.

Credit: commomy.com
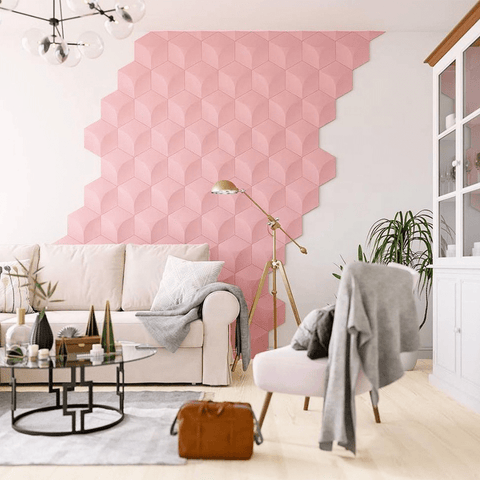
Creative Diy Ideas
Creative DIY ideas for making 3D wall panels give you the freedom to express your style while adding texture and depth to any room. You don’t need to be an expert to craft something that looks professionally done. With simple materials and a bit of imagination, your walls can become a stunning focal point.
Geometric Patterns
Geometric patterns bring a modern, clean look to your wall panels. You can create shapes like triangles, hexagons, or diamonds using foam board, cardboard, or wood. Cutting these shapes in varying sizes and arranging them in repeating or random patterns adds an eye-catching 3D effect.
Try painting each shape in different shades of one color or contrasting hues for more visual interest. Have you considered how changing the angle of each piece affects the light and shadow play on your wall?
Natural And Organic Designs
Natural and organic designs make your space feel warm and inviting. Use materials like cork, driftwood, or clay to craft panels that mimic natural textures. For example, layering thin slices of wood in uneven rows can resemble tree bark or waves.
This approach lets you bring the outdoors inside without needing a lot of tools. What natural elements in your home inspire you the most to create a calming environment?
Mixed Materials
Combining different materials adds complexity and uniqueness to your 3D wall panels. Mix wood, metal, fabric, or even recycled items like bottle caps or old tiles. The contrast between soft and hard textures draws attention and makes your wall a conversation starter.
You can glue or nail pieces onto a baseboard and finish with a clear sealant for durability. How might using unexpected materials transform a simple wall into a bold statement?
Maintenance Tips
Maintaining 3D wall panels keeps them looking fresh and new. Proper care extends their life and beauty. Simple steps help avoid damage and dirt buildup. Follow these tips to keep your panels in top shape.
Cleaning Procedures
Dust the panels regularly with a soft cloth or duster. Use a vacuum cleaner with a brush attachment for deep cleaning. For stains, use a mild soap solution and a damp sponge. Avoid harsh chemicals that can damage the surface. Dry the panels with a clean towel to prevent water marks.
Repairing Damages
Small scratches can be fixed with touch-up paint matching the panel color. For cracks, apply a flexible filler and smooth it carefully. Replace any severely damaged panel to maintain the overall look. Handle repairs gently to avoid further damage. Use proper tools for a clean and neat finish.
Long-term Care
Keep the room well-ventilated to prevent moisture buildup. Avoid direct sunlight to reduce fading over time. Inspect panels regularly for signs of wear or damage. Use protective coatings if recommended by the manufacturer. Maintain a stable indoor climate to protect the material.

Credit: commomy.com
Frequently Asked Questions
What Materials Are Needed To Make 3d Wall Panels?
You need materials like MDF boards, PVC sheets, or gypsum panels. Also, gather adhesive, paint, and mounting tools for installation.
How Long Does It Take To Make 3d Wall Panels?
Making 3D wall panels typically takes 2 to 4 hours. The time depends on design complexity and drying times for paint or adhesive.
Can I Install 3d Wall Panels Myself?
Yes, you can install 3D wall panels yourself. Follow instructions carefully, use proper tools, and ensure the wall surface is clean and smooth.
Are 3d Wall Panels Suitable For All Rooms?
3D wall panels work well in living rooms, bedrooms, and offices. Avoid damp areas unless panels are moisture-resistant.
Conclusion
Creating 3D wall panels adds style and depth to any room. The process is simple and fun to try at home. Using basic tools and materials saves money and lets you customize designs. Each panel brings texture and interest to your walls.
Small steps lead to great results. Start with a clear plan and enjoy the creative process. Your space will feel fresh and unique with these panels. Give it a go and see how your walls transform.


