

Are you looking to add a unique, eye-catching feature to your space? A 3D metal wall panel can transform any room with its modern, textured look.
Imagine the impact of a design that stands out, catches the light, and brings depth to your walls. In this guide, you’ll learn exactly how to make your own 3D metal wall panel step by step. No special skills needed—just a bit of creativity and the right tools.
Keep reading to discover how you can create a striking piece that will impress everyone who sees it.
Materials Needed
Gathering the right materials sets the foundation for creating a stunning 3D metal wall panel. Knowing what types of panels to choose, the tools to have on hand, and the safety gear to wear will save you time and frustration. Let’s break down these essentials so you feel ready and confident to start your project.
Types Of Metal Panels
Choosing the right metal panel depends on your design goals and installation space. Aluminum panels are lightweight and resist rust, making them ideal for indoor and outdoor use. Steel panels offer strength and durability but require a protective finish to prevent corrosion.
Some panels come pre-textured or embossed, giving you 3D effects right out of the box. Others are flat sheets that you can shape yourself for a custom look. Which style fits your vision better—the ready-made dimension or a panel you craft yourself?
Tools Required
Having the right tools makes shaping and installing your metal panel much easier. Common tools include:
- Metal snips or a power shear for cutting panels to size.
- A metal brake or bending tool to create precise folds and curves.
- A drill with metal bits for making holes to mount the panel.
- Measuring tape and a square for accurate dimensions.
- Clamps to hold the panel steady while working.
Investing in quality tools pays off in cleaner cuts and smoother finishes. Have you checked if your toolkit is ready for metal work?
Safety Gear
Working with metal can be risky without proper protection. Always wear sturdy gloves to protect your hands from sharp edges. Safety glasses are a must to shield your eyes from flying metal shards.
Consider ear protection if you use power tools that create loud noise. A dust mask helps if you’re sanding or grinding the metal surface. Prioritizing safety lets you focus better and reduces accidents.

Credit: woodywalls.com
Choosing Your Design
Choosing the right design for your 3D metal wall panel sets the tone for your entire project. It affects the style, mood, and visual impact of the space. The design should match the room’s purpose and your personal taste. Simple or bold patterns can create very different effects. Consider the size of the wall and the lighting too. These details help guide your choice.
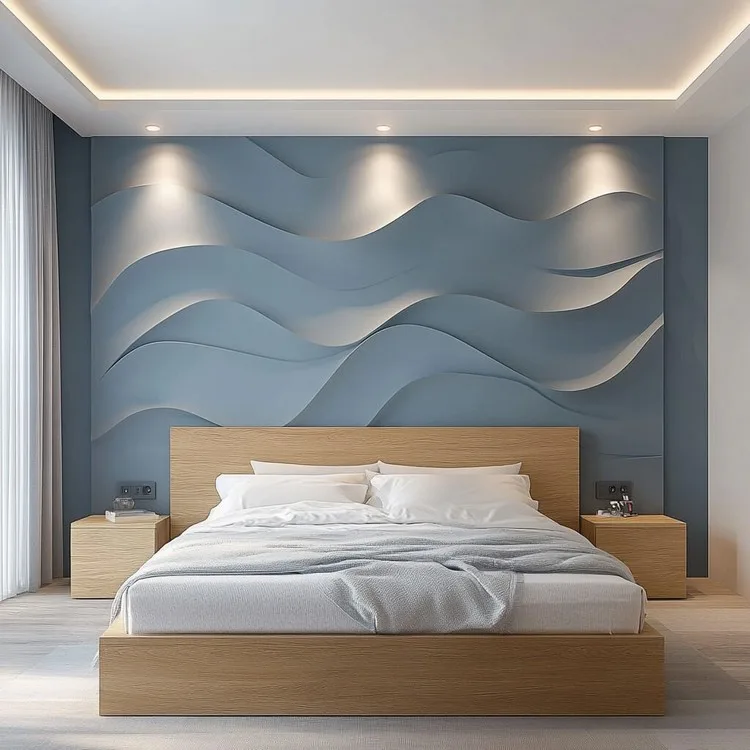
Popular 3d Patterns
Many popular patterns work well for metal wall panels. Geometric shapes like hexagons and triangles add a modern look. Waves and curves give a softer, flowing feel. Repetitive patterns create rhythm and structure. Some designs mimic natural forms such as leaves or wood grain. Textured patterns with depth bring light and shadow into play.
- Hexagonal honeycomb
- Diamond lattice
- Wave ripple
- Leaf veins
- Abstract organic shapes
Choose a pattern that fits the room’s style. Bold patterns suit large spaces. Smaller, detailed designs work better in cozy rooms.
Customization Tips
Customizing your 3D metal panel makes it unique. Adjust size and shape to fit your wall perfectly. Change the depth of the pattern for more texture. Use different finishes like matte, glossy, or brushed metal. Color can also be added through paint or powder coating. Mix and match patterns for creative effects.
- Resize panels to fit your wall space
- Choose pattern depth for shadow play
- Pick metal finishes to match decor
- Add color for vibrancy or subtlety
- Combine patterns for a unique look
Keep balance between design and function. Ensure your customization enhances the room without overwhelming it.
Preparing The Metal Sheets
Metal sheets need cleaning and smoothing before shaping. Removing rust and dirt ensures a better finish and easier handling. Proper preparation helps the metal form accurately for the 3D panel design.
Preparing the metal sheets for a 3D metal wall panel is a critical step that sets the foundation for the entire project. Your attention to detail here ensures that the final outcome is not only structurally sound but also aesthetically pleasing. It’s the phase where precision meets creativity, transforming raw metal into a canvas for your design.Measuring And Cutting
Accurate measurements are your best friend here. Use a reliable measuring tape to ensure each piece fits perfectly into your design. Mistakes at this stage can lead to costly material waste or an uneven wall panel. Cutting the metal sheets requires steady hands and the right tools. A metal shear or a cutting torch can make this task easier, depending on the thickness of your metal. Always wear protective gear to keep yourself safe during the cutting process.Cleaning And Smoothing Edges
Once cut, the metal edges need attention to detail. Rough edges not only look unprofessional but can also be hazardous. Use a metal file or sandpaper to smooth out any jagged parts. Cleaning the metal is equally important to ensure proper adhesion of any finishes or paints. A simple wipe-down with a cloth soaked in a mix of water and mild detergent can remove dirt and grease. You might find this step meditative, as you prepare your material for the next stage of transformation. Have you ever noticed how a small scratch on a metal surface can ruin its entire look? Ensuring a smooth edge and clean surface can be the difference between a good and a great project. So, take a moment to appreciate the groundwork you’re laying for your metal wall panel masterpiece.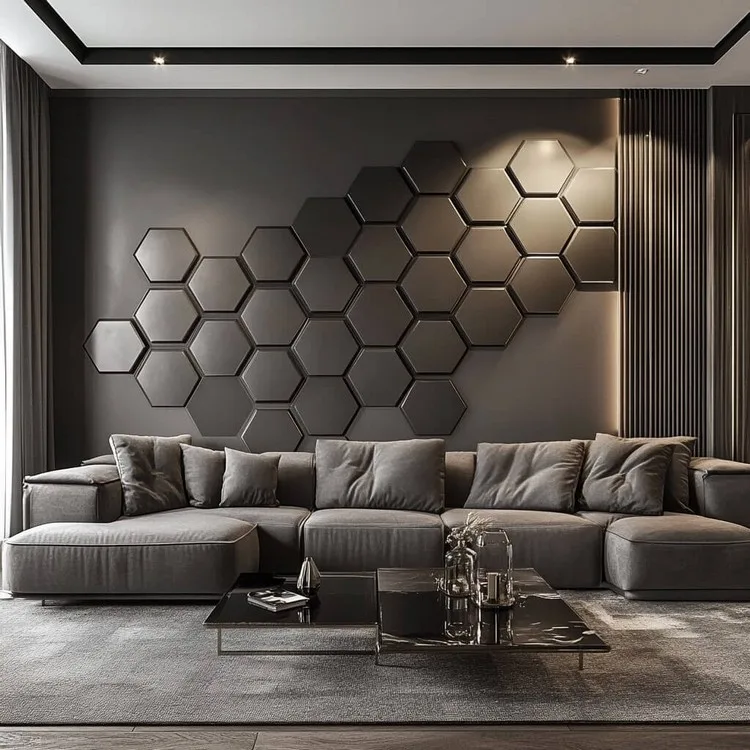
Credit: www.interiorcompany.com
Creating The 3d Effect
Creating the 3D effect on metal wall panels is where your design truly comes to life. This process adds depth and texture, turning a flat sheet of metal into a captivating piece of art. Understanding the techniques to shape the metal is essential to achieve stunning results that catch the eye.
Folding Techniques
Folding metal is one of the most straightforward ways to create three-dimensional patterns. You can use simple hand tools like pliers or specialized bending machines to make precise folds.
Start with clean, flat metal sheets. Carefully mark the fold lines with a pencil or marker to maintain accuracy. Then, bend the metal along these lines to form sharp creases or gentle curves depending on your design.
Folding lets you create geometric shapes, ridges, and patterns that add visual interest. Have you tried folding thin sheets before? The thickness of the metal dramatically changes how easy or challenging this step is. Thin aluminum folds easily, while thicker steel requires more force and patience.
Using Molds And Presses
For more complex or consistent 3D effects, molds and presses are your best friends. These tools shape metal by applying pressure to force it into a specific form.
You can create custom molds from materials like wood, plastic, or steel. Place your metal sheet over the mold and use a hydraulic or mechanical press to push the metal into the desired shape. This method works well for repeating patterns or detailed textures.
Using molds allows you to replicate designs quickly and with precision. It’s important to select the right mold material and press strength to avoid damaging the metal. Have you considered how different pressures affect the final texture? Experimenting with pressure levels can help you find the perfect balance between detail and metal integrity.
Assembling The Panels
Assembling 3D metal wall panels requires care and precision. Proper assembly ensures a smooth, attractive finish. This part focuses on how to join the panels and keep them stable on your wall.
Joining Methods
Choose a joining method that suits your panel type and wall surface. Common techniques include:
- Interlocking edges:Panels with built-in grooves fit tightly together.
- Using screws:Attach panels securely with metal screws at the edges.
- Adhesive bonding:Strong construction adhesive works well on smooth surfaces.
- Clips and brackets:Metal clips hold panels without visible fasteners.
Test the fit before fixing panels in place. Align edges carefully to avoid gaps.
Ensuring Stability
Stable installation prevents panels from shifting or warping over time. Follow these tips:
- Use a level to keep panels straight.
- Secure every panel at multiple points.
- Reinforce corners and edges with extra fasteners or brackets.
- Check for even wall surfaces; fill holes or bumps first.
- Allow adhesive to cure fully before applying pressure.
Proper stability extends your wall panel’s life and appearance.
Finishing Touches
Finishing touches give your 3D metal wall panel a polished look. They protect the metal and prepare it for display. Proper finishing enhances durability and style. This step ensures your panel stays beautiful for years.
Painting And Coating
Painting adds color and protects the metal from rust. Choose paint made for metal surfaces. Use spray paint for an even coat. Apply thin layers to avoid drips and bubbles.
Coating with a clear sealant boosts protection. It guards against scratches and weather damage. Options include:
- Polyurethane for a glossy finish
- Matte clear coat for a subtle look
- Rust-inhibiting sprays for outdoor panels
Let each coat dry fully before applying the next. This step improves the panel’s lifespan and appearance.
Mounting Options
Mounting the panel properly is key for safety and style. Choose a method based on your wall type and panel weight.
- Adhesive strips for lightweight panels on smooth walls
- Screws and anchors for heavy panels on drywall or wood
- French cleats for easy removal and repositioning
- Magnetic mounts for metal surfaces
Check the wall surface before mounting. Use a level to keep panels straight. Secure mounting prevents damage and ensures lasting display.
Maintenance Tips
Keeping your 3D metal wall panels looking sharp and lasting longer depends on regular care. Maintenance doesn’t have to be complicated or time-consuming. With some simple habits, you can protect your investment and enhance the panel’s appearance over time.
Cleaning Methods
Dust and dirt can dull the look of metal panels quickly. Use a soft cloth or a microfiber duster to gently remove surface debris.
For deeper cleaning, mix mild soap with warm water. Avoid harsh chemicals that might damage the finish.
- Dip a soft sponge or cloth into the soapy water.
- Wipe the panel gently, following the texture of the 3D design.
- Rinse with clean water to remove soap residue.
- Dry immediately with a soft towel to prevent water spots.
Have you noticed stubborn stains? A little white vinegar diluted with water can help, but always test a small spot first.
Preventing Rust And Damage
Rust can sneak up, especially if your panels are exposed to moisture. Applying a clear protective sealant can keep moisture at bay.
Check your panels regularly for scratches or chips. These tiny damages can become starting points for rust.
- Touch up any damaged areas with a matching metal paint or rust inhibitor.
- Keep the surrounding area dry and clean to reduce the risk of corrosion.
- Consider installing your panels in locations shielded from heavy rain or direct water flow.
Think about your environment: Is your wall near a kitchen, bathroom, or outdoor area? These spots need extra care to prevent damage.
Credit: www.interiorcompany.com
Frequently Asked Questions
What Materials Are Needed For 3d Metal Wall Panels?
You need metal sheets, cutting tools, safety gear, and mounting hardware. Common metals include aluminum and steel. Choose materials based on durability and design preference for best results.
How Do You Create The 3d Effect On Metal Panels?
Use stamping, embossing, or bending techniques to shape the metal. These methods add depth and texture, creating the desired 3D visual impact on the panel surface.
Can 3d Metal Wall Panels Be Customized?
Yes, you can customize size, shape, texture, and finish. Customization allows panels to fit specific spaces and design themes, enhancing aesthetic appeal and uniqueness.
What Tools Are Essential For Making Metal Wall Panels?
Essential tools include metal cutters, hammers, welders, and grinders. Safety equipment like gloves and goggles is crucial. Using the right tools ensures precision and safety.
Conclusion
Creating a 3D metal wall panel can add style and texture to your space. Follow the steps carefully and use the right tools. Take your time to measure and cut precisely. Painting or finishing the panel can make it look even better.
This project suits both beginners and experienced DIYers. Try different patterns to match your room’s design. Enjoy the process and the unique look it brings. Your walls will stand out with a fresh, modern feel.


