
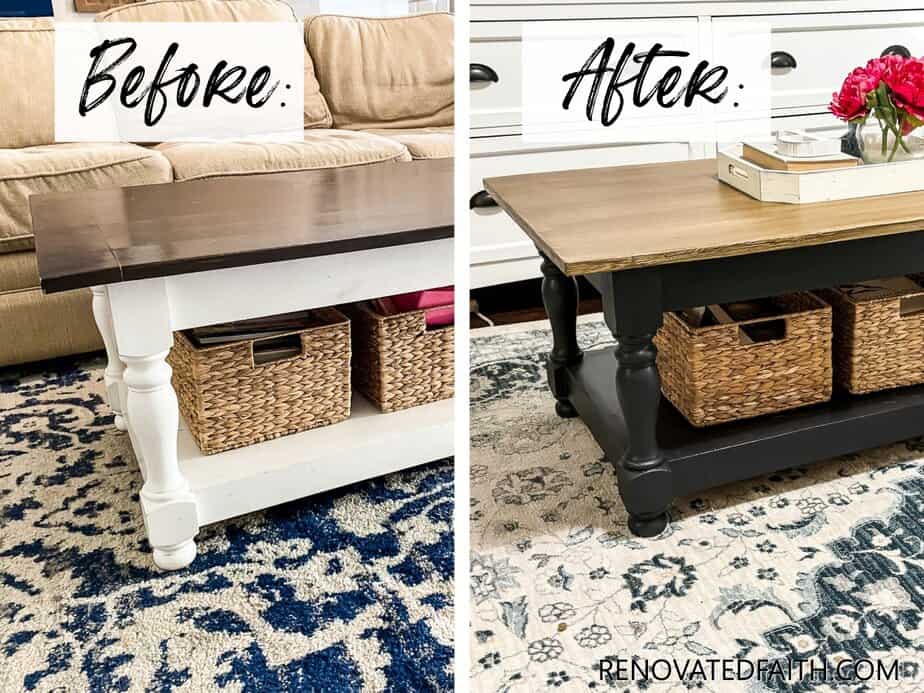
Are your coffee and end tables looking dull or outdated? You don’t have to buy new furniture to refresh your space.
With just a little paint and some simple steps, you can transform your tables into stylish focal points. Imagine turning those worn surfaces into pieces that match your personality and home decor perfectly. Ready to learn how to paint your coffee and end tables like a pro?
Keep reading, and you’ll discover easy tips that make the process quick, fun, and rewarding. Your next creative project starts here!
Choosing The Right Paint
Choosing the right paint is essential for a successful coffee or end table makeover. The paint type and finish affect durability and appearance. Color choice impacts the style and mood of your space. Understanding these factors helps you create a beautiful piece that lasts.
Types Of Paint For Furniture
Furniture requires paint that can handle wear and tear. Chalk paint is popular for its matte finish and easy distressing. Latex paint is water-based, dries fast, and cleans up easily. Oil-based paint offers a smooth, hard finish but takes longer to dry.
Consider paint designed specifically for furniture or cabinets. These options resist chipping and handle daily use well. Primer is often necessary to ensure paint sticks and lasts.
Selecting Colors That Pop
Bright colors can make your table a focal point. Bold reds, blues, or yellows add energy to any room. Soft pastels create a calm, cozy feel. Neutral tones offer versatility and match most decor.
Think about the room’s existing colors and lighting. Test paint samples on a small area before committing. Colors look different in natural light versus artificial light.
Matte Vs Glossy Finishes
Matte finishes hide imperfections and give a rustic look. They absorb light and create a soft, subtle effect. Glossy finishes reflect light and highlight details. They are easier to clean but show scratches more.
Satin finish offers a middle ground with slight shine and durability. Choose a finish based on your style and how much use the table will get.

Credit: www.confessionsofaserialdiyer.com
Preparing Your Tables
Preparing your coffee and end tables before painting is essential for a smooth finish. Proper preparation improves paint adhesion and durability. It also helps the final look stay fresh longer. The process involves cleaning, sanding, fixing any damage, and priming the surface.
Cleaning And Sanding
Start by wiping down the tables with a damp cloth. Remove dust, dirt, and grease spots. Use mild soap if necessary. Let the tables dry completely before sanding.
Sand the surface lightly with fine-grit sandpaper. This roughens the finish, helping paint stick better. Sand edges and corners carefully. Wipe away dust with a clean cloth after sanding.
Repairing Imperfections
Inspect the tables for scratches, dents, or holes. Fill small holes with wood filler using a putty knife. Smooth the filler and let it dry fully. Sand the repaired areas to blend with the table surface. This step creates an even base for painting.
Priming For Durability
Apply a coat of primer to protect the wood and improve paint adhesion. Use a brush or roller for even coverage. Choose primer based on your paint type—oil or water-based.
Let the primer dry according to the instructions. Lightly sand the primed surface for a smooth finish. Wipe away dust before painting. Priming prevents stains and extends the life of your paint job.
Painting Techniques
Painting coffee and end tables can transform your space. A fresh coat can breathe life into old furniture. Using proper painting techniques ensures a smooth, lasting finish.
Brushing Tips For Smooth Coats
Choose a high-quality brush for a clean finish. Dip the brush lightly into the paint. Remove excess paint by tapping it against the can. Apply with long, even strokes. Overlapping strokes prevent visible lines. Clean the brush regularly to avoid clumps.
Using A Roller Or Spray Paint
Rollers cover large areas quickly. Use a small roller for tables. Choose a foam roller for smooth surfaces. Spray paint offers an even finish. Hold the can 12 inches from the surface. Move in slow, steady motions. Multiple light coats prevent drips.
Layering And Drying Times
Apply thin layers to prevent runs. Allow each layer to dry completely. Check the paint can for drying times. Typically, wait two hours before the next coat. This ensures proper adhesion and durability. Sand lightly between coats for smoothness.
Adding Decorative Touches
Adding decorative touches can transform plain coffee and end tables into charming pieces. These details create personality and style. Small changes make a big impact and give furniture a unique look.
Try different techniques to match your room’s vibe. Use simple tools and materials for easy decoration. The right accents highlight your painting work and add character.
Stenciling Designs
Stenciling adds patterns without much effort. Choose a stencil with shapes or motifs you like. Secure it on the table surface to avoid slipping.
Use a sponge or brush to dab paint over the stencil. Light layers prevent paint from bleeding under edges. Remove the stencil carefully while the paint is still wet.
Repeat the design across the table or in specific spots. Stenciling works well with contrasting colors for bold effects. This method gives a neat, artistic touch to your furniture.
Distressing For A Vintage Look
Distressing makes tables look old and charming. Sand edges and corners lightly after painting. Focus on areas that get natural wear, like corners and edges.
Use fine sandpaper or steel wool for a soft worn effect. Avoid over-sanding to keep the base paint visible but intact. This technique suits rustic or farmhouse styles perfectly.
Add a wax or glaze finish to protect the distressed areas. The result is a cozy, lived-in feel that enhances painted furniture.
Using Tape For Patterns
Painter’s tape helps create clean, sharp lines and patterns. Apply tape in stripes, grids, or geometric shapes on the painted surface. Press tape edges firmly to prevent paint bleed.
Paint over the taped area with a different color. Wait for the paint to dry before removing the tape slowly. This creates crisp, modern designs that stand out.
Try mixing wide and thin tape for interesting effects. Tape patterns offer a quick way to add style without complex skills.
Sealing And Protecting
Sealing and protecting your freshly painted coffee and end tables is crucial to keep them looking great and lasting longer. Without a proper sealant, your hard work can be easily damaged by spills, scratches, and daily use. Taking the right steps to protect your furniture ensures it stays vibrant and durable over time.
Choosing The Right Sealant
Not all sealants work the same, so pick one that fits your table’s finish and how you plan to use it. For a smooth, glossy look, polyurethane offers strong protection against water and scratches. If you prefer a natural, matte finish, consider a water-based polycrylic—it dries clear and won’t yellow over time.
Think about where the table will be placed. High-traffic areas or homes with kids might need tougher sealants. Ask yourself: Do you want something easy to reapply or a longer-lasting coat that takes more time upfront?
Applying Protective Coats
Apply sealants in thin, even layers to avoid drips and bubbles. Use a high-quality synthetic brush or a foam brush for smooth coverage. Remember, two to three coats usually provide the best protection.
Let each coat dry completely before adding the next. Lightly sanding between coats with fine-grit sandpaper helps the layers stick better. If you rush the process, the finish might peel or look uneven.
Maintenance Tips For Longevity
Keep your tables clean by wiping spills immediately with a soft, damp cloth. Avoid harsh chemicals that can break down the sealant. Instead, use mild soap and water for regular cleaning.
Every year, check for signs of wear like dull spots or scratches. Touch up with a fresh sealant coat to maintain the table’s protective layer. Would you rather spend a few minutes on upkeep or redo the entire project later?

Credit: www.youtube.com
Troubleshooting Common Issues
Painting coffee and end tables can transform your space, but even careful painters run into hiccups. Troubleshooting these common issues helps you keep your project smooth and your furniture looking flawless. Understanding how to fix problems quickly saves time and prevents frustration.
Fixing Drips And Runs
Drips and runs happen when paint pools and flows unevenly on your table’s surface. If you catch them while the paint is still wet, gently smooth the area with a fine brush or a damp cloth.
If the paint has dried, lightly sand the drip with fine-grit sandpaper until smooth. Then, repaint the area carefully with thin, even coats. Have you noticed your brush strokes leaving marks? Using a high-quality brush or foam roller can reduce drips and improve finish.
Dealing With Uneven Coverage
Uneven coverage often occurs because the paint is too thick or applied inconsistently. Thin your paint slightly with water or the recommended thinner to improve flow and spread.
Apply multiple thin layers instead of one thick coat, allowing each to dry fully before the next. This builds a smooth, uniform finish. Are your edges or corners looking patchy? Using a small brush to carefully cover these spots can make a big difference.
Repairing Chips And Scratches
Chips and scratches can appear after painting, especially on frequently used tables. Start by lightly sanding the damaged area to remove rough edges and create a smooth surface.
Next, touch up with matching paint using a small brush, blending carefully into the surrounding area. For deeper scratches, applying a wood filler before painting can restore the surface completely. Have you tried sealing your table with a protective clear coat? It helps prevent future chips and keeps your paint job lasting longer.

Credit: 100things2do.ca
Frequently Asked Questions
What Type Of Paint Is Best For Coffee And End Tables?
Use acrylic or latex paint for coffee and end tables. These paints provide durability and a smooth finish. They dry quickly and resist chipping, perfect for furniture surfaces.
How Do I Prepare A Table Before Painting It?
Clean the table thoroughly, sand the surface lightly, and remove dust. Apply a primer to ensure paint adhesion and a smooth finish.
Can I Paint Over Varnished Coffee Tables?
Yes, but lightly sand the varnished surface first. Then apply a suitable primer before painting to ensure the paint sticks well.
How Many Coats Of Paint Should I Apply?
Apply at least two to three coats for even coverage. Allow each coat to dry completely before applying the next one.
Conclusion
Painting coffee and end tables can refresh any room easily. Choose your paint and tools carefully. Clean and sand the surfaces well before you start. Apply paint in thin, even coats for best results. Let each layer dry fully to avoid smudges.
Adding a protective finish helps your table last longer. Take your time and enjoy the creative process. Small changes can make a big difference in your space. Now, your tables look fresh and unique. Try this simple project to brighten your home today.


