
Have you ever put up a sticker on your wall, only to watch it peel off a few days later? It’s frustrating, especially when you want your space to look just right.
The good news is, you don’t have to keep dealing with this problem. With a few simple tricks, you can make your stickers stick firmly and stay put for a long time. Keep reading, and you’ll discover easy, effective ways to stop your stickers from peeling off your walls once and for all.
Choose The Right Surface
Choosing the right surface is key to keeping stickers from peeling off walls. Not all walls hold stickers well. Some surfaces help stickers stick better and last longer. Understanding the type and condition of your wall can save you frustration.
Smooth Vs. Textured Walls
Smooth walls offer a flat surface for stickers to stick firmly. Paint finishes like satin, semi-gloss, or gloss work best. Stickers bond well on these surfaces and stay put for a long time.
Textured walls have bumps or patterns that reduce sticker contact. Stickers often peel off or bubble on rough surfaces. Avoid applying stickers on walls with heavy texture like popcorn or stucco.
Clean And Dry Walls
Clean walls give stickers a fresh surface to hold on tightly. Dust, dirt, and grease create barriers that weaken the sticker’s grip. Wipe the wall with a damp cloth and let it dry completely before applying stickers.
Dry walls prevent moisture from loosening the sticker’s adhesive. Humid or wet walls cause stickers to peel quickly. Ensure the wall is fully dry and not exposed to water or steam.

Credit: stickerbrand.com
Prepare The Wall Properly
Proper wall preparation is crucial to keep stickers from peeling off. If the surface isn’t clean and smooth, the adhesive won’t stick well, causing your stickers to lift or curl over time. Taking a few extra minutes to prepare the wall can save you from frustration later.
Remove Dust And Grease
Dust and grease act like tiny barriers between the sticker and the wall. If you just slap your sticker onto a dusty or greasy surface, it won’t hold. Use a soft cloth or a microfiber duster to wipe down the area thoroughly.
Focus on areas where your hands might touch the wall often—around light switches or near furniture. You want the wall to feel clean and dry before applying your sticker. It’s surprising how often dust sneaks into overlooked corners.
Use Rubbing Alcohol For Cleaning
Rubbing alcohol is a simple, effective way to remove stubborn dirt and oils that water alone can’t handle. Dab some on a cotton ball or cloth and gently wipe the spot where you plan to place your sticker. This step ensures the surface is free from residue that can weaken the adhesive.
Make sure to let the wall dry completely after using rubbing alcohol. Have you ever noticed how stickers peel off in humid bathrooms? Dryness matters just as much as cleanliness. Taking this one extra step can make all the difference in sticker longevity.
Select Quality Stickers
Choosing the right stickers plays a huge role in keeping them stuck to your walls longer. Not all stickers are made equal, and picking quality ones can save you time and frustration. Let’s break down what makes a sticker stick well and last.
Material Types
The material of a sticker affects both its look and how well it stays on your wall. Vinyl stickers, for example, are waterproof and flexible, making them a strong choice for smooth walls. Paper stickers might look nice but tend to peel faster, especially in humid areas.
Think about where you plan to place your stickers. Are the walls smooth or textured? For rough surfaces, thicker materials like vinyl or polyester work better because they conform to the surface without lifting. Have you noticed how some stickers curl at the edges after a few days? That’s often due to cheap materials that can’t handle wall conditions.
Adhesive Strength
Adhesive strength is crucial. Some stickers come with weak glue that barely holds, while others use strong adhesives designed for long-term use. You want a balance—too strong might damage your paint when removed, but too weak means peeling starts almost immediately.
Look for stickers labeled with “removable” or “repositionable” adhesives if you want flexibility without losing stickiness. On the other hand, permanent adhesives are better for areas where you don’t plan to move the sticker. Have you ever peeled a sticker off and left a sticky residue or torn paint? That’s a sign the adhesive wasn’t right for your wall.
Choosing quality stickers means paying attention to both the material and the glue. Next time you shop for stickers, ask yourself: will this material suit my wall’s texture? Does the adhesive match my need for durability or easy removal? These questions make a big difference in how long your stickers stay put.
Apply Stickers Correctly
Clean the wall surface completely before applying stickers to remove dust and grease. Press firmly from the center outward to avoid air bubbles and ensure strong adhesion.
Applying stickers correctly is crucial to ensuring they remain securely affixed to your walls. An improperly applied sticker can peel off, leaving an unsightly residue or damaging your wall paint. By following a few simple steps, you can keep your stickers looking fresh and vibrant for a long time. Let’s dive into the details that can make all the difference.Peel And Position Carefully
The way you peel and position your stickers can greatly affect their longevity. Begin by peeling the sticker slowly from its backing to prevent any tearing or curling. Position it gently on the wall without pressing too hard initially. This approach allows you to adjust the placement if needed. Imagine you’re applying a temporary tattoo; you wouldn’t want it crooked, right? You can even use a pencil to lightly mark where you want the sticker beforehand, ensuring the perfect spot every time.Use A Squeegee Or Card
After positioning your sticker, using a squeegee or a credit card can help eliminate air bubbles. Start from the center of the sticker and work your way outward, smoothing the surface as you go. This technique ensures that the sticker adheres evenly to the wall. A friend of mine swore by this method, claiming it made her kid’s room transformation seamless. Have you ever noticed how professional installers work with wallpaper? They always use a tool to smooth things out. This small step can turn your sticker application from amateur to expert. By paying attention to these details, you can create a professional-looking finish that lasts. Have you tried these techniques before? What were your results?Use Additional Adhesives
Sometimes, stickers just won’t stick no matter how carefully you apply them. Adding extra adhesive can give your stickers the staying power they need. This approach is especially useful on textured or painted walls where the sticker’s own adhesive may struggle.
Double-sided Tape
Double-sided tape is a simple yet powerful solution. It provides extra grip between the sticker and the wall without making a mess.
Cut small pieces of the tape and place them on the back of the sticker. Press firmly against the wall to ensure it sticks well. You can use this method on both flat and slightly uneven surfaces.
One time, I used double-sided tape to keep a large wall decal in place during a humid summer. The tape held strong while the sticker’s original glue began to peel. Could this be the secret weapon your wall decor needs?
Spray Adhesives
Spray adhesives offer even stronger hold for stubborn stickers. They work by evenly coating the back of your sticker with a thin layer of glue.
Make sure to spray in a well-ventilated area and follow the product instructions closely. After spraying, allow the adhesive to become tacky before applying the sticker to the wall. This helps prevent bubbles and peeling.
From personal experience, spray adhesives are excellent for heavier stickers or those applied to textured walls. If your sticker keeps falling off despite your efforts, giving it a light spray might be the fix you need. Have you tried spray adhesives on your wall stickers yet?

Credit: commomy.com
Control Environmental Factors
Controlling environmental factors is key to keeping stickers stuck on walls longer. Walls exposed to moisture, heat, or sunlight can cause stickers to peel. Managing these conditions helps preserve the adhesive and the sticker’s appearance.
Avoid Humidity And Heat
High humidity weakens sticker glue. Moist air seeps under the edges, causing lifting. Heat softens the adhesive, making it less sticky. Keep stickers in dry, cool rooms for better hold.
Use a dehumidifier in damp areas. Avoid placing stickers near heaters or vents. These steps reduce moisture and temperature stress on stickers.
Keep Away From Direct Sunlight
Sunlight fades sticker colors fast. UV rays break down the adhesive over time. Avoid sticking in spots with direct sun exposure.
Choose shaded walls or use curtains to block sunlight. This protects stickers from damage and peeling caused by sun rays.
Maintain Stickers Over Time
Keeping your stickers looking fresh on the wall takes more than just sticking them up. Over time, dust, humidity, and accidental bumps can cause edges to lift or surfaces to lose their grip. Paying attention to maintenance helps your stickers stay vibrant and firmly attached for longer periods.
Regular Cleaning Tips
Dust and dirt buildup can weaken the adhesive on your stickers. Gently wipe the surface with a soft, dry cloth every week to prevent grime from settling. If you notice stubborn spots, slightly dampen the cloth with water—avoid harsh chemicals that might damage the sticker’s finish.
Have you ever ignored cleaning and ended up with a peeling sticker? It’s surprising how a simple wipe can extend its life significantly. Keeping the surrounding wall clean also helps maintain the sticker’s stickiness.
Fixing Peeling Edges
If you spot edges starting to peel, don’t wait for them to curl up completely. Press the edges back firmly against the wall using your fingers or a flat tool like a credit card. This quick action can prevent further lifting and keep the sticker looking neat.
For stubborn peeling, a small drop of clear craft glue or double-sided tape underneath the lifting part can work wonders. Be careful to use only a tiny amount to avoid mess or staining. Have you tried this quick fix before? It often surprises people how effective it is.
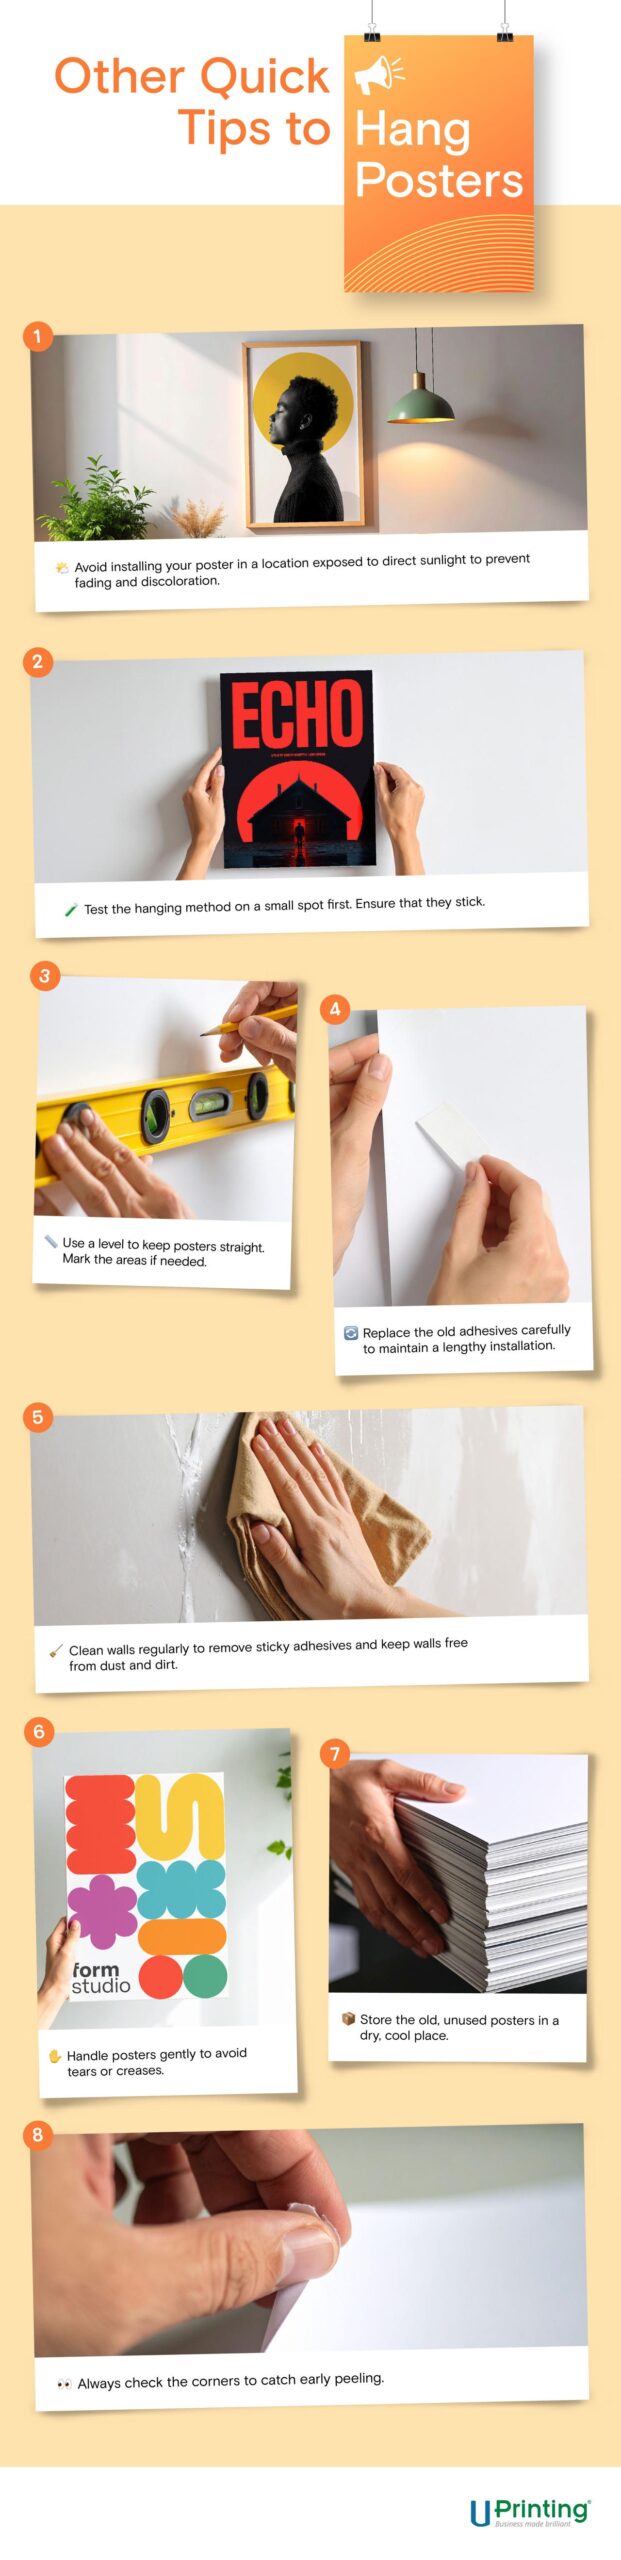
Credit: www.uprinting.com
Frequently Asked Questions
How Can I Prepare My Wall Before Applying Stickers?
Clean the wall with mild soap and water to remove dust and grease. Ensure the surface is dry and smooth for better sticker adhesion.
What Materials Help Stickers Stick Longer On Walls?
Use stickers made from vinyl or with strong adhesive backing. These materials resist peeling and last longer on various wall surfaces.
How Does Room Humidity Affect Sticker Adhesion?
High humidity weakens the adhesive, causing stickers to peel. Keep rooms well-ventilated and avoid placing stickers in damp areas.
Can I Use A Sealant To Prevent Stickers From Peeling?
Yes, applying a clear acrylic sealant over stickers protects them from moisture and peeling. Make sure the sealant is compatible with your sticker type.
Conclusion
Keeping stickers stuck on your wall takes some care. Clean the surface well before applying stickers. Avoid placing stickers on damp or rough walls. Press stickers firmly to remove air bubbles. Use clear tape or a sealant to protect edges.
Check stickers regularly and fix any lifting parts. Small steps help stickers last longer and look better. Try these tips to enjoy your wall decorations without worry. Stickers can brighten any space when handled right.


