
Are you ready to transform your space quickly and easily? Applying vinyl stickers to your wall can give any room a fresh, personalized look without the mess or cost of paint.
But if you’ve never done it before, it might seem tricky or intimidating. Don’t worry—you’re about to learn simple, step-by-step tips that will make the process smooth and stress-free. By the end of this guide, you’ll have the confidence to decorate your walls like a pro and enjoy a stunning new design that reflects your style.
Keep reading to discover how easy it can be!
Choose The Right Vinyl Sticker
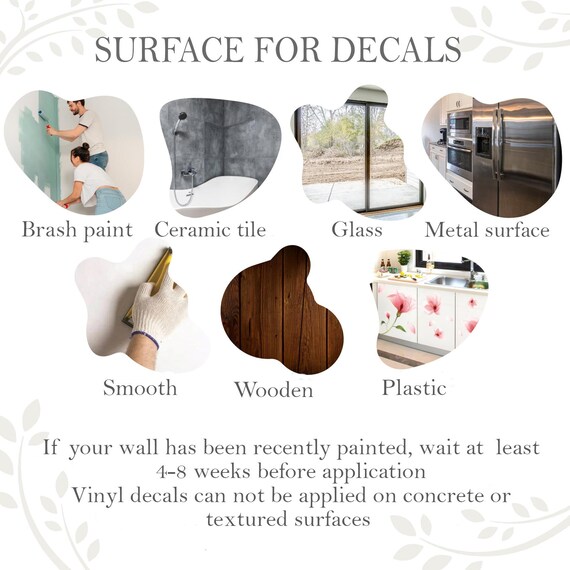
Choosing the right vinyl sticker is key to a smooth and lasting wall application. The right sticker suits your wall type and fits your style. It affects how well the sticker sticks and looks over time. Take time to pick a vinyl sticker that matches your needs and space.
Types Of Vinyl Stickers
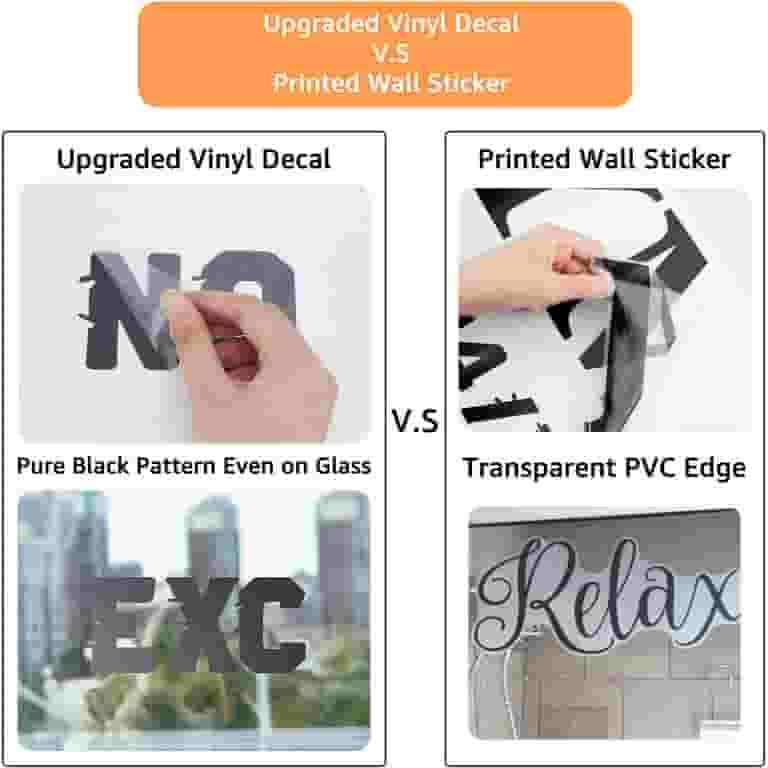
Vinyl stickers come in various types, each with unique features. Permanent vinyl offers strong adhesion and lasts long. Removable vinyl peels off easily without damaging walls. Outdoor vinyl resists weather and sunlight, perfect for exterior walls. Indoor vinyl is designed for smooth, clean surfaces inside your home. Understanding these types helps you choose the best one for your wall.
Selecting The Perfect Design
The design of your vinyl sticker sets the tone of your room. Simple shapes and bold colors stand out well on walls. Choose designs that match your room’s theme and color palette. Large stickers cover more space and make a statement. Small stickers work well for subtle decoration or accents. Think about the wall size and placement before picking your design.
Credit: kraftmatics.com
Prepare Your Wall Surface
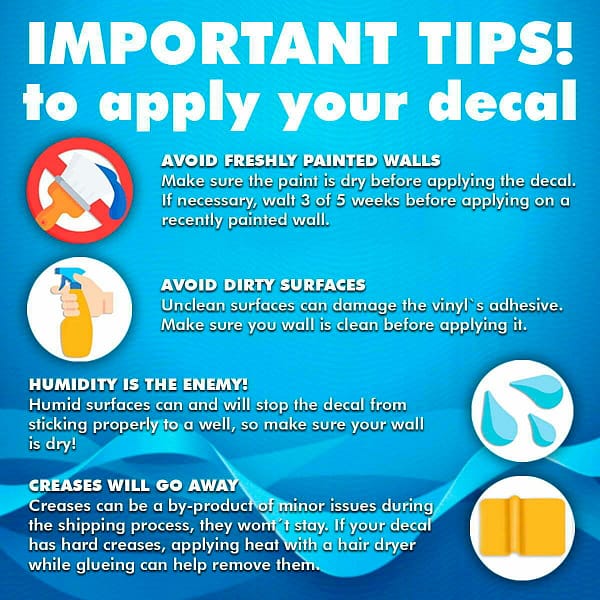
Preparing the wall surface is key for vinyl stickers to stick well and last long. A clean, smooth wall helps the sticker stay put without bubbles or peeling. Take time to ready the surface before applying your vinyl sticker.
Cleaning And Drying
Start by removing dust, dirt, and grease from the wall. Use a mild soap mixed with water and a soft cloth or sponge. Wipe the area gently to avoid damaging the paint.
Rinse the wall with clean water to remove soap residue. Dry the surface completely with a clean towel or let it air dry. Moisture can stop the sticker from sticking properly.
Smoothing Imperfections
Check the wall for bumps, holes, or cracks. These imperfections can cause the sticker to wrinkle or peel off.
Use fine sandpaper to smooth rough spots lightly. Fill holes or cracks with spackle or wall filler. Let the filler dry fully, then sand it smooth.
A flat, even surface ensures your vinyl sticker looks neat and lasts longer.
Gather Necessary Tools
Gather a squeegee, cleaning cloth, measuring tape, and a level before starting. These tools help ensure smooth, accurate sticker placement on the wall. Prepare everything nearby to work efficiently and avoid interruptions.
Gathering the right tools is crucial for a smooth vinyl sticker application. Proper tools ensure the stickers stick well and look professional. Let’s dive into what you need for this task.Essential Application Tools
Start with a clean, lint-free cloth. This helps remove dust from the wall. A level ensures your sticker aligns perfectly. Use a pencil for marking positions lightly. A squeegee or a credit card helps press the sticker onto the wall. Scissors or a utility knife trims excess vinyl. Masking tape temporarily holds the sticker in place. These tools are must-haves for a neat application.Optional Accessories
Consider a hairdryer for stubborn stickers. Heat can help smooth out bubbles. A measuring tape provides precision for larger designs. Use a spirit level for extra accuracy. A spray bottle with water and a drop of dish soap helps adjust the sticker. These accessories make the task easier but aren’t mandatory.Position The Sticker
Positioning your vinyl sticker on the wall is a crucial step that can make or break the final look. Getting it right ensures your design appears neat and professional. Taking your time here saves you from peeling off and reapplying, which can damage both the wall and the sticker.
Measuring And Marking
Start by measuring the wall space where you want to place the sticker. Use a tape measure or ruler to find the exact center or the perfect spot that fits your design’s flow.
Mark the spot lightly with a pencil or painter’s tape. These marks act as a guide so you don’t have to guess while sticking.
Remember, small adjustments now prevent crooked or uneven placement later. Have you ever placed a sticker only to realize it’s slightly off? That small mark could have saved you the hassle.
Temporary Placement Techniques
Before sticking the vinyl permanently, try temporary methods to check the position. One way is to use painter’s tape to hold the sticker in place.
This lets you step back and see how the sticker looks from different angles and distances. You can even snap a photo to compare or show others for a second opinion.
Another tip is to use a low-tack adhesive spray on the back of the sticker for a repositionable hold. It gives you a chance to move the sticker without losing its stickiness.
How often do you rush and regret where you put your wall art? Trying these temporary placement tricks gives you confidence before committing.
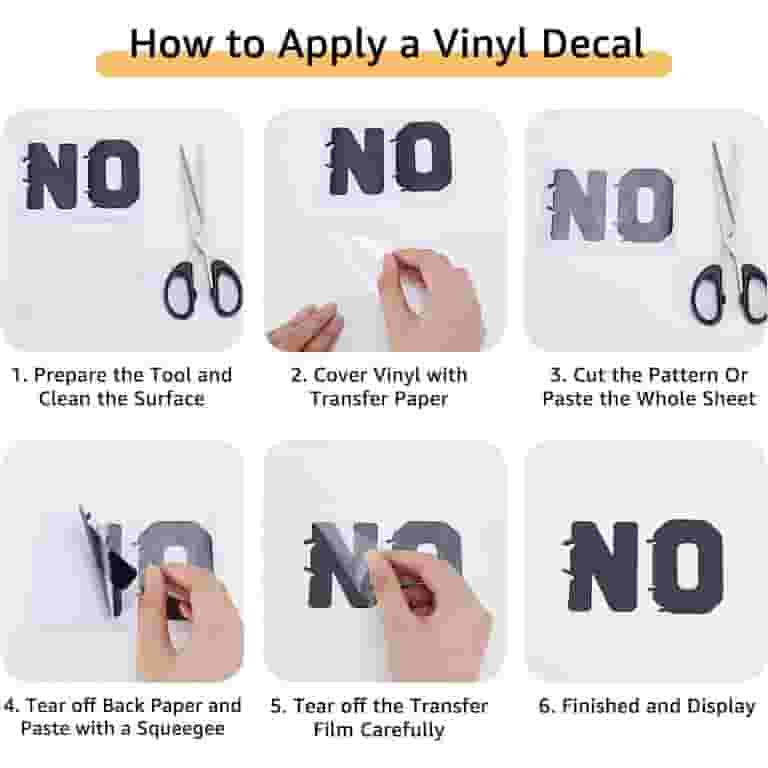
Apply The Sticker
Applying a vinyl sticker to a wall requires patience and care. The process begins by carefully peeling the backing. Then, use a squeegee to press the sticker firmly. This ensures no air bubbles remain and the sticker stays put.
Peeling The Backing
Start by lifting one corner of the sticker gently. Slowly pull the backing away from the vinyl. Keep the sticker flat and avoid stretching it. If the sticker folds or creases, stop and smooth it out. Work slowly to prevent tearing or damaging the vinyl.
Using A Squeegee For Smooth Application
Hold the sticker in place on the wall. Take a squeegee or a flat tool with a smooth edge. Press from the center outward to push out air bubbles. Use firm, even strokes for a clean finish. Check for any bubbles and smooth them carefully. This step helps the sticker stick well and look great.
Credit: www.walmart.com
Remove Air Bubbles
Air bubbles can spoil the smooth look of vinyl stickers on walls. Removing them is key to a clean, professional finish. Small bubbles trap air between the sticker and wall, making the design look uneven. Take time to smooth out these bubbles for a flawless appearance.
Techniques For Bubble Removal
Start by using a soft, flat tool like a credit card. Gently press the sticker from the center outward. This pushes trapped air toward the edges. For stubborn bubbles, use a pin to make a tiny hole. Then, press the air out carefully. Avoid tearing the vinyl by working slowly and gently.
Fixing Wrinkles And Creases
Wrinkles form when the sticker folds on itself. To fix this, lift the sticker gently from the edge. Smooth it down slowly while pressing out folds. Use a warm cloth to soften the vinyl for easier stretching. Work carefully to prevent new creases. Patience helps keep the sticker flat and smooth.
Final Touches
After carefully applying your vinyl sticker to the wall, the final touches can make all the difference between a good job and a flawless finish. These small steps ensure your sticker stays put and looks professionally done. Paying attention here saves you from peeling edges or a crooked look later on.
Trimming Excess Vinyl
Sometimes, vinyl stickers come with extra edges or backing that need removal. Use a sharp craft knife or scissors to carefully trim any excess around the design. Be cautious not to cut into the sticker itself; precision is key.
Hold the knife at a slight angle and make slow, deliberate cuts. If you rush, you risk damaging the sticker or wall paint. Don’t forget to clear away the trimmed pieces to keep your workspace clean and avoid accidental sticking.
Allowing Proper Adhesion Time
Once your sticker is perfectly positioned and trimmed, give it time to bond with the wall. Vinyl takes a few hours to set fully, but waiting at least 24 hours is best for long-lasting adhesion.
Avoid touching or repositioning the sticker during this period. The more patient you are, the stronger the bond will be. Have you ever noticed stickers peeling off after a day? This step often gets overlooked but is crucial for durability.
Care And Maintenance
Proper care and maintenance help vinyl stickers stay vibrant and last longer on your walls. Small efforts prevent peeling, fading, and damage. Keep your stickers looking fresh and new with simple cleaning and careful handling.
Cleaning Vinyl Stickers
Use a soft, damp cloth to wipe the surface gently. Avoid harsh chemicals or abrasive cleaners that can damage the vinyl. Mild soap and water work best for removing dirt or dust. Dry the sticker with a soft towel after cleaning. Regular cleaning keeps the colors bright and the surface smooth.
Avoiding Damage
Keep sharp objects away from the sticker’s surface. Avoid scrubbing or rubbing too hard, which can peel or scratch the vinyl. Do not expose stickers to extreme heat or direct sunlight for long periods. Keep walls dry to prevent adhesive failure. Handle the area around the sticker carefully to maintain its adhesive strength and appearance.
Credit: www.etsy.com
Frequently Asked Questions
How Do I Prepare My Wall For Vinyl Sticker Application?
Clean the wall thoroughly with soap and water to remove dust and grease. Ensure the surface is dry and smooth before applying the sticker for better adhesion.
Can Vinyl Stickers Damage My Wall Paint?
Vinyl stickers usually don’t damage paint if removed carefully. Peel slowly and use heat like a hairdryer to soften the adhesive before removal.
What Is The Best Method To Apply Vinyl Stickers Smoothly?
Use a squeegee or a credit card to press the sticker from center outwards. This prevents air bubbles and ensures smooth, even application.
How Long Does Vinyl Sticker Adhesive Last On Walls?
Adhesion typically lasts from several months to years, depending on the wall texture and environment. Proper application and surface prep extend its lifespan.
Conclusion
Applying vinyl stickers to your wall can be simple and fun. Clean the surface well for better stickiness. Peel the backing slowly to avoid wrinkles. Press the sticker firmly from the center outward. Use a flat tool to smooth out air bubbles.
Take your time and work carefully. This helps your sticker last longer and look great. Enjoy your new wall design with pride!


