
Have you ever wanted to create your own canvas but didn’t know where to start? Making your own canvas is easier than you think, and it gives you full control over the size, texture, and quality.
Imagine having a custom canvas ready for your next masterpiece, crafted by your own hands. In this guide, you’ll discover simple steps and insider tips to help you make a canvas that suits your style perfectly. Keep reading, and you’ll soon be ready to bring your creative ideas to life on a canvas made just for you.

Credit: marquindesigns.com
Materials Needed
Creating your own canvas is a rewarding project. The right materials ensure a successful outcome. Let’s explore the essentials you’ll need for this creative journey.
Choosing The Right Fabric
Canvas starts with the right fabric. Cotton and linen are top choices. Cotton is affordable and easy to stretch. Linen is durable and provides a smoother finish. Consider the texture and weight of the fabric. Heavier fabric offers more strength. Lighter fabric is easier to handle. Choose fabric that suits your project size.
Selecting Frame Supplies
A sturdy frame supports your canvas. Wooden stretcher bars are common. Choose bars that match your canvas size. Consider the wood quality. Pine is lightweight and cost-effective. For durability, use hardwood like oak. Ensure your bars have mitered corners for easy assembly. Use corner braces for additional support. These help maintain the frame’s shape.
Essential Tools
Having the right tools makes the process smoother. You’ll need a staple gun for securing the fabric. A pair of sharp scissors helps trim excess material. A measuring tape ensures accuracy in sizing. A rubber mallet assists in adjusting frame joints. Don’t forget a staple remover for easy corrections. These tools make canvas creation efficient and enjoyable.

Credit: canvaslot.com
Preparing The Frame
Preparing the frame is the first important step in making your own canvas. The frame holds the fabric tight and keeps the surface smooth for painting. A strong frame ensures your artwork lasts long and looks professional. This stage involves cutting and joining wood pieces, securing their corners firmly, and smoothing the surface for a clean finish.
Cutting And Assembling Wood
Start by selecting lightweight, sturdy wood like pine or fir. Measure the size you want for your canvas. Cut four pieces of wood: two for the length and two for the width. Use a saw to make straight cuts for clean edges.
Join the wood pieces by arranging them in a rectangle. The length pieces should be outside the width pieces to create a strong frame. Make sure all corners form right angles before securing them.
Securing Corners
Use wood glue on the ends of each piece to hold them together tightly. Clamp the corners and wait until the glue dries. For extra strength, add nails or screws at each corner. This prevents the frame from coming apart over time.
Check the frame again to ensure it is square and firm. Loose corners can cause the canvas to sag or warp.
Sanding And Finishing
Sand all surfaces of the frame using fine-grit sandpaper. This removes splinters and smooths rough edges. Focus on corners and edges where the fabric will stretch.
Wipe the frame with a clean cloth to remove dust. For a polished look, apply a light coat of wood finish or sealant. This protects the wood from moisture and dirt.
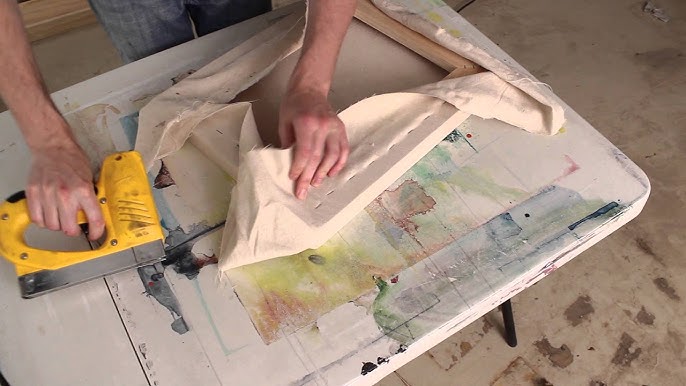
Stretching The Canvas
Stretching the canvas is a key step in making your own canvas. It ensures the fabric stays tight and smooth. A well-stretched canvas improves paint application and overall durability. Follow clear steps to stretch your canvas properly.
Attaching Fabric To Frame
Start by placing the fabric over the wooden frame. Leave enough fabric to wrap around the edges. Secure the fabric at the center of one side using a staple or tack. This anchors the fabric and keeps it in place.
Pulling Fabric Tight
Pull the fabric tightly toward the opposite side of the frame. Keep it smooth to avoid wrinkles or sagging. Use your hands or pliers for a stronger pull. Work from the center outwards to maintain even tension.
Stapling Techniques
Staple the fabric along the edges, spacing staples about two inches apart. Start at the center, then move to corners. Fold corners neatly to prevent bulk. Check tension and adjust as needed before finishing.

Credit: canvaslot.com
Priming Your Canvas
Priming your canvas is a crucial step that prepares the surface for painting. It ensures your artwork lasts longer and the paint adheres properly. Skipping this step can lead to uneven textures and colors that don’t pop as you expect.
Choosing The Right Primer
Not all primers are created equal. Acrylic gesso is the most common choice because it works well with different paints and dries quickly. If you want a smoother finish, consider a clear or white acrylic primer, depending on your painting style.
Ask yourself: do you prefer a rough texture to grip the paint or a smooth surface? Your answer will guide your primer choice. Also, think about the type of paint you’ll use—oil paints need a different primer than acrylics.
Applying Gesso
Applying gesso is easier than you might think. Use a wide, flat brush or a roller to spread an even coat across your canvas. Don’t worry if the first layer looks patchy; multiple thin layers work better than one thick one.
Let your brush strokes guide you, but avoid going over the same area repeatedly while the gesso is wet. This prevents unwanted texture and bubbles. You can add two to three coats for optimal coverage, allowing each to dry fully before the next.
Drying And Sanding
Give your primed canvas enough time to dry completely—usually a few hours. Rushing this step can cause peeling or cracking later. Once dry, lightly sand the surface with fine-grit sandpaper to smooth out any rough spots.
Sanding makes a big difference in how your paint glides on. Don’t skip it even if your first coat looks good. If you want a silky surface, repeat the process of priming and sanding one more time.
Customizing Your Canvas
Customizing your canvas gives it a unique look and feel. It lets you express creativity beyond plain surfaces. Small changes can make a big difference in the final artwork.
Customizing also allows the canvas to fit your specific project needs. You can tailor size, shape, and texture to match your style. This section explores simple ways to personalize your canvas effectively.
Adding Texture
Texture adds depth and interest to your canvas. Use materials like gesso, modeling paste, or fabric to create raised surfaces. Apply these before painting for a tactile effect. Experiment with patterns or thick strokes for varied results.
Textures can make colors pop and catch light differently. Try layering textures to build a complex background. Let each layer dry fully to avoid mixing.
Cutting Shapes And Sizes
Canvas does not have to be a rectangle. Cut it into different shapes to fit your design. Use sharp scissors or a craft knife for clean edges. Measure carefully before cutting to avoid mistakes.
Small canvases suit detailed work, while large ones offer bold statements. Consider oval, circular, or irregular shapes for creative flair. Stretch the canvas tightly over a frame after cutting.
Creating Multi-panel Boards
Multi-panel boards break one image into parts. This style adds drama and modern appeal. Cut or prepare several canvases of equal size. Arrange them side by side with small gaps in between.
Each panel can hold a section of the artwork or a connected design. Secure panels firmly on a wall for stability. This method works well for large spaces or galleries.
Tips For Durable Artboards
Creating your own canvas is rewarding, but ensuring it lasts is just as important. Durable artboards hold up better over time and provide a stable surface for your creativity. Here are some practical tips to help you protect and maintain your canvas for years of use.
Protecting The Surface
Start by applying a quality primer like gesso to your canvas. It seals the fibers and prevents paint from soaking in unevenly. You don’t want your hard work to fade or crack because the surface wasn’t properly prepared.
Consider adding a protective varnish after your artwork dries. This layer guards against dust, moisture, and UV light. Have you tried using matte versus gloss varnish? Each offers different finishes and protection levels, so choose one that fits your style.
Storage And Maintenance
Store your canvases in a dry, cool place away from direct sunlight. Excess humidity can warp your frame or cause mold, while too much heat can dry out and crack the paint. Do you rotate your stored canvases occasionally to avoid pressure marks? It’s a simple habit that extends their lifespan.
Use dust covers or acid-free paper to wrap your canvases when not in use. This keeps dust and dirt off the surface without trapping moisture. Regularly check your storage space for pests that might damage your art.
Repairing Damage
Small tears or dents don’t mean your canvas is ruined. Patch holes with canvas repair tape from the back and reapply gesso on the front. This restores the surface for repainting without the need for a new canvas.
If paint cracks appear, gently clean the area and use a flexible acrylic medium to fill in gaps. Have you ever saved a damaged canvas by touching up the paint instead of starting over? It’s a satisfying way to keep your original work intact.
Frequently Asked Questions
How Do I Choose The Right Fabric For Canvas?
Choose tightly woven cotton or linen fabric for durability and smooth texture. These materials hold paint well and last long. Avoid thin or stretchy fabrics as they may warp or tear during use.
What Tools Are Needed To Make A Canvas?
You need wooden stretcher bars, fabric, staple gun, scissors, and a measuring tape. These basic tools help create a sturdy, well-stretched canvas frame efficiently.
How Do I Stretch Fabric Tightly On The Frame?
Start stapling one side, then opposite side, pulling fabric tight. Continue stapling adjacent sides, ensuring even tension to avoid wrinkles or sagging.
Can I Prime My Homemade Canvas For Painting?
Yes, apply gesso primer in thin, even coats to seal and prepare the fabric. Let each coat dry before applying the next for best paint adhesion.
Conclusion
Making your own canvas is a fun and simple project. It saves money and lets you customize size and texture. You only need a few materials to start. The process helps you understand art tools better. Try different fabrics and frames to find what works best.
Enjoy creating your unique canvas for painting or decoration. Keep practicing to improve your skills. Start today and see how rewarding this craft can be.


