
If you want your vinyl stickers to stick perfectly and last longer, cleaning your walls the right way is key. Dust, dirt, and oils can stop your stickers from adhering properly, causing them to peel or bubble.
But don’t worry—cleaning your walls doesn’t have to be hard or time-consuming. You’ll learn simple and effective steps to prepare your walls so your vinyl stickers look flawless and stay put. Keep reading, and you’ll discover easy tips that make a big difference!
Credit: www.tenstickers.co.uk
Prepare The Surface
Preparing the wall surface is crucial before applying vinyl stickers. A clean, smooth surface helps the sticker stick well and last longer. Dirt, dust, and grease can prevent proper adhesion. Follow these steps to get the wall ready.
Remove Dust And Dirt
Start by wiping the wall with a dry cloth or a soft brush. This removes loose dust and dirt particles. For stubborn dirt, use a damp cloth and gently clean the area. Avoid scrubbing hard to prevent damage to the wall.
Eliminate Grease And Oil
Grease and oil stop stickers from sticking properly. Use a mild detergent mixed with warm water to clean these spots. Apply the solution with a sponge and wipe gently. Rinse the area with clean water to remove soap residue.
Dry The Wall Completely
Moisture can weaken the sticker’s hold. Use a dry towel to pat the wall dry. Let the wall air dry for at least 30 minutes before applying the sticker. Ensure no dampness remains on the surface for best results.
Choose The Right Cleaning Supplies
Choosing the right cleaning supplies is essential to protect your vinyl stickers and keep your walls looking fresh. The wrong products can damage the adhesive or fade the colors. Paying attention to what you use will save you time and preserve your sticker’s appearance.
Mild Detergents And Soaps
Opt for mild detergents or gentle soaps that won’t strip away the vinyl’s surface or weaken the adhesive. Dish soap diluted in water works well for most wall types and stickers. You want a cleaner that removes dirt without being too aggressive.
Think about the last time you cleaned a stickered surface with a harsh cleaner—did the sticker peel or discolor? Mild soaps help avoid that problem while still doing a good job.
Avoid Harsh Chemicals
Steer clear of bleach, ammonia, or any abrasive cleaners. These chemicals can cause the vinyl to crack or lift off the wall. Even if the wall material seems tough, your stickers are more delicate.
Have you noticed any sticky residue or fading after using a strong cleaner? That’s a clear sign to switch to gentler options. Your sticker’s lifespan depends on avoiding these harsh substances.
Use Soft Cloths Or Sponges
Use soft microfiber cloths or non-abrasive sponges for cleaning. Rough scrubbers or brushes can scratch the vinyl and ruin its finish. A gentle touch is all it takes to keep your stickers intact.
Next time you clean, try wiping in small circles with a soft cloth. You’ll find it easier to control pressure and prevent damage. Have you ever cleaned a sticker with a rough sponge? Notice the difference a soft cloth makes.
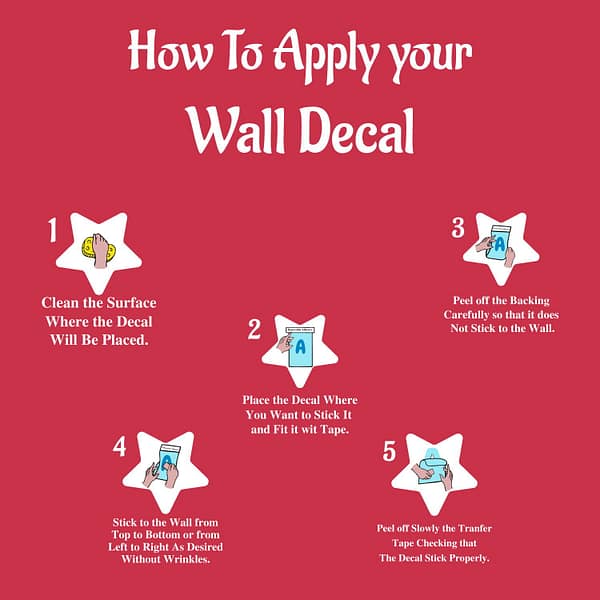
Step-by-step Cleaning Process
Begin by gently dusting the wall to remove loose dirt. Use a mild soap and water mix to clean the surface without damaging paint. Let the wall dry completely before applying vinyl stickers.
Cleaning your walls properly is a crucial step before applying vinyl stickers. A clean surface ensures the stickers adhere well and maintain their charm for a long time. Let’s dive into a step-by-step cleaning process to prepare your walls for those vibrant vinyl additions.Wipe Down The Wall
Start with a soft, dry cloth or a microfiber duster. Gently wipe the wall to remove any loose dust or cobwebs. You’d be surprised how much dust can accumulate, even if your wall looks clean. Pay special attention to the corners and edges where dust tends to hide. Make sure to cover all areas to create an even surface for your stickers.Rinse With Clean Water
Fill a bucket with warm water and add a few drops of mild dish soap. Dip a clean sponge into the soapy water and wring it out well. Wipe down the wall gently, ensuring you cover every inch. Once you’ve soaped the wall, rinse the sponge and fill your bucket with clean water. Use the sponge to wipe away any soap residue. Clean walls not only improve sticker adhesion but also prevent any potential peeling.Dry Thoroughly
Use a clean, dry towel or cloth to pat the wall dry. Any remaining moisture can interfere with the sticker’s adhesive, so ensure the wall is completely dry. If you’re short on time, a fan or hairdryer can speed up the drying process. Have you ever noticed how a clean wall can make a room feel brand new? This fresh canvas is now ready for your creative touch with vinyl stickers. Enjoy the satisfaction of knowing your efforts will result in a lasting display.
Credit: www.amazon.ca
Check For Wall Texture And Paint Type
Before you clean your walls for vinyl stickers, it’s important to understand the texture and type of paint on your walls. These factors affect how well the stickers will stick and how you should clean the surface without damaging it. Taking a moment to check these details can save you from frustrating peeling or bubbling later on.
Smooth Vs Textured Walls
Smooth walls offer a clean, flat surface that vinyl stickers can easily adhere to. They’re usually easier to clean because dirt and dust don’t get trapped in crevices. When cleaning, a gentle wipe with a damp cloth and mild soap often does the trick.
Textured walls, on the other hand, have bumps or patterns that make cleaning trickier. Dust and grease can settle into the grooves, so you might need to use a soft brush to reach those spots. Be careful not to scrub too hard, or you risk damaging the texture or paint.
Ask yourself: Is your wall smooth enough for a simple wipe, or does it need extra care? The answer will guide your cleaning method and help your vinyl sticker stay put longer.
Matte Vs Glossy Paints
Matte paint has a flat finish that can be more porous and absorbent. This means dirt can stick firmly, and cleaning requires a gentler touch to avoid removing paint. Use a mild cleaner and test a small area first to ensure the paint won’t come off.
Glossy paints create a shiny, slick surface that resists stains better and is easier to wipe clean. You can usually use a damp cloth or gentle cleaner without much risk. However, avoid abrasive tools that could scratch the shiny surface.
Consider your paint’s finish carefully. How aggressive should your cleaning be? Your answer will protect the wall and ensure your vinyl sticker adheres smoothly without damage.
Tips For Ensuring Sticker Adhesion
Ensuring vinyl stickers stick well to your walls starts with proper preparation. Clean walls help the adhesive bond firmly. Stickers last longer and look better when applied correctly. Use these tips to improve sticker adhesion and avoid peeling or bubbling.
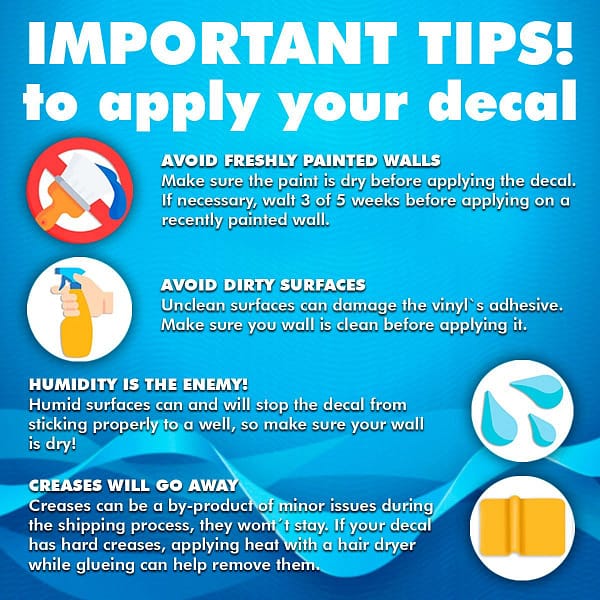
Avoid Moisture And Humidity
Moisture weakens sticker glue and causes edges to lift. Make sure the wall is completely dry before applying stickers. Avoid placing stickers in bathrooms or kitchens with high humidity. Use a dehumidifier or fan to reduce moisture in the room. Wait until any freshly cleaned surfaces dry fully.
Allow Proper Curing Time
After cleaning, let the wall cure before sticking. Curing means the wall surface dries and settles. This can take a few hours to a day depending on the cleaning method. Avoid rushing the process to ensure the adhesive bonds well. Stickers applied too soon may peel off easily.
Test A Small Area First
Always test stickers on a small wall area first. This helps check how well the sticker sticks and removes later. Some paints or wall textures may not hold vinyl well. Testing prevents damage and saves time on large surfaces. If the test works, continue with the full application confidently.
Credit: kraftmatics.com
Common Mistakes To Avoid
Cleaning walls before applying vinyl stickers is key for strong adhesion. Many people make simple mistakes that cause stickers to peel or bubble. Avoid these common errors to get the best results.
Applying On Dirty Walls
Putting stickers on dusty or greasy walls is a big error. Dirt blocks the sticker’s glue from sticking well. Always clean the wall with mild soap and water. Rinse and wipe off any residue to ensure a smooth surface.
Using Abrasive Cleaners
Avoid harsh or abrasive cleaners on walls. They can roughen or damage the surface. Scratches and uneven textures cause poor sticker adhesion. Use gentle cleaners like dish soap or a vinegar solution instead.
Skipping Drying Time
Never place stickers on wet or damp walls. Moisture traps air bubbles under the sticker. It also weakens the glue, causing early peeling. Wait until the wall is completely dry before applying your vinyl sticker.
Frequently Asked Questions
How Do I Prepare Walls For Vinyl Stickers?
Clean walls with mild soap and water. Remove dust, grease, and dirt completely. Dry the surface before applying stickers.
What Cleaning Solutions Are Safe For Vinyl Sticker Walls?
Use gentle, non-abrasive cleaners like diluted dish soap. Avoid harsh chemicals or solvents that can damage paint or stickers.
Can I Use Rubbing Alcohol To Clean Walls?
Yes, rubbing alcohol removes grease and residue effectively. Test a small area first to avoid paint damage.
How Often Should I Clean Walls Before Applying Stickers?
Clean walls once before application to ensure proper adhesion. Avoid frequent cleaning to prevent surface wear.
Conclusion
Cleaning walls before applying vinyl stickers keeps them neat and long-lasting. Use mild soap and water for best results. Avoid harsh chemicals that can damage paint or sticker. Dry the wall completely to help stickers stick well. Regular cleaning prevents dust and dirt buildup under stickers.
These simple steps make your vinyl stickers look fresh and stay put longer. Clean walls create a smooth surface for easy sticker removal later. Take a little time to clean walls carefully. It really makes a difference in how stickers look and last.


