
Is your floor lamp flickering, not turning on, or showing signs of old wiring? Instead of buying a new one, you can save money and bring your lamp back to life by rewiring it yourself.
Rewiring a floor lamp might sound tricky, but with the right steps, you can do it safely and confidently. In this guide, you’ll discover exactly how to give your lamp a fresh start, avoid common mistakes, and enjoy bright, reliable light once again.
Ready to take control and fix your lamp like a pro? Let’s get started!
Tools And Materials Needed
Before you start rewiring your floor lamp, gathering the right tools and materials is key. Having everything on hand saves time and reduces frustration. It also keeps you safe and ensures the job is done correctly.
Essential Tools
You’ll need a few basic tools that make the process straightforward. Start with a screwdriverto open lamp parts and remove old wiring. A wire stripperis necessary to remove insulation without damaging the wire inside.
Next, get a needle-nose plierfor bending and twisting wires into place. A voltage testerhelps confirm the lamp is unplugged and safe to work on. Don’t forget a utility knifefor precise cuts and a electrical tapeto secure connections.
Choosing The Right Replacement Parts
Picking the correct replacement parts is just as important as having the right tools. Check the lamp’s wattage rating to choose a compatible socketand cord. Using parts with the wrong rating can cause overheating or failure.
Also, consider the lamp’s design. A vintage lamp might need cloth-covered wire for authenticity, while a modern one often uses plastic insulation. Look for UL-listed components to ensure safety and quality.
Have you thought about whether you want a simple on/off switch or a dimmer? Your choice affects which replacement parts you’ll need. Being clear on this upfront makes the rewiring smoother and your lamp more functional.

Credit: www.amazon.ca
Safety Precautions
Safety is the top priority when rewiring a floor lamp. Working with electricity can be dangerous without proper care. Simple safety steps reduce the risk of shocks or fire. Always prepare your workspace before starting any electrical task.
Power Off And Unplug
Always switch off the lamp and unplug it from the wall socket. This stops any electric current from flowing. Double-check by plugging another device into the same outlet to confirm power is off. Never work on a lamp that is still connected to power.
Work In A Well-lit Area
Choose a bright space to see all parts clearly. Good lighting helps avoid mistakes like wrong wire connections. Use a desk lamp or natural daylight. Avoid shadows or dim rooms that make details hard to see. Clear your workspace from clutter for better focus and safety.
Removing The Old Wiring
Removing the old wiring is a key step in rewiring a floor lamp. It ensures safety and prepares the lamp for new wiring. Taking the lamp apart carefully helps avoid damage. Disconnecting the old wires must be done with attention to detail. This process sets the stage for a smooth rewiring experience.
Disassembling The Lamp
Start by unplugging the lamp from the power outlet. Remove the lampshade and bulb to access the socket. Unscrew the socket cover using a screwdriver. Carefully take apart the lamp base if needed. Keep all screws and parts in a safe place. Handle the lamp gently to avoid breaking any parts.
Disconnecting The Old Wires
Locate where the wires connect to the socket and plug. Note how the wires are attached for reference. Use a screwdriver to loosen screws holding the wires. Gently pull the wires free from the socket and plug. Inspect the wires for any damage or wear. Dispose of the old wiring properly once removed.

Credit: www.amazon.ca
Preparing New Wires
Cut new wires to the correct length for your floor lamp. Strip the ends carefully to expose the metal for connections. Ensure wires are clean and free of damage before attaching.
Preparing New Wires When you’re rewiring a floor lamp, one of the most crucial steps is preparing new wires. This step ensures that your lamp functions safely and efficiently. You’ll need to measure, cut, and strip the wires correctly. Let’s dive into the details of these tasks.Measuring And Cutting
Before you start, ensure you have the correct wire length. Measure the distance from the lamp base to the socket, adding a few extra inches for flexibility. Use a measuring tape for accuracy. Once measured, cut the wire with a wire cutter. A clean cut is essential for a secure fit. Be cautious not to cut it too short. It’s always better to have a little extra wire than to come up short.Stripping Wire Ends
Stripping wire ends is a delicate task but crucial for a solid electrical connection. Use a wire stripper to gently remove about half an inch of the insulation from each wire end. This exposes the copper wire needed for connection. Ensure you don’t nick the wire strands, as this can weaken the connection. Have you ever considered how a simple task like stripping wires can impact lamp performance? A clean strip ensures smooth energy flow, reducing potential hazards. By preparing your wires with care, you’re setting up your floor lamp for reliable and safe operation. Ready to take on the challenge? Let’s get your lamp shining bright again!Connecting The New Wiring
Connecting the new wiring in your floor lamp is where your careful preparation really pays off. This stage requires attention to detail and a steady hand to ensure everything is safe and works perfectly. Let’s break down the process of attaching wires to the socket and securing those connections so your lamp shines bright again.
Attaching Wires To The Socket
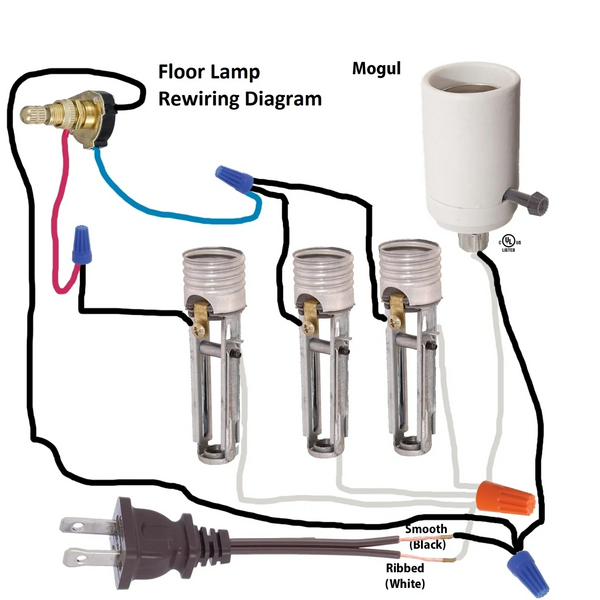
Start by identifying the two wires: usually one is neutral (often white or ribbed) and the other is hot (usually black or smooth). You’ll need to connect each wire to the corresponding terminal on the socket. Look closely at the socket terminals—one is typically marked with a silver screw for the neutral wire, and the other with a brass screw for the hot wire.
Wrap the exposed wire ends clockwise around the screws to ensure a tight connection. If the wires are frayed, trim and strip them again for a clean contact. Have you noticed how a loose wire here can cause flickering or worse? That’s why this step can’t be rushed.
Securing Wire Connections
Once the wires are attached, secure the connection by tightening the terminal screws firmly but without over-tightening. Over-tightening can damage the wire or socket, which can lead to electrical issues down the line. After the screws are tight, gently tug each wire to make sure it’s firmly in place.
Use electrical tape to wrap around the terminals if there’s any exposed wire that could touch other metal parts. This extra layer of safety keeps your lamp from short-circuiting. Have you ever skipped this step? It’s a quick fix that might prevent a trip to the repair shop or worse, a fire hazard.
Reassembling The Lamp
After carefully rewiring your floor lamp, it’s time to put everything back together. Reassembling the lamp requires patience and attention to detail. This step ensures your hard work pays off with a fully functional and safe lamp ready to light up your space.
Putting The Lamp Back Together
Start by aligning the lamp parts in the reverse order you disassembled them. Secure the socket and wiring into the lamp base, making sure the wires are tucked neatly to avoid pinching.
Fasten the socket shell or cover back in place, ensuring it fits snugly without forcing. Attach the harp or lamp frame, if your model has one, before screwing in the bulb.
Don’t forget to double-check that all screws and nuts are tightened properly. Loose parts can cause instability or electrical hazards, so take your time here.
Testing The Lamp
Before plugging in your lamp, examine your work carefully. Look for exposed wires or loose components that could cause shorts or shocks.
Plug the lamp into a power source and switch it on. Does the bulb light up immediately? If not, try tightening the bulb or rechecking your wiring connections.
Consider testing the lamp with a multimeter if you have one. It helps verify that the wiring is correct and there are no hidden faults.
Have you experienced unexpected issues while testing your lamp? Sometimes, a simple loose wire or a misaligned socket is all that’s needed to fix the problem.
Troubleshooting Tips
Troubleshooting is key when rewiring a floor lamp. Small errors can stop it from working. Identifying problems early saves time and effort. This section covers common wiring issues and signs that point to professional help.
Common Wiring Issues
- Loose connections cause flickering or no light.
- Wrong wire placement can create shorts or sparks.
- Damaged wires may lead to electrical shocks or failures.
- Faulty sockets stop the bulb from fitting or lighting.
- Incorrect polarity affects lamp safety and function.
Check each wire for secure attachment. Use a tester to ensure proper current flow. Inspect the socket for any cracks or corrosion. Replace damaged parts immediately for safety.
When To Seek Professional Help
- Repeated flickering even after rewiring.
- Signs of burning smell or smoke near the lamp.
- Wires that feel hot to touch during use.
- Complex wiring setups beyond basic repair skills.
- Uncertainty about electrical codes or safety standards.
Electricity poses risks. Calling an expert ensures safe and correct repairs. Professionals have tools and experience to handle tricky issues. Never ignore warning signs to avoid accidents.

Credit: diy.stackexchange.com
Frequently Asked Questions
How Do I Safely Rewire A Floor Lamp?
First, unplug the lamp and remove the old wiring carefully. Use wire strippers and connectors to attach new wires. Follow the wiring diagram and ensure all connections are secure. Always check for exposed wires to prevent electric shocks. Test the lamp before final assembly.
What Tools Are Needed To Rewire A Floor Lamp?
You need wire strippers, a screwdriver, electrical tape, wire nuts, and a new lamp cord. A voltage tester is useful to ensure no current flows. These tools help you safely and efficiently complete the rewiring process.
How Long Does It Take To Rewire A Floor Lamp?
Rewiring a floor lamp usually takes between 30 minutes to 1 hour. Time depends on your experience and the lamp’s complexity. Taking your time ensures safety and proper wiring, preventing future electrical issues.
Can I Replace The Lamp Socket When Rewiring?
Yes, you can replace the lamp socket during rewiring. This is ideal if the socket is damaged or old. Make sure the new socket matches the lamp type and voltage rating for safe operation.
Conclusion
Rewiring a floor lamp can save money and extend its life. Always turn off power before starting any work. Take your time and follow each step carefully. Use the right tools for safety and success. Check your work before plugging the lamp back in.
A well-rewired lamp brings light and warmth to your space. Small repairs like this build your confidence and skills. Give it a try and enjoy your bright, safe lamp.


