
Are you struggling to upload a picture on Canvas? You’re not alone.
Whether it’s for a class assignment or a project, getting your image uploaded quickly and correctly can save you time and stress. In this guide, you’ll discover simple, step-by-step instructions that anyone can follow. By the end, you’ll feel confident and ready to share your pictures without any hassle.
Keep reading to unlock the easy way to upload your picture on Canvas right now.

Credit: www.youtube.com
Preparing Your Picture
Choose a clear, well-lit photo to upload on Canvas. Make sure the file size is small and the format is supported. Double-check the image quality to ensure it looks good online.
Preparing your picture for uploading on Canvas is a crucial step that ensures your visuals appear sharp and professional. This process involves more than simply selecting any image from your gallery. It’s about making thoughtful choices that enhance your work and communicate your message effectively.Choosing The Right Image
Selecting the perfect image is an art. Consider the subject matter and ask yourself if the image aligns with the content’s theme. A high-quality image can captivate your audience’s attention, while a poor choice might detract from your message. Think about the emotional response you want to evoke. Does the image reflect that feeling? Remember, a picture speaks a thousand words, so choose wisely.Optimizing Image Size And Format
Image size and format play a critical role in how your picture is displayed. Large images can slow down loading times, frustrating your audience. Resize your image to a web-friendly size without compromising quality. JPEG is often the best choice for photographs, offering a good balance of quality and size. For graphics or images with text, PNG might be more suitable due to its clarity. Are you using the right format for your needs? Adjusting these elements can significantly impact your viewers’ experience.
Credit: www.youtube.com
Accessing Canvas Platform
Accessing the Canvas platform is your first move toward uploading a picture successfully. It’s where all your course materials live, and getting there is simpler than you might think. Once logged in, you’re just a few clicks away from sharing your visuals.
Logging Into Your Account
Start by opening your preferred web browser and typing in the Canvas login URL provided by your school or organization. Enter your username and password carefully; these credentials are usually the same ones you use for your other school accounts.
If you ever forget your password, don’t hesitate to use the “Forgot Password” link. It’s a quick way to reset and get back on track without delay. Have you ever tried logging in during peak times? Sometimes the system slows down, so patience can be key here.
Navigating To The Upload Section
After logging in, locate the course where you want to upload your picture. The dashboard usually lists all your courses with clear labels, making navigation straightforward. Clicking on the course title takes you inside.
Look for areas like “Assignments,” “Discussions,” or “Files,” depending on where you want your picture to appear. Most courses have an “Upload” or “Add” button near these sections. If you don’t see it immediately, check the toolbar or the sidebar; Canvas often places upload options there.
Remember, the upload section may look slightly different depending on your institution’s settings. Don’t be afraid to click around—you won’t break anything, and you might discover helpful features along the way.
Uploading Your Picture
Uploading your picture on Canvas is a straightforward process that lets you personalize your workspace or assignments quickly. Whether you want to add a profile photo or include images in your project, understanding the upload options makes the task easier. Let’s explore how you can get your picture onto Canvas smoothly.
Selecting The Upload Option
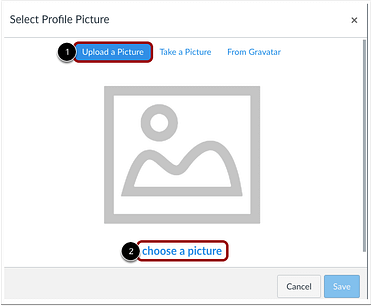
First, look for the upload button or icon, usually marked with a camera or an upward arrow. Clicking this will open a menu or dialog box prompting you to choose a file.
This option is clear and direct, especially if you’re new to Canvas or prefer clicking through guided steps.
Dragging And Dropping Files
Did you know you can drag your image file directly into the Canvas window? Simply open the folder where your picture is saved, click on it, and drag it over to the upload area.
This method saves time and feels more natural once you get used to it. It’s perfect when you have multiple files to upload at once.
Using The File Browser
If dragging and dropping isn’t your style, you can use the file browser to find your picture. After clicking the upload option, select the button that opens your computer’s file explorer.
Navigate through your folders to locate the image, then double-click or select and confirm to upload. This approach works well if you’re unsure of where your files are saved or if you want to double-check before uploading.

Credit: www.amazon.com
Editing And Adjusting Your Image
Editing and adjusting your image on Canvas helps make it look just right. It lets you fit the picture perfectly into your design. Simple changes can improve the image’s impact and clarity.
Cropping And Resizing
Cropping removes unwanted parts of your image. It focuses attention on the most important areas. Resizing changes the image size to fit your space without distortion. Use the handles on the image corners to adjust size smoothly.
Applying Filters And Effects
Filters change the image’s color and mood quickly. Effects like blur or sharpen add style or clarity. Try different filters to see which fits your design best. Keep effects subtle to avoid overwhelming the image.
Enhancing Image Quality
Brighten your image to make it more visible. Adjust contrast to add depth and detail. Use Canvas tools to reduce noise or fix colors. These tweaks improve the overall look without losing quality.
Saving And Publishing
Saving and publishing your picture on Canvas is essential to keep your work safe and share it with others. After uploading and editing, you want to make sure your image looks perfect and is stored correctly. This process allows you to review the final look, save your progress, and explore ways to share your creation.
Previewing Your Final Image
Always preview your image before saving. Canvas shows a clear view of your picture as it will appear after publishing. Check the colors, size, and details carefully. This step helps catch any mistakes or adjustments needed. Previewing gives confidence that your picture is ready to go live.
Saving Changes
Save your work regularly to avoid losing any edits. Canvas offers options to save directly to your account or device. Choose the location that suits your needs. Use clear file names for easy access later. Saving also keeps all changes intact for future editing.
Sharing And Exporting Options
Canvas provides multiple ways to share your picture. Export your image in popular formats like PNG or JPG. Share directly on social media or send via email. You can also create links to share with friends or colleagues. Exporting ensures your picture looks great everywhere.
Troubleshooting Common Issues
Uploading pictures on Canvas can sometimes cause problems. These issues may stop your image from appearing correctly or at all. Knowing common troubles helps fix them faster. This section covers typical problems and easy solutions.
Upload Failures
Uploads can fail due to slow internet or large file sizes. Clear your browser cache and try again. Use a stable connection to avoid interruptions. Check if Canvas servers are online by visiting their status page. Refresh the page before re-uploading. Rename the file to remove special characters that may cause errors.
Image Quality Problems
Low-quality images often result from small or compressed files. Use pictures with at least 72 dpi resolution for better clarity. Avoid screenshots or images saved multiple times, as they lose detail. Upload original photos for sharpness. Canvas may resize images, so start with a bigger size. Check your image format; JPEG and PNG usually keep quality intact.
Compatibility Concerns
Canvas supports common image formats like JPEG, PNG, and GIF. Other file types might not work. Convert unsupported files using free online tools before upload. Browser compatibility matters too. Use updated versions of Chrome, Firefox, or Edge for best results. Disable browser extensions that block scripts, as they can interfere with uploads. Always test uploads on different devices to spot compatibility issues.
Frequently Asked Questions
How Do I Upload A Picture On Canvas?
To upload a picture on Canvas, log in to your account, go to the desired course, and open the assignment or discussion. Click the “Submit” or “Reply” button, then select the “File Upload” option. Choose your image file and click “Submit” to upload it.
What Image Formats Does Canvas Support For Uploads?
Canvas supports common image formats like JPEG, PNG, and GIF for uploads. Ensure your file is in one of these formats to avoid errors. If your image is in a different format, convert it before uploading to Canvas for smooth submission.
Can I Upload Pictures Directly From My Phone To Canvas?
Yes, you can upload pictures directly from your phone to Canvas. Use the Canvas app or mobile browser, select the upload option in assignments or discussions, and choose an image from your phone’s gallery to submit instantly.
Is There A File Size Limit For Uploading Pictures On Canvas?
Canvas allows image uploads up to 500 MB per file. Large images may take longer to upload, so compress them if needed. Always check your institution’s specific size limits, as they can vary in some cases.
Conclusion
Uploading a picture on Canvas is simple and quick. Just follow the steps carefully. Choose the right file and check its size. Drag and drop or use the upload button. Make sure the image appears correctly in your course. This helps you share important visuals with others.
Practice a few times to get comfortable. Soon, uploading pictures will feel easy and natural. Keep this guide handy for future reference.


