
Are you looking to add a cozy, stylish touch to your living space without spending a fortune? Making a crochet floor pouf is easier than you think, and it’s a perfect project whether you’re new to crochet or have some experience.
Imagine having a soft, handmade pouf that not only looks great but also provides extra seating or a comfy footrest. In this guide, you’ll discover simple steps and tips to create your own beautiful crochet floor pouf. Ready to transform your home and enjoy a rewarding craft?
Let’s get started!

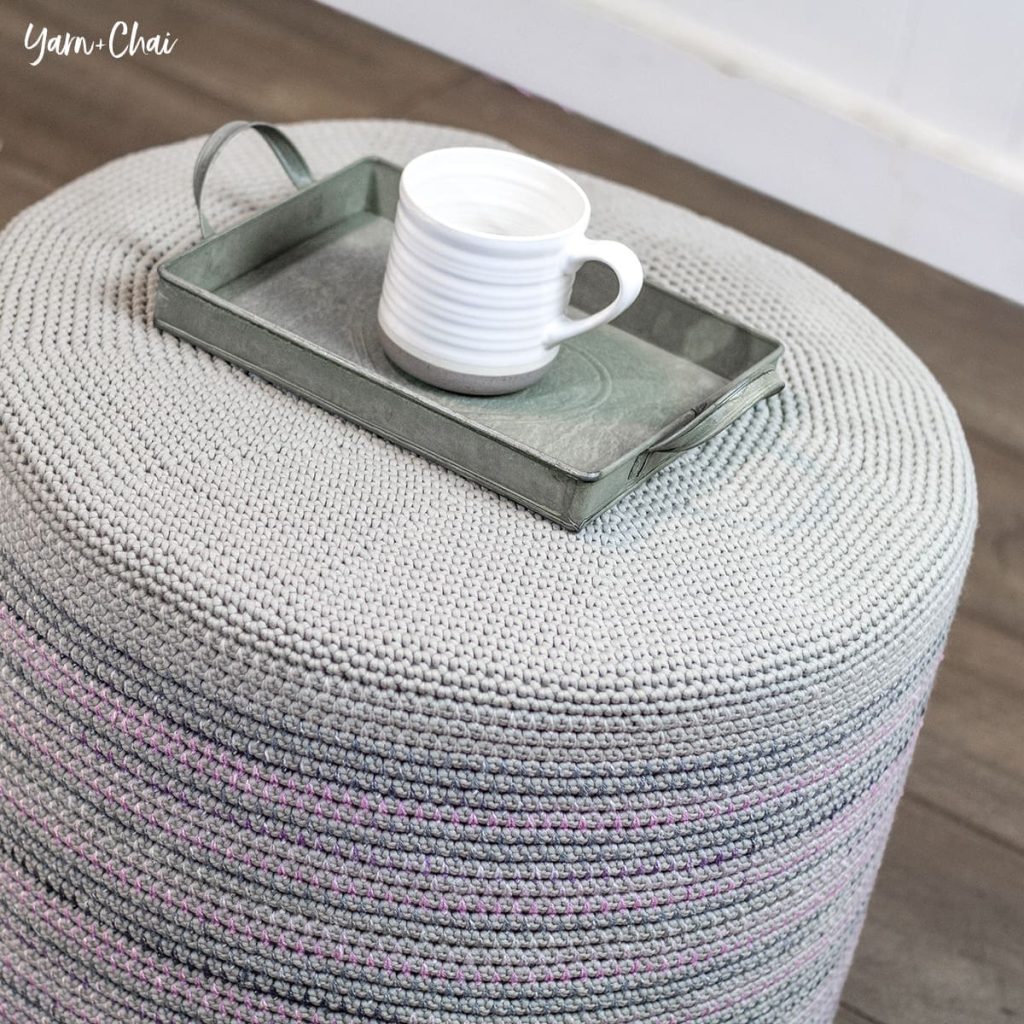
Credit: yarnandchai.com
Materials Needed
Creating a crochet floor pouf needs specific materials. Choosing the right supplies makes the project easier and the result durable. Gather all items before starting to avoid interruptions. Let’s explore the essential materials to prepare your crochet floor pouf.
Yarn Selection
Select thick, sturdy yarn for a strong pouf. Cotton or acrylic yarn works well for durability. Chunky yarn helps the pouf keep its shape. Pick a color that matches your room’s style. Avoid delicate or thin yarn; it won’t hold up under pressure.
Hook Size
Use a crochet hook size that fits your yarn thickness. A larger hook creates a loose stitch, making the pouf softer. A smaller hook gives a tighter stitch, making it firmer. Check the yarn label for recommended hook size. Common sizes for poufs range from 8mm to 12mm.
Stuffing Options
Stuffing fills the pouf and gives it volume. Polyester fiberfill is soft and easy to use. Foam pieces provide firm support and shape. Recycled fabric scraps or old clothes can be eco-friendly stuffing. Use enough stuffing to make the pouf comfortable and stable.
Additional Tools
- Scissors for cutting yarn cleanly
- Yarn needle for sewing ends and closing pouf
- Measuring tape to check pouf size
- Stitch markers to keep track of rounds
Basic Crochet Stitches
Mastering the basic crochet stitches is essential before you start making a cozy crochet floor pouf. These stitches form the foundation of your project and determine its texture and strength. Getting comfortable with each stitch can boost your confidence and make the entire process smoother and more enjoyable.
Chain Stitch
The chain stitch is the starting point for almost every crochet project. It creates a flexible foundation row that you will build upon. Once you get the rhythm of making even loops, your work will look neat and consistent.
Try making a chain of 20 stitches and observe how consistent tension affects the look. Are your loops too tight or too loose? Adjusting your grip can make a huge difference in the final appearance.
Single Crochet
Single crochet is one of the most basic and sturdy stitches. It creates a tight, dense fabric perfect for making the structure of your floor pouf strong. This stitch is ideal if you want a firm pouf that holds its shape well.
Practice by crocheting a small square with single crochets. Notice how the fabric feels—does it seem durable? This will help you decide if it’s the right stitch for your project.
Double Crochet
Double crochet stitches are taller and create a looser, more flexible fabric. This stitch works well if you want your pouf to have a bit of softness and stretch. It also speeds up the process since it builds height faster than single crochet.
Try combining double crochet rows with single crochet rows to see how the texture changes. How does this mix affect the appearance and feel? Playing with stitch height can give your pouf a unique look.
Slip Stitch
Slip stitch is a simple, almost invisible stitch used to join pieces or move yarn without adding height. It’s perfect for closing rounds or creating a smooth edge on your pouf. Learning this stitch helps you finish your project cleanly.
Practice making slip stitches in a round and notice how it tightens the work. Have you tried using slip stitches to create decorative edges? They can add a subtle, professional touch to your pouf.
Creating The Pouf Base
Creating the base of your crochet floor pouf is essential. It sets the foundation for the entire project. A sturdy base ensures your pouf retains its shape and functionality. Follow these steps to craft a perfect base for your pouf.
Starting The Circle
Begin with a magic ring. This technique creates a tight center. Chain two to build height for the first round. Work six single crochets into the magic ring. Pull the tail to tighten the loop. Secure the ring with a slip stitch in the first single crochet.
Increasing Rounds
In the second round, double your stitches. Crochet two single crochets in each stitch around. You should have 12 stitches by the end. In the third round, increase every second stitch. Crochet one single crochet, then two in the next. This pattern continues around. The total is 18 stitches. Continue increasing until you reach your desired diameter.
Maintaining Shape
Once the desired diameter is reached, stop increasing. Crochet single stitches in each stitch around. This maintains the shape and height of the pouf. Continue this pattern until the base reaches the desired height. Remember to check the shape regularly. Adjust tension if needed to ensure evenness.

Credit: lo-rain.com
Building The Sides
Building the sides of your crochet floor pouf shapes its overall look and functionality. This part requires attention to detail to ensure the pouf stands firm and looks neat. Let’s dive into how you can craft the sides with precision and ease.
Working In Rounds
When you crochet the sides, you’ll work in continuous rounds instead of rows. This technique helps create a seamless, cylindrical shape perfect for poufs. Remember to mark the beginning of each round with a stitch marker to keep track of your progress.
Working in rounds also means you’ll need to adjust stitch counts carefully. Adding stitches evenly prevents the sides from bulging or shrinking unexpectedly. Have you tried counting your stitches at the end of each round? It saves you from unpleasant surprises later on.
Height Considerations
The height of your pouf sides determines its comfort and style. Think about where you’ll place the pouf—lower for footrests, taller for extra seating support. Measure as you go to avoid ending up with a side that’s too short or too tall for your space.
One tip I learned is to try the pouf’s height against furniture as you crochet. This helps you visualize the final look and make adjustments early. How tall do you want your pouf to be? Keep that in mind while working on the sides.
Consistent Stitching
Maintaining consistent stitch tension is key to smooth, even sides. Uneven stitches create bumps and gaps that can affect the pouf’s durability and appearance. Try to keep your yarn tension steady throughout each round.
If you notice stitches getting tighter or looser, take a break and reset your grip on the hook and yarn. Small changes in hand position can make a big difference. Are your stitches looking uniform so far? If not, don’t hesitate to unravel and redo for a cleaner finish.
Closing The Top
Closing the top of your crochet floor pouf is where your project starts to take its final shape. This part requires patience and careful attention to detail to ensure a neat and secure finish. Let’s look at how you can smoothly close the top while keeping the pouf plush and well-formed.
Decreasing Stitches
As you near the top, you need to reduce the number of stitches gradually. This shapes the pouf and prevents a bulky, uneven closure.
To decrease, crochet two stitches together (known as a single crochet decrease) evenly around the round. Keep track of your stitch count after each round to maintain symmetry.
Have you noticed how a well-executed decrease creates a professional look? It’s the small details like this that elevate your handmade pouf.
Stuffing The Pouf
Stuffing is crucial for a comfortable and sturdy pouf. Use firm stuffing like polyester fiberfill or repurposed fabric scraps for the best support.
Stuff the pouf gradually as you crochet the final rounds. This way, you can adjust the filling to avoid lumps or empty spots.
Try pressing the stuffing firmly but not too tight—your pouf should be soft enough to sit on but firm enough to hold its shape.
Final Seams
Once you have decreased and stuffed the pouf, it’s time to close the remaining gap. Use a yarn needle and the tail end of your yarn to stitch the top shut.
Weave the yarn through the remaining stitches in a whip stitch or slip stitch manner, pulling tight to close the hole smoothly.
Don’t forget to secure your yarn with a few knots and weave in the ends neatly inside the pouf to hide them and prevent unraveling.

Credit: yarnandchai.com
Customization Tips
Making a crochet floor pouf gives you a blank canvas to express your style. Customizing it not only makes your pouf unique but also adds personality to your living space. Let’s look at some easy ways to personalize your creation.
Color Patterns
Choosing the right color scheme can completely change the vibe of your pouf. You can use bold, contrasting colors to make it a statement piece or soft, neutral tones for a subtle look. Try alternating stripes, creating color blocks, or even mixing gradients for a modern twist.
Think about the room where the pouf will live. Does the decor call for calm pastels or vibrant pops of color? Your choice can either blend in or stand out, depending on what you want to achieve.
Adding Texture
Texture adds depth and interest to your floor pouf. Experiment with different crochet stitches like bobble, popcorn, or shell stitches to create a tactile experience. Combining smooth and raised stitches can make your pouf feel cozy and inviting.
Have you ever touched a pouf that invited you to sink into it? That’s the power of texture. It’s also a practical way to hide minor wear and tear over time.
Embellishments
Adding embellishments can make your pouf truly one of a kind. Consider sewing on buttons, attaching tassels, or adding pom-poms around the edges. These small details bring charm and a handcrafted feel to your project.
Don’t hesitate to use materials you already love or have at hand. Sometimes, a simple ribbon or a few beads can transform your pouf from plain to playful.
Care And Maintenance
Proper care and maintenance keep your crochet floor pouf looking fresh and lasting longer. Regular attention helps avoid damage and wear. Simple steps protect your handiwork and maintain comfort.
Cleaning Instructions
Dust your pouf often to remove surface dirt. Use a soft brush or vacuum with a gentle attachment. For stains, spot clean with mild soap and cold water. Dab gently; do not rub hard. Avoid soaking the pouf to prevent shape loss. Let it air dry completely before use. For deep cleaning, hand wash the cover if removable. Follow yarn care labels carefully to avoid shrinking.
Repair Tips
Check for loose stitches or holes regularly. Use a matching yarn to sew small tears. Tighten loose ends with a crochet hook. Reinforce weak areas with extra stitching. Replace stuffing if the pouf feels flat. Keep repair tools handy for quick fixes. Prompt repairs stop damage from spreading.
Storage Advice
Store your pouf in a dry, cool place. Avoid direct sunlight to prevent fading. Use a breathable bag or cover to protect from dust. Keep away from damp areas to stop mold growth. If storing long-term, remove stuffing to save shape. Store flat or upright without heavy pressure. Proper storage extends the pouf’s life and keeps it neat.
Frequently Asked Questions
What Materials Are Needed To Make A Crochet Floor Pouf?
To make a crochet floor pouf, you need chunky yarn, a large crochet hook, stuffing, and a yarn needle. Choose soft, durable yarn for comfort and strength. You may also want stitch markers to keep track of your rounds.
How Long Does It Take To Crochet A Floor Pouf?
Crocheting a floor pouf typically takes 6 to 10 hours, depending on your skill level. Beginners may take longer, while experienced crocheters can finish faster. The size and complexity of the pattern also affect the total time required.
Can Beginners Crochet A Floor Pouf Easily?
Yes, beginners can crochet a floor pouf with basic stitches like single crochet and slip stitch. Follow step-by-step instructions and take breaks to avoid frustration. Practice with smaller projects first for better confidence.
How Do You Stuff A Crochet Floor Pouf Properly?
Stuff the pouf evenly with polyester fiberfill or recycled fabric scraps. Add stuffing gradually to maintain shape and firmness. Avoid overstuffing, as it can stretch the stitches and distort the pouf.
Conclusion
Making a crochet floor pouf can be fun and relaxing. You only need basic materials and simple steps. This project adds a cozy touch to any room. Plus, it lets you use your creativity. Try different colors and patterns to match your style.
Enjoy sitting or resting your feet on it. Keep practicing to improve your crochet skills. Soon, you will have a unique, handmade pouf to enjoy every day. Simple, useful, and beautiful. A perfect craft for all skill levels.


