
Looking to add style and warmth to your space? Hanging a pendant light is one of the easiest ways to transform any room instantly.
But if you’re unsure where to start or worried about making mistakes, you’re not alone. This guide will walk you through every step, so you can hang your pendant light safely and perfectly. By the end, you’ll have the confidence to brighten up your home like a pro.
Ready to get started? Let’s dive in!
Choosing The Right Pendant Light
Choosing the right pendant light can transform your space, adding both style and function. The perfect pendant doesn’t just illuminate; it becomes a statement piece that complements your room. To get it right, focus on style, size, ceiling height, and how well the light matches your existing décor.
Selecting Style And Size
Think about the mood you want to create. Sleek metal pendants work well in modern kitchens, while glass or fabric shades add warmth to living rooms. Size matters too—too big can overwhelm, too small might go unnoticed.
Measure your space before buying. A good rule is the pendant’s diameter should be about one-third the width of the surface it hangs over. Imagine how the light will look from different angles and distances.
Considering Ceiling Height
Ceiling height affects pendant placement and style. Low ceilings call for flush or semi-flush mounts, while high ceilings allow for longer drops and dramatic shapes. Hanging a pendant too low can block sightlines; too high and it loses impact.
Adjust the chain or cord to keep the bottom of the pendant 28 to 34 inches above the surface below, like a dining table or kitchen island. How does your ceiling height limit or expand your options?
Matching Room Décor
Your pendant light should feel like part of the room, not an afterthought. Consider colors, materials, and overall design—rustic wood pendants can soften a modern room, while shiny chrome suits minimalist spaces. Balance is key.
Look around your room and ask: Does this pendant add character or clash? Sometimes mixing styles works, but if you choose a bold light, keep the rest simple to avoid visual chaos.
Credit: thediyplaybook.com
Gathering Essential Tools
Before you begin hanging your pendant light, gathering the right tools is crucial. Having everything ready saves time and keeps the process smooth. Missing even one tool can lead to frustration or unsafe installation.
Tools Needed For Installation
Start with a sturdy ladder to reach your ceiling comfortably and safely. A voltage tester is essential to ensure the power is off before you touch any wires.
- Drill:For making holes if your ceiling doesn’t have existing mounts.
- Screwdriver set:Both flathead and Phillips head to handle different screws.
- Wire strippers:To remove insulation from the wires cleanly.
- Electrical tape:For securing wire connections.
- Measuring tape:To position the light at the desired height.
- Wire nuts:To connect wires safely.
Have you ever started a project only to realize you’re missing a simple tool? It’s frustrating and can cause delays. Taking a few minutes to check your toolkit before starting will save you headaches later.
Safety Gear To Use
Safety should never be an afterthought. Protecting yourself reduces the risk of injury and helps you focus on the task.
- Safety glasses:Shield your eyes from dust and accidental sparks.
- Work gloves:Protect your hands from sharp edges and electrical contacts.
- Non-slip shoes:Ensure stable footing on ladders or uneven surfaces.
Have you considered how a small slip or spark could disrupt your project? Wearing safety gear isn’t just about rules—it’s about making sure you finish the job without harm. Take a moment to gear up properly before you climb that ladder.
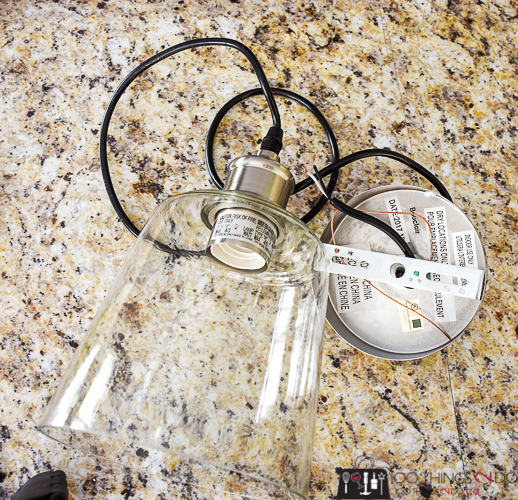
Preparing The Installation Site
Clear the area where the pendant light will hang and turn off the power at the breaker. Check the ceiling box for strength and proper wiring before starting.
Preparing the installation site is crucial for hanging a pendant light. This ensures safety and a successful installation. Begin by gathering your tools and materials. A ladder, screwdriver, and voltage tester are essential. Once ready, follow the steps below to prepare the site.Turning Off Power
Safety comes first. Turn off the power at the circuit breaker. Double-check with a voltage tester. This confirms no electricity flows to the site. Ensuring the power is off prevents accidents.Removing Existing Fixture
Remove the current light fixture carefully. Use a screwdriver to detach it from the ceiling. Lower it slowly to avoid damaging wires. Keep all screws and parts in a safe place.Checking Electrical Box
Inspect the electrical box after removing the fixture. Ensure it can support the new pendant light. It should be securely attached to the ceiling. If it feels loose, reinforce it before proceeding.
Credit: 100things2do.ca
Wiring The Pendant Light
Wiring the pendant light is a crucial step for safe and proper installation. It involves connecting the electrical wires carefully and securely. Proper wiring ensures the light works well and prevents hazards. Follow these tips to wire your pendant light correctly.
Connecting Wires Safely
Turn off the power at the circuit breaker before starting. Identify the wires in the ceiling and on the pendant light. Usually, black or red wires are live, white wires are neutral, and green or bare wires are ground.
Match the wires by color: connect live to live, neutral to neutral, and ground to ground. Hold the wires together firmly before securing them. Avoid forcing wires or leaving any exposed copper.
Using Wire Nuts And Tape
Twist the wire ends together clockwise. Screw on a wire nut that fits tightly over the twisted wires. Give the wire nut a gentle tug to check it is secure.
Wrap electrical tape around the wire nut and wires for extra safety. This prevents the nut from loosening and protects against electrical shorts. Use tape designed for electrical use only.
Testing Electrical Connections
Restore power at the circuit breaker carefully. Use a voltage tester to check if the wires carry current correctly. Turn on the pendant light switch to see if it lights up.
If the light does not work, switch off power again and recheck all connections. Loose or wrong wire connections often cause issues. Testing ensures your work is safe and functional.
Mounting The Pendant Light
Mounting the pendant light is where your project truly begins to take shape. This stage demands careful attention because a secure installation ensures safety and longevity. It also sets the tone for how your new fixture will look and function in your space.
Attaching The Mounting Bracket
The mounting bracket is the foundation of your pendant light’s installation. First, locate the electrical box in the ceiling and align the bracket holes with the box’s screws.
Use a screwdriver to tighten the screws firmly, but avoid overtightening to prevent damage. If your ceiling box lacks proper support, consider adding a brace before attaching the bracket. This small step prevents future sagging or wobbling.
Securing The Fixture
Once the bracket is in place, it’s time to secure the pendant light fixture itself. Carefully connect the fixture wires to the electrical wires, matching colors: black to black, white to white, and green or copper to ground.
Twist wire connectors tightly and tuck the wires neatly into the electrical box. Then, lift the fixture and attach it to the mounting bracket using the screws or hooks provided. Check that the fixture feels steady and doesn’t move when gently shaken.
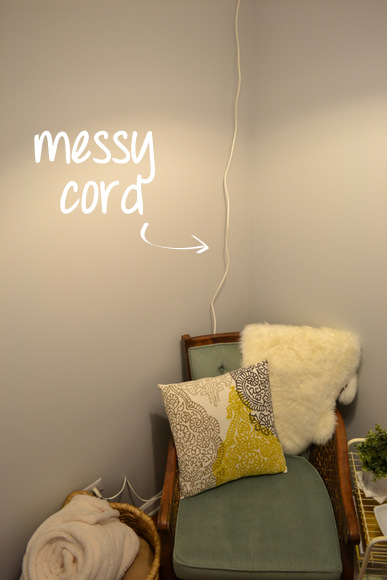
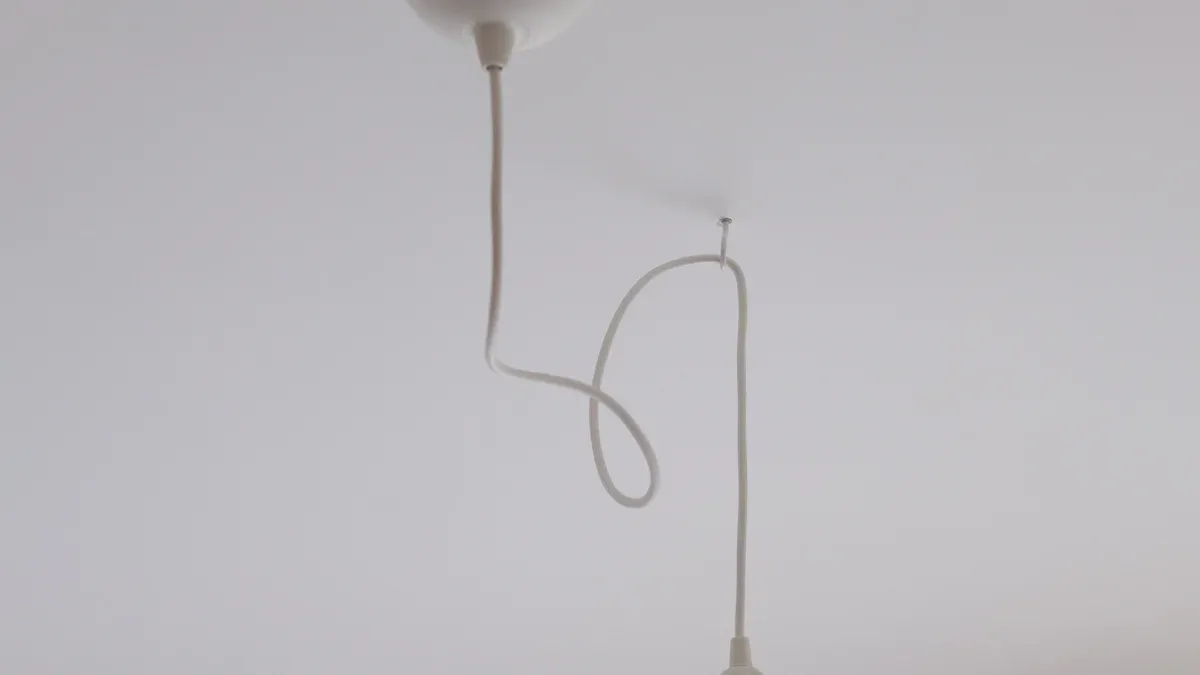
Adjusting The Height
One of the perks of pendant lights is customizing their height to suit your space. To adjust, loosen the canopy or the adjustable rod so you can slide the cord or chain to your desired length.
Keep in mind the function of the light—task lighting over a kitchen island needs to be lower than ambient lighting in a dining room. Always double-check that the cord is secure before tightening everything back in place.
Final Touches
After hanging the pendant light, some final touches will complete the project. These small steps ensure your light looks great and works perfectly. Pay attention to each detail to avoid any issues later. The right finishing steps add safety and style to your space.
Installing Bulbs
Choose bulbs that fit your pendant light’s specifications. Use the right wattage to prevent overheating. Screw bulbs in gently to avoid damage. Check if your fixture requires LED, incandescent, or other types. Proper bulb installation ensures good light and long bulb life.
Cleaning And Polishing
Remove dust or fingerprints from the fixture’s surface. Use a soft cloth to clean glass or metal parts. Avoid harsh chemicals that can damage finishes. Polishing adds shine and freshness to the light. Clean fixtures enhance the overall room appearance.
Restoring Power And Testing
Turn the circuit breaker back on carefully. Test the light by switching it on and off. Look for flickering, buzzing, or other problems. Ensure the pendant hangs straight and secure. Testing confirms your installation is safe and effective.
Troubleshooting Common Issues
Hanging a pendant light can brighten up your space instantly, but sometimes issues pop up that can be frustrating. Knowing how to troubleshoot common problems will save you time and keep your project on track. Let’s dive into practical tips to fix flickering lights, loose fixtures, and wiring problems so your pendant light shines perfectly.
Fixing Flickering Lights
Flickering can be more than just annoying; it might signal a loose bulb or a deeper electrical issue. First, check if the bulb is screwed in tightly. A loose connection often causes flickering.
If the bulb is secure, try swapping it with a new one to rule out a faulty bulb. Sometimes, the dimmer switch isn’t compatible with your LED or CFL bulb, causing flickering. Consider replacing the dimmer with one designed for your bulb type.
Have you noticed flickering only when other appliances run? That might hint at a voltage fluctuation in your home’s wiring, which needs professional attention.
Addressing Loose Fixtures
A pendant light that wiggles or hangs unevenly can feel unstable and unsafe. Start by turning off the power and inspecting the mounting bracket. Tighten any screws holding the fixture or bracket in place.
If the fixture still feels loose, check the canopy—the cover that hides the electrical box. Sometimes it doesn’t sit flush against the ceiling because of uneven wiring or mounting plates. Adjust the wires or reposition the bracket for a snug fit.
Have you ever found the chain or rod holding your pendant light to be the weak link? Ensure all connecting points are securely fastened to prevent wobbling.
Handling Wiring Problems
Wiring can be intimidating, but many issues are simple to spot and fix. If your pendant light doesn’t turn on at all, test the power source with a voltage tester to confirm electricity is reaching the fixture.
Loose or disconnected wires inside the electrical box are a common culprit. Always turn off the power before opening the box. Look for wires that are not twisted together properly or are missing wire nuts, then reconnect and secure them firmly.
If you encounter damaged wires or unsure about your connections, don’t hesitate to call an electrician. Your safety is the top priority, and a professional can prevent hazards you might not see.
Safety Tips For Pendant Light Installation
Hanging a pendant light can transform any room, but safety must be your top priority. Improper installation can lead to electrical hazards or damage to your home. Paying attention to a few key safety tips will help you avoid common pitfalls and ensure a smooth, secure setup.
Avoiding Electrical Hazards
Before you touch any wiring, turn off the power at the circuit breaker. Never rely on just flipping the light switch off. Use a voltage tester to double-check that the power is off.
Wear insulated gloves and use tools with insulated handles to reduce the risk of electric shock. Keep your work area dry and clear of clutter to prevent accidents. Remember, even a small mistake with electrical wiring can cause serious injury or fire.
Working With A Partner
Having someone assist you makes the installation safer and easier. One person can hold the pendant light steady while the other secures the mounting bracket and connects wires.
A partner can also help by handing you tools and parts, reducing the risk of dropping anything fragile. Plus, they can watch out for any hazards you might miss, like loose wires or unstable ladders.
When To Call A Professional
If you feel unsure about handling electrical wiring or the installation involves complex ceiling structures, calling a licensed electrician is the smartest choice. Professionals have the tools and experience to handle tricky situations safely.
Don’t risk voiding your home insurance or causing damage by attempting a job beyond your skill level. Ask yourself: Is saving time worth the potential safety risks? Sometimes, investing in expert help saves you from costly repairs or accidents down the line.
Credit: glarefusion.com
Frequently Asked Questions
How High Should I Hang A Pendant Light?
Hang pendant lights 28 to 34 inches above a table or countertop. This height ensures proper illumination and avoids glare. Adjust based on ceiling height and room size for best results.
What Tools Do I Need To Hang A Pendant Light?
You need a screwdriver, wire stripper, voltage tester, drill, and ladder. These tools help safely install and secure the pendant light fixture.
Can I Hang Multiple Pendant Lights Together?
Yes, you can hang multiple pendant lights in a row. Space them evenly and ensure your electrical box can support the combined weight.
How Do I Choose The Right Pendant Light Size?
Select a pendant size based on room dimensions and purpose. Larger rooms need bigger or multiple pendants; small spaces benefit from compact fixtures.
Conclusion
Hanging a pendant light can brighten any room easily. Follow the steps carefully for a safe installation. Choose the right height and style for your space. Always turn off the power before starting work. Take your time and check all connections.
A well-hung pendant light adds charm and light. Enjoy the new look and cozy feel it brings. Small efforts make a big difference in home decor. Try it yourself and see how simple it can be.


