
Are you ready to transform your space with a stylish pendant light but unsure how to hang it properly? Hanging a pendant light with a cord might seem tricky, but with the right steps, you can do it yourself and add a beautiful touch to your room.
This guide will walk you through everything you need to know, making the process simple and stress-free. By the end, you’ll have the confidence to install your pendant light safely and perfectly—no electrician needed. Keep reading to discover the easy way to brighten up your home!
Choosing The Right Pendant Light
Choosing the right pendant light is key to transforming any space. It’s not just about picking a pretty fixture; it’s about finding one that fits your room’s size, style, and function. Let’s break down the essentials to help you find that perfect pendant light with cord.
Types Of Pendant Lights
Pendant lights come in various shapes and sizes, each serving a different purpose. You’ll find single pendants, multi-light pendants, and cluster pendants that offer different lighting effects. Think about the room’s size and ceiling height—larger spaces can handle bigger or multiple pendants, while smaller rooms benefit from more compact designs.
- Single Pendant:Ideal for focused lighting, like over a kitchen island or bedside table.
- Multi-Light Pendant:Combines several bulbs for broader illumination, great for dining areas.
- Cluster Pendant:A group of small pendants hung together, adding a dynamic look to living rooms or entryways.
Selecting The Perfect Style
Your pendant light should reflect your personal taste and complement your décor. Are you drawn to sleek modern lines, rustic charm, or vintage vibes? Consider the material and finish—metal, glass, wood, or fabric can dramatically change the feel of your space.
Remember, the right style can make a statement or blend seamlessly. Ask yourself: do you want the pendant to be a focal point or an understated accent? Your answer will guide your choice effectively.
Considering Light Bulb Options
The type of bulb you choose affects not only the light quality but also energy efficiency and mood. LED bulbs are popular for their long life and low energy use. If you want softer, warmer light, look for bulbs labeled “warm white” or “soft white.”
Think about dimmable bulbs if you want control over brightness. Have you ever noticed how the right bulb can completely change the ambiance of a room? That’s the kind of power your pendant light can have.

Credit: www.decor8blog.com
Gathering Necessary Tools And Materials
Before you start hanging your pendant light, gathering the right tools and materials is crucial. Having everything at hand not only speeds up the process but also prevents frustrating interruptions. Imagine halfway through your installation only to realize you don’t have the right screwdriver or wire connectors—avoiding that is simple with a quick checklist.
Essential Tools List
- Voltage tester:Ensures the power is off before you touch any wires.
- Screwdrivers:Both flat-head and Phillips for removing and attaching fixtures.
- Wire strippers:Needed to strip the insulation off the electrical wires.
- Drill with bits:Helps in making holes for mounting brackets if necessary.
- Measuring tape:To get the perfect height and alignment for your pendant light.
- Step ladder:For safely reaching your ceiling.
Materials For Installation
- Pendant light kit:Including the cord, canopy, and bulb socket.
- Wire connectors (wire nuts):To securely join electrical wires.
- Mounting bracket:Usually comes with your light, but check to make sure.
- Electrical tape:Adds an extra layer of safety around wire connections.
- Light bulb:Choose one that fits your fixture and desired ambiance.
Safety Gear Recommendations
Safety should never be an afterthought. Wearing insulated gloves protects your hands from accidental shocks and sharp edges. Safety glasses shield your eyes from dust and debris, especially when drilling into ceilings.
Have you ever started a project without safety gear and wished you hadn’t? It’s a small step that can save you from big trouble. Always double-check that your power is off at the breaker before handling any wiring.
Preparing The Installation Area
Preparing the installation area is an important first step before hanging a pendant light with a cord. It ensures safety and accuracy during the process. Taking time to prepare helps avoid common mistakes and saves effort later.
Turning Off Power
Safety is key. Turn off the power at the circuit breaker to avoid electric shock. Use a voltage tester on the wires to confirm the power is off. Never skip this step.
Measuring Ceiling Height
Measure the ceiling height to set the pendant light at the right level. Use a tape measure from the floor to the ceiling. This helps find the perfect hanging length for the cord.
Locating Electrical Box
Find the electrical box on the ceiling where the light will hang. It should be secure and able to support the pendant light’s weight. Use a stud finder or look for existing fixtures to locate it easily.
Installing The Mounting Bracket
Secure the mounting bracket to the ceiling junction box with screws. Align it properly for a stable fit. Ensure it’s tight to support the pendant light’s weight effectively.
Installing the mounting bracket is a crucial step in hanging a pendant light with a cord. This step ensures the light fixture stays securely attached to the ceiling, providing both functionality and aesthetic appeal. The process might seem daunting, but with a little patience and the right tools, it becomes quite manageable. Let’s walk through the steps to successfully install the mounting bracket for your pendant light.Attaching Bracket To Ceiling
Begin by identifying the location on the ceiling where you want the light. Ensure it’s near a power source for easy connection. Hold the mounting bracket against the ceiling. Use a pencil to mark the holes where screws will go. This helps in aligning the bracket properly when drilling.Securing With Screws
Drill holes at the marked points on the ceiling. Use the appropriate drill bit for your ceiling material. Next, position the bracket over the drilled holes. Insert screws into the holes and tighten them securely. Use a screwdriver or a drill with a screwdriver bit for this task. Make sure the screws are tight to hold the bracket firmly.Ensuring Stability
After securing the screws, check the stability of the bracket. Gently tug it to ensure it doesn’t move or wobble. If it feels loose, tighten the screws a bit more. Stability is crucial to support the weight of the pendant light. Double-check all connections to ensure everything is in place. Once stable, you’re ready to proceed to the next step in hanging your pendant light. By following these steps, you ensure a secure installation, providing peace of mind and a beautiful lighting fixture.Connecting The Wiring
Connecting the wiring is a crucial part of hanging a pendant light with a cord. It ensures the light works safely and properly. Taking care with the wiring prevents electrical issues and keeps your home safe.
Identifying Wires
First, recognize the wires you are working with. Usually, there are three types:
- Live (hot) wire:Often black or red, it carries electricity from the power source.
- Neutral wire:Usually white, it completes the electrical circuit.
- Ground wire:Typically green or bare copper, it protects against electrical faults.
Check your pendant light cord and the ceiling wiring to match these wires correctly.
Making Safe Connections
Turn off the power before touching any wires. This step is essential for safety.
Connect the live wire from the ceiling to the live wire on the pendant light. Do the same for the neutral wires. Attach the ground wire from the ceiling to the pendant’s ground wire or to the mounting bracket if needed.
Ensure the wires are twisted together tightly to avoid loose connections.
Using Wire Nuts And Tape
Use wire nuts to cover the twisted wire ends. This prevents exposed wires and shorts.
Choose the right size wire nut for the wires you connect. Twist the nut clockwise until snug.
Wrap electrical tape around the wire nut and wires for extra security. This keeps the connection firm and safe.
Adjusting The Cord Length
Adjusting the cord length is key to hanging a pendant light correctly. It controls how low or high the light sits in the room. Getting this right affects both the look and the function of your space.
Too long a cord can make the light hang awkwardly. Too short, and it may not provide enough illumination. Adjust the cord carefully to fit your needs and style.
Measuring Desired Drop
Start by deciding where the light should hang. Use a tape measure to check the distance from the ceiling to the spot you want the light. Measure twice to be sure.
Consider the room’s ceiling height and furniture placement. A good rule is to hang the light about 30 to 36 inches above a table or countertop.
Shortening The Cord
Once you know the right length, unplug the light before adjusting. Pull the cord through the canopy or ceiling mount gently. Use wire cutters to trim the excess cord.
Strip the ends of the wires carefully to prepare them for connection. Avoid cutting the wires too short. Leave enough length for a secure connection.
Securing Excess Cord
Coil any extra cord neatly inside the ceiling box or canopy. Use twist ties or cable clips to hold the cord in place. This prevents the cord from slipping or tangling.
Make sure the cord is not pinched or damaged. Secure the canopy tightly to the ceiling for a clean look. Double-check your work before turning the power back on.
Mounting The Pendant Light
Mounting a pendant light correctly ensures safety and enhances room aesthetics. Follow clear steps to attach the light securely. Pay attention to details for a neat finish. This section guides you through the mounting process.
Attaching Light To Bracket
Start by securing the pendant light’s canopy to the mounting bracket. Align the holes on the canopy with those on the bracket. Use screws provided with your light fixture to fasten them tightly. Make sure the bracket is stable before proceeding.
Tightening Fixtures
Once attached, tighten all screws and nuts firmly. This prevents the light from wobbling or loosening over time. Use a screwdriver or wrench as needed. Avoid over-tightening to protect the fixture and ceiling.
Checking Alignment
Check if the pendant light hangs straight and centered. Adjust the cord length if needed to achieve the desired height. Ensure the light does not tilt or lean to one side. Proper alignment enhances both function and style.

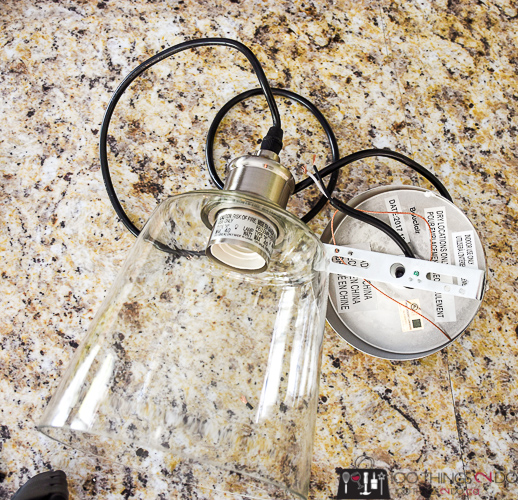
Credit: 100things2do.ca
Testing And Final Touches
After hanging your pendant light and securing the cord, it is time to focus on testing and final touches. This stage ensures your light works safely and looks great in your space. Careful checks help avoid electrical issues and improve the overall appearance.
Restoring Power
Turn the power back on at the circuit breaker. Make sure the switch controlling the pendant light is off before restoring power. This prevents any electrical surprises. Once the power is back, switch on the light to check if it receives electricity.
Testing Light Functionality
Flip the wall switch to turn on the pendant light. Watch for steady light without flickering or dimming. If the light does not turn on, recheck the wiring connections. Ensure the bulb is screwed in tightly and is the correct type. Test the light multiple times to confirm consistent performance.
Adding Decorative Elements
Adjust the length of the cord if needed for the perfect height. Use cord clips or ties to keep excess cord neat and tidy. Add a stylish bulb or lampshade that matches your room’s decor. Clean the fixture and nearby area to remove dust or fingerprints. These small touches enhance the look and feel of your new pendant light.
Troubleshooting Common Issues
Hanging a pendant light with a cord can brighten up any room, but sometimes issues pop up that disrupt its charm. Troubleshooting these common problems quickly saves you frustration and keeps your space glowing just right. Let’s dive into practical fixes that anyone can handle.
Dealing With Flickering Lights
Flickering lights can be a sign of several issues, but don’t let it dim your spirits. Start by checking the bulb—loose or incompatible bulbs often cause flickers. Try tightening the bulb or swapping it for one that matches your fixture’s specifications.
If the bulb isn’t the problem, inspect the socket. Dust or corrosion inside can interrupt power flow. A gentle clean with a dry cloth might restore steady light.
Also, consider your home’s wiring. Flickering might mean a loose wire connection or voltage fluctuations. If unsure, consulting an electrician is the safest bet.
Fixing Loose Connections
Loose connections are a common culprit behind pendant light issues. Start by turning off the power to avoid shocks. Then, gently tug the wires inside the ceiling box and the light fixture to see if anything feels loose or disconnected.
Use wire nuts to secure any loose wire ends and wrap them tightly. If wires look worn or frayed, replace them to prevent future problems. Tightening screw terminals can also make a big difference in stability.
Have you noticed your light flickers more when you touch the cord? That’s a clear sign you need to check these connections immediately.
Handling Cord Twists
Cord twists can make your pendant light look messy and affect its hanging height. To fix this, first unplug the fixture or turn off the power. Gently untwist the cord by rotating the light fixture in the opposite direction of the twist.
If the cord keeps twisting, secure it with small cable ties or use a cord grip to keep it straight. Avoid pulling too hard as this can damage internal wiring.
Have you tried adjusting the ceiling canopy? Sometimes loosening it slightly allows the cord to untwist naturally before tightening it back in place.
Credit: ledsone.co.uk
Frequently Asked Questions
How Do I Measure Cord Length For Pendant Lights?
Measure from the ceiling to the desired hanging height. Add extra length for adjustments and cord slack. This ensures your pendant light hangs perfectly in your space.
What Tools Are Needed To Hang A Pendant Light?
You need a drill, screwdriver, wire stripper, voltage tester, and ladder. These tools help safely and efficiently install your pendant light.
How To Safely Connect Pendant Light Wires?
Turn off power at the breaker first. Match wire colors: black to black, white to white, and green to ground. Use wire nuts to secure connections firmly.
Can I Hang A Pendant Light Without Ceiling Support?
No, pendant lights must be anchored to a ceiling joist or support box. This ensures the fixture is secure and safe from falling.
Conclusion
Hanging a pendant light with a cord is easier than it seems. Follow each step carefully and take your time. Measure the length and choose a good spot for lighting. Secure the cord tightly to avoid any accidents. Test the light before finishing to ensure it works well.
This simple task can change your room’s look nicely. Enjoy the new light and the cozy feel it brings. Keep safety in mind during the process. A little effort brings great results in home lighting.


