
Are you tired of your plain recessed lights and want to add a stylish touch to your room? Converting recessed lights to pendant lights can instantly transform your space, giving it character and warmth.
But maybe you’re wondering if it’s too complicated or expensive. The good news is—it’s easier than you think. In this guide, you’ll discover simple, step-by-step tips to make the switch safely and beautifully. Keep reading, and you’ll be ready to upgrade your lighting and elevate your home’s style in no time.
Tools And Materials Needed
Switching from recessed lighting to a pendant light changes the look and feel of any room dramatically. To do this yourself, having the right tools and materials is crucial for a smooth and safe upgrade. Before you start, gather everything you need so you don’t have to stop midway and risk safety or quality.
Basic Electrical Tools
- Voltage Tester:Ensures power is off before you touch any wires.
- Wire Strippers:Helps you remove insulation cleanly without damaging wires.
- Screwdrivers:Both flathead and Phillips types for removing and securing fixtures.
- Pliers:Useful for twisting wires together and bending them as needed.
- Electrical Tape:For insulating wire connections safely.
- Drill:Handy if you need to adjust mounting holes.
Having these tools ready made my own light conversion much faster and less frustrating. What’s more, a simple voltage tester gave me peace of mind every time I worked on the wiring.
Pendant Light Components
- Pendant Fixture:Choose a style and size that complements your space.
- Mounting Bracket:Attaches the pendant securely to your ceiling box.
- Canopy:Covers the electrical box and wiring for a clean look.
- Wire Connectors:Also known as wire nuts, these keep connections safe and stable.
- Light Bulb:Pick the right wattage and shape for your new fixture.
Picking a pendant light that fits your room’s vibe is exciting, but don’t forget the small components that hold it all together. These parts may seem minor, but they play a huge role in safety and appearance.
Safety Gear
- Insulated Gloves:Protect your hands from electrical shocks.
- Safety Glasses:Shield your eyes from dust and debris.
- Step Ladder:Provides stable access to your ceiling.
- Work Light:Ensures your workspace is bright enough to see clearly.
Safety isn’t optional when dealing with electricity. I once underestimated the need for gloves and paid the price with a painful shock. Don’t let a small mistake become a big problem—gear up properly.
Preparing The Workspace
Preparing your workspace is a crucial part of converting a recessed light to a pendant fixture. It sets the tone for a smooth, safe, and efficient project. Taking time to get organized and ready can save you from frustration and potential hazards later.
Turning Off Power
Safety should always come first. Before touching any wiring, locate your home’s circuit breaker and switch off the power to the recessed light. Double-check by flipping the light switch to confirm the power is truly off.
Have you ever skipped this step and regretted it? It’s not worth the risk. Even if you think you know which breaker controls the light, use a voltage tester for peace of mind.
Clearing The Area
Remove furniture, rugs, or decorations near the light fixture. You need a clean, open space to work without worrying about accidents or damage. A clutter-free area also helps you lay out tools and parts for easy access.
Think about how much easier your project will be if you aren’t constantly moving things around or crawling over obstacles. A tidy workspace keeps your focus sharp and your movements safe.
Gathering Supplies
Make a list of everything you’ll need before starting. Common supplies include a new pendant light kit, screwdriver, wire strippers, voltage tester, electrical tape, and wire nuts. Having all tools and materials at hand prevents unnecessary interruptions.
Consider the style and size of your pendant light too—does it come with mounting hardware? Will you need extra chain or cord? Being prepared with the right parts means you won’t have to pause your project halfway through.
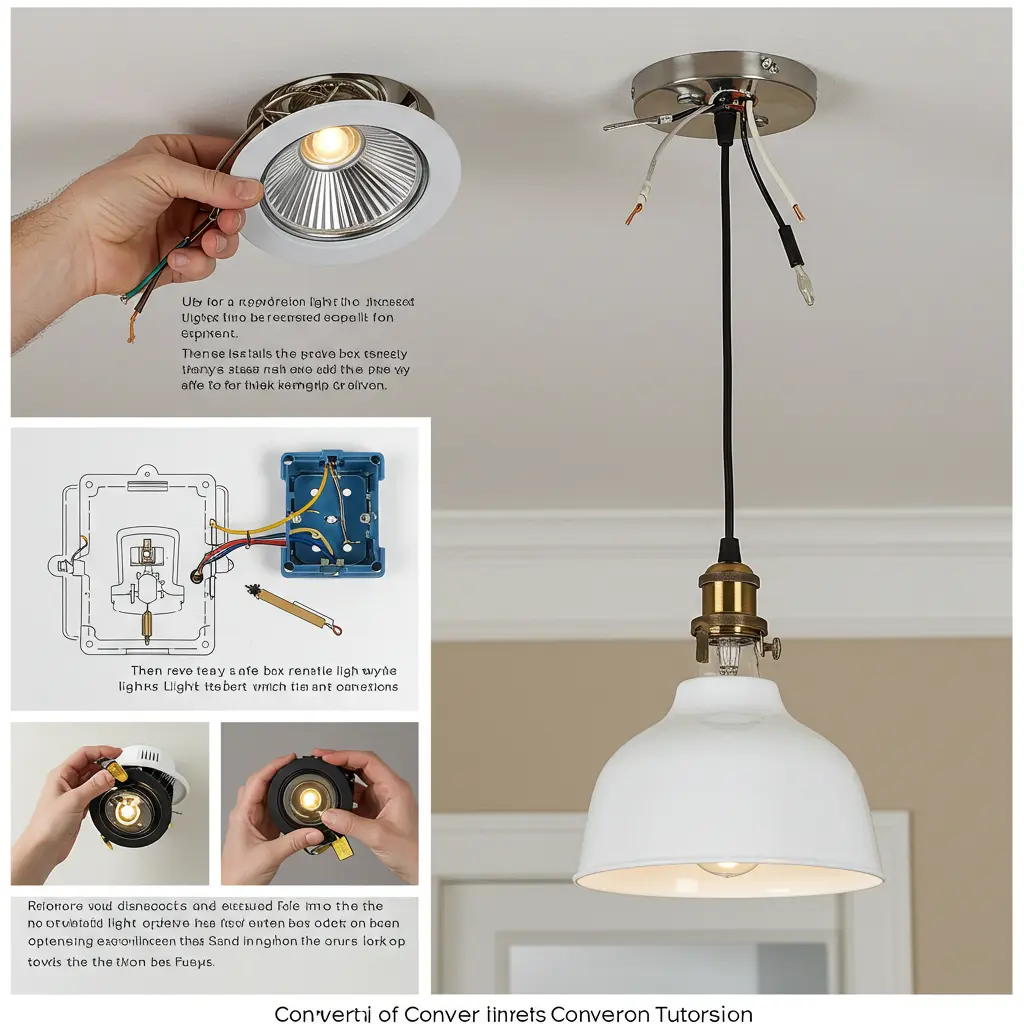
Removing The Recessed Light
Start by turning off the power and removing the recessed light trim and bulb. Carefully disconnect the wiring and take out the housing from the ceiling. This creates space for installing a pendant light fixture in its place.
Transforming a recessed light into a pendant can breathe new life into a room. It adds style and a focal point that draws the eye. But first, you need to remove the recessed light. This task might seem daunting, but with a little patience and the right steps, you can manage it efficiently.Detaching Trim And Bulb
Start by turning off the power to the light at the circuit breaker for safety. Use a sturdy ladder to reach the light fixture comfortably. Gently remove the trim by pulling it away from the ceiling. If it’s held in place by clips, simply squeeze them to release. Once the trim is off, unscrew the bulb and set it aside. This step is straightforward, but always handle the bulb with care to avoid breakage.Disconnecting Wiring
Next, you need to disconnect the wiring. Carefully detach the fixture’s cover to access the wiring compartment. Here, you’ll find wire nuts connecting the light to the power supply. Unscrew these nuts and separate the wires. Remember to keep track of which wire connects where. Using a smartphone to snap a picture can be a handy reference for later. Are you ready to see the fruits of your efforts?Removing Housing
Finally, it’s time to remove the housing. This part involves a bit more effort, as the housing is often secured with clips or screws inside the ceiling. Use a screwdriver or pliers to gently release these fasteners. Pull the housing down carefully, ensuring not to damage the ceiling. Once out, you’ve successfully prepped the area for your new pendant light. Converting a recessed light to a pendant might seem like a lot of work. But with each step, you’re closer to transforming your space. Are you excited to see how your new pendant will change the room’s vibe?
Credit: www.create-enjoy.com
Installing The Pendant Fixture
Installing the pendant fixture is a key step in converting recessed lighting. This process involves mounting the bracket, connecting the wires, and securing the pendant. Each part must be done carefully for safety and proper function.
Mounting The Bracket
Start by attaching the mounting bracket to the electrical box. Use the screws that come with the pendant fixture. Make sure the bracket is tight and stable. A secure bracket holds the pendant safely and prevents wobbling.
Connecting The Wires
Turn off the power at the circuit breaker before touching any wires. Match the wires by color: black to black, white to white, and green or copper to ground. Use wire nuts to connect each pair. Wrap electrical tape around the nuts for extra safety. Push the wires gently back into the box.
Securing The Pendant
Attach the pendant canopy to the mounting bracket. Align it so it covers the electrical box completely. Tighten the screws to hold the canopy in place. Adjust the pendant length if needed. Check that it hangs straight and secure before turning the power back on.
Adjusting Pendant Height
Adjusting the pendant height is key when converting recessed lighting to a pendant fixture. The right height enhances the room’s look and ensures proper lighting. You want the pendant to hang at a comfortable and stylish level. This part of the process requires careful measuring and adjusting the cord length.
Measuring Drop Length
Start by measuring the distance from the ceiling to where the bottom of the pendant should hang. Consider the room’s size and furniture height. For dining areas, the bottom of the pendant typically hangs 28 to 34 inches above the table. In open spaces, it can hang higher to avoid blocking views. Use a tape measure and mark the desired drop length on the cord.
Shortening Or Lengthening Cord
Adjust the cord to match the measured drop length. To shorten, remove excess cord by loosening the fixture’s canopy and pulling the cord through. Cut the extra cord carefully, then secure the wires again. To lengthen, check if extra cord is available inside the ceiling box. Pull more cord out gently if possible. Always turn off power before making adjustments. Make sure the cord is tight and the pendant hangs straight.

Credit: hellofromliz.com
Testing And Final Touches
Testing and final touches are important to complete the conversion from recessed light to pendant. These steps ensure the new light works well and looks great. Taking time here prevents future problems and guarantees safety.
Restoring Power
Turn the circuit breaker back on carefully. Check that power returns to the fixture area. Use a non-contact voltage tester to confirm electricity is flowing. This step helps avoid shocks or damage during testing.
Checking Functionality
Switch on the pendant light to see if it lights up. Make sure the bulb fits properly and the pendant hangs straight. Test the light switch several times for smooth operation. Listen for any unusual sounds or flickering. These signs may indicate wiring issues.
Cleaning Up
Remove all tools and debris from the work area. Wipe dust or fingerprints off the pendant and ceiling. Dispose of old fixture parts according to local rules. Organize leftover materials for future use or recycling. A clean space keeps your home safe and neat.
Common Issues And Fixes
Converting recessed lighting to pendant fixtures can transform your space, but it often comes with a few common hiccups. Understanding these issues helps you troubleshoot quickly and avoid extra trips to the hardware store. Let’s look at some frequent problems and how you can fix them effectively.
Loose Connections
Loose wiring connections are one of the most common reasons your new pendant light might not work properly. When wires aren’t tightly secured, you can experience flickering or even complete power loss.
Check all wire nuts and terminal screws to make sure they are snug. Sometimes, simply twisting the wires together a bit more before securing the wire nut can solve the problem.
Have you ever had a light flicker right after installation? That’s often a loose connection at fault, and tightening it can save you a lot of frustration.
Flickering Light
Flickering lights aren’t just annoying—they might indicate an electrical issue that needs attention. Besides loose connections, flickering can happen if the bulb isn’t compatible with your fixture’s dimmer or transformer.
- Try swapping the bulb with one that matches the fixture’s specifications.
- Make sure your dimmer switch is rated for LED or the bulb type you’re using.
- Inspect the fixture’s wiring for signs of damage or wear.
Have you checked whether your existing dimmer supports the new pendant light? Sometimes the fix is as simple as upgrading the switch.
Improper Height
One of the biggest visual mistakes when installing pendant lights is hanging them at the wrong height. If your pendant is too high, it won’t provide enough light or impact. Too low, and it can obstruct movement or look awkward.
The ideal height over a dining table or kitchen island is usually between 28 to 34 inches from the surface to the bottom of the fixture. For general room lighting, aim for about 7 feet from the floor.
Did you measure before you hung the pendant? Taking a moment to adjust the chain or cord length can make a huge difference in both function and style.

Credit: hellofromliz.com
Frequently Asked Questions
How Do I Convert Recessed Lights To Pendant Lights?
To convert recessed lights to pendant lights, first turn off power. Remove the recessed fixture carefully. Install a compatible pendant light mounting bracket. Connect the wiring following safety codes. Finally, secure the pendant and test the light.
What Tools Are Needed For This Conversion?
You will need a screwdriver, wire stripper, voltage tester, pliers, and a ladder. Additionally, have electrical tape and a pendant light kit ready. Safety gloves and goggles are recommended for protection during installation.
Is It Safe To Convert Recessed Lights Myself?
Yes, if you follow safety precautions and local electrical codes. Always turn off power at the breaker. Use a voltage tester before handling wires. When unsure, consult a licensed electrician to avoid hazards.
Can I Use Any Pendant Light For Conversion?
Choose pendant lights compatible with your existing wiring and ceiling box. Ensure the weight of the pendant matches ceiling support. Check the light’s voltage and bulb type for compatibility.
Conclusion
Converting recessed lights to pendant lights adds style and function. The process is simple with the right tools and steps. Always turn off power before starting work. Choose a pendant that fits your room’s size and look. Take your time to connect wires safely and securely.
This change brightens spaces and updates your home’s feel. Enjoy the fresh, new lighting you created yourself. Small projects like this can make a big difference. Try it and see how your room transforms.


