
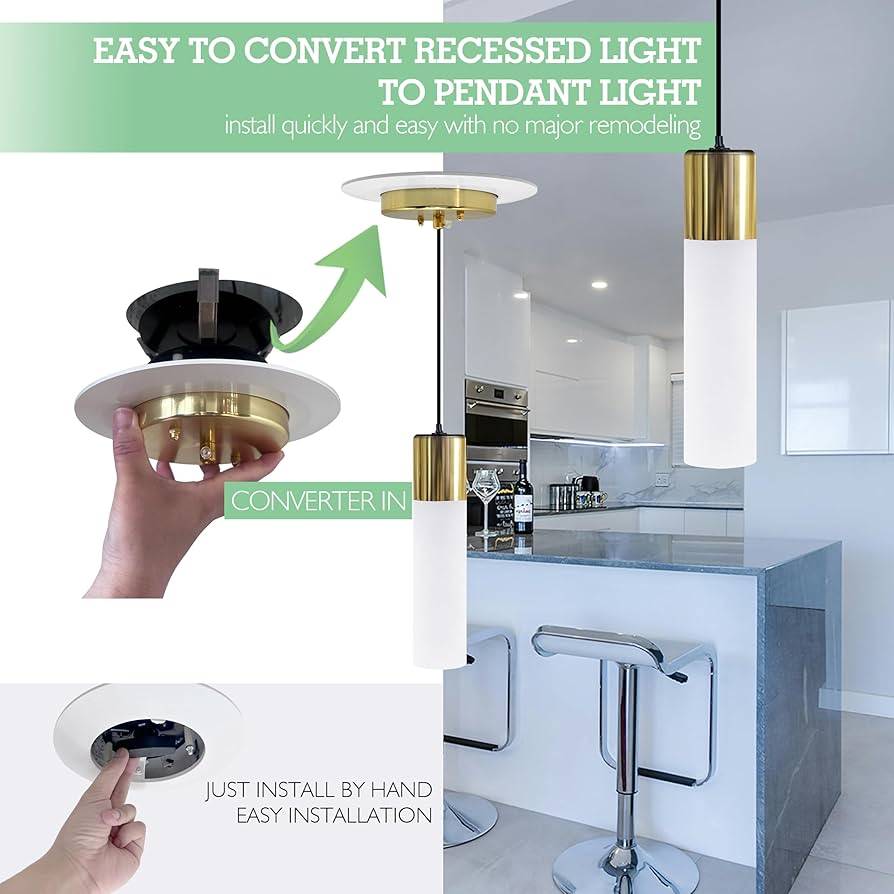
Are you tired of the plain, flat look that recessed lights give your room? Imagine transforming your space with a stylish pendant light that not only brightens up the area but also adds character and charm.
Replacing recessed lights with pendant lights might seem tricky, but it’s easier than you think—and the impact is huge. In this guide, you’ll discover simple, step-by-step tips to make the switch safely and confidently. Ready to elevate your home’s lighting and create a cozy, inviting atmosphere?
Keep reading, because your perfect pendant light is just a few easy steps away.
Tools And Materials Needed
Replacing a recessed light with a pendant light requires specific tools and materials. Having the right items makes the job easier and safer. This section covers everything needed before starting the project.
Essential Tools
- Voltage tester to ensure power is off
- Wire strippers for removing insulation
- Wire nuts for safe electrical connections
- Screwdriver set for mounting and removing fixtures
- Drill with bits for new holes if needed
- Measuring tape to set pendant height
- Utility knife for cutting drywall or insulation
- Step ladder for safe access to the ceiling
Choosing The Right Pendant Light
Select a pendant light that fits the room’s style and size. Check the weight to ensure ceiling support is adequate. Pick a fixture with adjustable height for flexibility. Confirm the light’s voltage matches home wiring. Choose energy-efficient bulbs to save electricity.
Safety Gear
- Insulated gloves to protect against shocks
- Safety glasses to shield eyes from debris
- Dust mask to avoid inhaling particles
- Non-slip shoes for stable footing
- Protective clothing to cover exposed skin
Preparing The Workspace
Preparing the workspace is a crucial first step in replacing a recessed light with a pendant light. A safe and tidy area helps the process go smoothly. Taking time to organize before starting saves effort later.
Turning Off Power
Safety is the top priority. Switch off the power at the circuit breaker. Do not rely on just the light switch. Test the light to confirm the power is off. Use a voltage tester for added safety.
Clearing The Area
Remove furniture and items under the light fixture. Cover the floor with a drop cloth or old sheet. This protects surfaces from dust and debris. Keep the space clear to move tools easily and avoid accidents.
Gathering Supplies
Collect all necessary tools and materials before starting. Common items include:
- Screwdrivers
- Wire strippers
- Voltage tester
- Wire nuts
- Electrical tape
- Pendant light fixture
- Step ladder
Having everything ready prevents delays and keeps the work efficient.
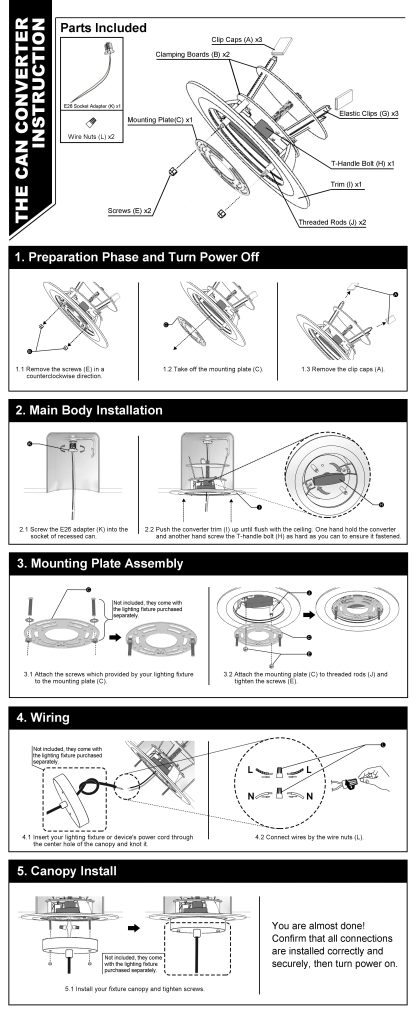
Removing The Recessed Light
Removing the Recessed Light Switching from recessed to pendant lighting can transform a room’s ambiance. Begin by turning off the power. Carefully remove the recessed light fixture, ensuring wires are safely disconnected.
Replacing a recessed light with a pendant light can transform your space. The first step is removing the existing recessed fixture. This involves accessing the fixture, disconnecting the wiring, and removing the housing. Each step requires caution and care to ensure a smooth transition.Accessing The Fixture
Turn off the power at the circuit breaker. Double-check by flipping the light switch. Use a ladder to safely reach the ceiling fixture. Remove the trim by gently pulling it down. You may need a screwdriver for some trims. Next, unscrew the bulb. This will expose the recessed light housing.Disconnecting Wiring
Locate the junction box inside the housing. Open the box to access the wiring. Identify the wires connected to the fixture. Usually, there are three: black, white, and a ground wire. Carefully untwist the wire connectors. Separate the wires from the fixture. Ensure no wires touch each other or any metal parts.Taking Out The Housing
Remove any screws holding the housing in place. Some housings have clips instead of screws. Gently push the clips inward to release. Carefully pull the housing down from the ceiling. Check for any remaining parts attached. Ensure the ceiling hole is clear for the new pendant light installation.
Credit: www.xhlux.com
Installing The Pendant Light Mount
Installing the pendant light mount is a key part of replacing recessed lighting. The mounting must be secure to hold the new fixture safely. Proper wiring ensures the pendant light functions correctly. Follow these steps carefully to install the mount with confidence.
Checking Ceiling Support
Start by examining the ceiling where the pendant light will hang. The ceiling must support the weight of the new fixture. Look for a ceiling joist or a sturdy beam near the electrical box.
If the support is weak, add a brace or a mounting box designed for heavy fixtures. This step prevents damage and keeps the light stable.
Attaching The Mounting Bracket
Find the mounting bracket that comes with your pendant light. Align it with the electrical box in the ceiling. Use screws to attach the bracket firmly to the box or support brace.
Ensure the bracket is level and tight. A loose bracket can cause the light to hang unevenly or fall.
Running The Wiring
Turn off power to the lighting circuit at the breaker box. Pull the electrical wires through the center hole of the mounting bracket. Strip the wire ends about half an inch.
Connect the wires from the pendant light to the ceiling wires. Match colors: black to black, white to white, and green or copper to ground. Use wire nuts to secure the connections.
Tuck the wires neatly into the electrical box. This keeps everything safe and ready for the final fixture installation.
Wiring The Pendant Light
Wiring your pendant light correctly is crucial to ensure both safety and functionality. This part of the process requires careful attention to detail and a clear understanding of electrical connections. Let’s break down how to wire your new pendant light step-by-step.
Matching Wire Connections
Start by identifying the wires in your ceiling and the pendant light. Typically, you will find a black (hot), white (neutral), and a green or bare copper (ground) wire. Your goal is to connect wires of the same color together.
Use wire nuts to securely twist the corresponding wires: black to black, white to white, and green or copper to the ground wire. If the colors differ, check the manufacturer’s instructions or use a voltage tester to confirm wire functions. Are you double-checking every connection before moving on? That extra caution prevents future headaches.
Securing Wires Safely
Once wires are matched, make sure they are tightly twisted and capped with wire nuts. Tug gently on each wire to confirm it’s firmly connected. Loose wires can cause flickering lights or worse, electrical shorts.
After securing the wire nuts, push the wires neatly into the electrical box. Avoid cramming wires in; space is limited but important for heat dissipation. Use electrical tape to wrap the wire nuts for an added layer of safety, especially if the connections feel loose.
Testing The Connection
Before finalizing the installation, turn the power back on at the circuit breaker. Use the wall switch to test if the pendant light turns on and off properly. If it doesn’t, turn off the power immediately and recheck all connections.
Consider using a voltage tester or a multimeter to verify current flow through the wires. Testing ensures you won’t have to redo the work later and confirms your safety. Have you thought about how a simple test can save you time and money?
Credit: www.amazon.com
Securing And Adjusting The Pendant
Securing and adjusting your new pendant light is crucial for both safety and style. This step ensures your fixture hangs correctly and enhances your room’s ambiance. Taking the time to properly secure and adjust will save you from future headaches like uneven lighting or a loose fixture.
Attaching The Pendant To The Mount
First, align the pendant’s mounting bracket with the ceiling box. Make sure the wires are threaded through the center hole of the bracket before attaching it. Use the screws provided to fasten the bracket firmly to the ceiling box, ensuring it doesn’t wobble.
Never rush this part—if the bracket isn’t tight, your pendant could sway or even fall. I once skipped double-checking this, and my new light swung every time the door closed. Avoid that by tightening these screws securely.
Adjusting Height And Position
Next, adjust the length of the pendant cord or chain to your desired height. Consider the room’s size and furniture below—too low can block views, too high might not provide enough light. A good rule is to hang the pendant about 30-36 inches above a table or countertop.
If your pendant has an adjustable swivel or joint, use it to center the light over the intended spot. Does the light fall exactly where you need it? If not, make small shifts until it feels right.
Final Tightening
After adjusting, go back and tighten all screws and fasteners one last time. This includes the canopy screws that hold the fixture flush against the ceiling. Loose connections here can cause the fixture to tilt or become unstable over time.
Give the pendant a gentle shake to test its stability. If it moves, tighten again. You want your light secure enough to last without needing frequent adjustments.
Safety Checks And Power On
Before you restore power to your new pendant light, performing safety checks is essential. Ensuring everything is installed correctly can prevent electrical hazards and protect your home. This stage might feel a bit nerve-wracking, but careful inspection keeps you safe and your lighting project successful.
Inspecting Installation
Double-check all wire connections are secure and properly insulated. Loose or exposed wires can cause shorts or shocks. Use a voltage tester to confirm no current is flowing before touching any wiring.
Look at the mounting hardware to verify the pendant light is firmly attached to the ceiling. A wobbly fixture isn’t just annoying; it can fall and cause damage or injury. Tighten all screws and brackets to keep the light steady.
Restoring Power
Switch the circuit breaker back on carefully. If you’re unsure which breaker controls the light, label it for future convenience. Avoid flipping multiple breakers at once to isolate the correct one.
Once the power is restored, step back and be ready to turn on the light switch. This moment is critical—be alert for any signs of electrical issues like sparks, buzzing, or flickering.
Testing The Light
Turn on your pendant light and observe its operation closely. Does it light up smoothly without flickering? If the bulb doesn’t illuminate, double-check the bulb and wiring connections.
Also, listen for unusual sounds or smells that could indicate a problem. If everything looks and sounds normal, you’ve successfully completed the replacement. If not, don’t hesitate to consult a professional—your safety comes first.

Credit: www.amazon.com
Troubleshooting Common Issues
Replacing recessed lights with pendant lights can brighten any room. Sometimes, small problems occur during installation. Troubleshooting helps fix these common issues quickly. It saves time and keeps your new lighting safe and functional.
Light Flickering
Flickering lights often mean a poor connection. Check if the bulb is tightly screwed in. Use bulbs that match the fixture’s recommended wattage. Loose or incompatible bulbs cause flicker. Also, inspect the dimmer switch. Some dimmers don’t work well with certain LED pendant lights. Replace the dimmer if needed for smooth lighting.
Loose Fixtures
Loose pendant lights swing or hang unevenly. Ensure the mounting bracket is secure in the ceiling box. Tighten all screws holding the fixture. Use a level to check if the pendant hangs straight. If the ceiling box is old or damaged, replace it. A sturdy base keeps your pendant light stable and safe.
Wiring Problems
Wiring issues can cause no light or sparks. Always turn off power before checking wires. Match wire colors correctly: black to black, white to white, and green or bare copper to ground. Use wire nuts to connect wires firmly. If wires look damaged or frayed, replace them. Consult an electrician if unsure about wiring safety.
Tips For Stylish Pendant Lighting
Pendant lighting can transform any room’s look instantly. Choosing the right pendant light involves more than picking a style. Size, decor harmony, and light control all play key roles in creating a chic space.
Choosing The Right Size
The size of your pendant light must fit the room and its purpose. A large pendant can overpower a small room. Small pendants may look lost in big spaces. Measure the area before buying. Consider hanging height too. Pendants over kitchen islands or dining tables should hang 28 to 34 inches above the surface.
Coordinating With Room Decor
Your pendant should match your room’s style and colors. For modern rooms, pick sleek designs and neutral tones. Traditional rooms suit classic shapes and warm finishes. Use materials that blend with furniture, like wood or metal. Balance the pendant with other fixtures and accessories. This keeps the look unified and pleasing.
Using Dimmers
Dimmers add flexibility to your lighting. They help set the mood by adjusting brightness. Soft light creates a cozy feel. Bright light improves visibility for tasks. Installing a dimmer switch is simple and cost-effective. It also saves energy and extends bulb life.
Frequently Asked Questions
How Do I Remove A Recessed Light Fixture Safely?
Turn off the power at the circuit breaker first. Unscrew the recessed light trim and bulb. Disconnect wiring carefully and remove the housing from the ceiling.
Can I Use The Existing Wiring For Pendant Lights?
Yes, existing wiring can usually support pendant lights. Ensure the wiring is in good condition and compatible with the pendant’s electrical requirements.
What Tools Are Needed To Install Pendant Lights?
You will need a screwdriver, wire stripper, voltage tester, pliers, and a ladder. These tools help safely remove old fixtures and install new pendant lights.
Do I Need An Electrician To Replace Recessed With Pendant Lights?
Not always. If you’re comfortable with electrical work, you can do it yourself. Otherwise, hiring a licensed electrician ensures safety and code compliance.
Conclusion
Replacing a recessed light with a pendant light can brighten your space beautifully. Choose the right pendant to match your room’s style and size. Turn off power before starting to keep safe. Follow simple steps carefully for a smooth change.
This upgrade adds charm and new light to your home. Enjoy the fresh look and warm glow it brings. Small efforts bring big changes. Try it yourself and see the difference!


