
Are you ready to transform your space with a stylish pendant light fixture but don’t know where to start? Installing a pendant light might seem tricky, but with the right steps, you can do it yourself and save money.
Imagine the warm glow and modern look that a new light can bring to your room. In this guide, you’ll find simple, clear instructions that make the process easy and stress-free. By the end, you’ll feel confident and proud of the new ambiance you’ve created.
Keep reading—you’re just a few steps away from lighting up your home in style!
Tools And Materials Needed
Before you start installing your pendant light fixture, gathering the right tools and materials is crucial. Having everything ready saves time and helps you avoid frustrating trips back to the hardware store. Plus, using the correct tools makes the job safer and the installation smoother.
Essential Tools For Installation
- Screwdriver Set:Both flathead and Phillips screwdrivers are necessary to handle various screws on the fixture and electrical box.
- Wire Strippers:These help you strip the insulation off the wires cleanly without damaging the metal inside.
- Voltage Tester:Always test the wires before touching them to ensure the power is off and avoid shocks.
- Drill:A cordless drill speeds up mounting the fixture bracket to the ceiling, especially if you need to make new holes.
- Measuring Tape:You’ll need this to set the right height for your pendant light, especially over dining tables or kitchen islands.
- Wire Nuts:These secure the wire connections safely and keep them insulated.
- Ladder or Step Stool:Choose a stable one that fits your ceiling height comfortably.
Materials To Have On Hand
- Pendant Light Fixture:Double-check the parts included in your package to avoid missing pieces during installation.
- Electrical Box:This should be securely mounted in your ceiling and rated to support the weight of the pendant.
- Mounting Bracket:Usually comes with your fixture and attaches the light to the electrical box.
- Electrical Tape:Useful for extra safety around wire connections.
- Light Bulbs:Know the correct wattage and type recommended for your fixture to avoid overheating.
Why Preparation Matters More Than You Think
Have you ever started a project only to realize halfway through that you lack a key tool? That’s exactly what I experienced the first time I installed a pendant light. It was a simple thing like the wrong size screwdriver that slowed me down.
Making a checklist of tools and materials before you begin helps you stay focused. It also reduces stress and makes your work feel more professional. What small tool could you forget that might cause the biggest delay in your setup?
Choosing The Right Pendant Light
Choosing the right pendant light is more than just picking a pretty fixture. It sets the mood, defines the space, and can even impact how functional your lighting is. Before you grab the first pendant you like, consider a few key factors to ensure your choice fits perfectly with your room and needs.
Selecting The Style
Your pendant light should match your room’s vibe. Are you drawn to sleek, modern designs or something more rustic and vintage? Think about the existing decor and how the pendant will blend or stand out.
For example, a minimalist kitchen benefits from simple, geometric shapes, while a cozy reading nook might look great with a warm, woven fixture. What style speaks to you and complements your space?
Considering Size And Scale
Size matters when it comes to pendant lights. A fixture that’s too large can overwhelm a small room, while one that’s too small might get lost in a bigger space.
Measure your ceiling height and the area where the pendant will hang. Aim for a pendant that is proportional—usually, a diameter of 12-20 inches works well over dining tables, but adjust based on your room’s size.
Have you thought about how many pendants you might need? Sometimes multiple smaller lights work better than one big one.
Checking Electrical Compatibility
Not all pendant lights fit every electrical setup. Check the voltage requirements and the type of bulb socket your wiring supports. This saves you from buying a beautiful fixture that won’t work without extra rewiring.
Also, consider if you want dimmable lights or smart bulbs. Your electrical system needs to support those features for full functionality.
Are you comfortable with basic electrical checks, or will you call a professional to verify compatibility? Ensuring this upfront can prevent headaches later on.
Turning Off Power Safely
Switch off the power at the circuit breaker before starting any electrical work. Confirm the power is off by testing the light switch or fixture with a voltage tester. Safety first to avoid electric shock during installation.
Turning off power safely is crucial when installing a pendant light fixture. It ensures your safety and prevents accidents. Follow these steps to ensure the power is off before starting your installation. Always prioritize safety.Locate The Circuit Breaker
Find the circuit breaker panel in your home. It is usually in the basement or a utility room. Open the panel door carefully.Identify The Correct Circuit
Look for the circuit controlling the room’s power. Often, breakers are labeled with room names. Confirm you have the right one.Switch Off The Circuit
Turn off the breaker by flipping the switch to the “off” position. Ensure it clicks into place.Test The Power
Use a voltage tester to confirm the power is off. Test the wires at the fixture location. No light or sound indicates a safe environment.Use A Circuit Lock
For added safety, use a circuit lock. It prevents accidental power restoration during your work. Attach the lock to the breaker switch.Inform Household Members
Tell others in the house about the power being off. It avoids confusion and keeps everyone safe. Ensure you follow these steps each time you install or repair any electrical fixture. Safety first.Removing The Old Fixture
Removing the old fixture is the first step in installing a new pendant light. Safety is key. Turn off the power at the circuit breaker before starting. Use a voltage tester to confirm no electricity flows to the fixture. This prevents shocks and accidents.
Focus on careful handling of wires and fixture parts. This helps avoid damage and keeps everything organized for the new installation.
Detaching The Fixture
Start by removing any bulbs or glass covers. Unscrew the fixture’s mounting screws or nuts. Hold the fixture firmly while detaching to prevent it from falling. Gently lower the fixture to access the wiring behind it.
Disconnecting Wiring
Identify the wire connections: usually black (hot), white (neutral), and green or bare (ground). Unscrew the wire nuts by turning them counterclockwise. Separate the wires carefully without pulling or damaging them. Use electrical tape to wrap exposed wire ends for safety. Set the old fixture aside once all wires are disconnected.
Preparing The Mounting Area
Preparing the mounting area is a crucial step before installing your pendant light fixture. This ensures the fixture is safely supported and functions properly. Taking the time to check and reinforce the electrical box can save you from future headaches and potential hazards.
Inspecting The Electrical Box
Start by turning off the power at the circuit breaker to avoid any risk of electric shock. Remove the existing fixture or cover plate to expose the electrical box. Look for signs of damage, rust, or looseness that could compromise the stability of the new pendant light.
Is the box securely fastened to the ceiling joist or support beam? If it wiggles or feels weak, it won’t safely hold your fixture’s weight. Also, check if the box is rated to support the weight of your pendant light—some decorative fixtures can be surprisingly heavy.
Installing Support Brackets If Needed
If your electrical box isn’t sturdy enough, you’ll need to add support brackets. These brackets attach between the ceiling joists and provide a firm base for the box. This step is especially important for heavier pendant lights or those with long hanging chains or rods.
Choose a support bracket designed for your ceiling type and electrical box size. Securely screw the bracket into place, making sure it’s level and stable. This small extra effort can prevent your fixture from sagging or falling, protecting both your ceiling and your safety.

Credit: designingvibes.com
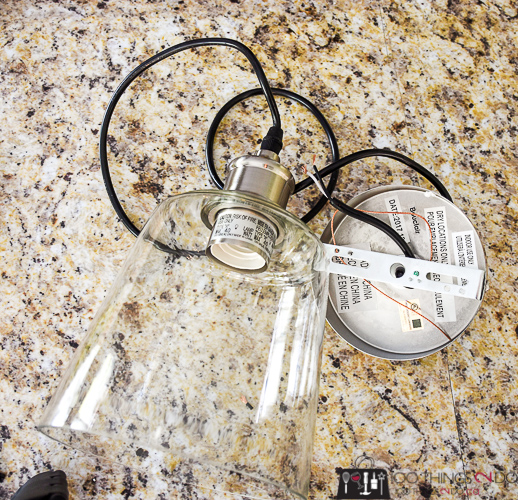
Wiring The Pendant Light
Wiring the pendant light is a crucial part of installation. It connects the light fixture to your home’s electrical system. Proper wiring ensures the light works safely and correctly. Take your time and follow these clear steps for a smooth process.
Matching Wire Colors
Identify the wires coming from the ceiling and the pendant light. Most homes use standard wire colors:
- Black (or red):Hot wire, carries electricity to the light.
- White:Neutral wire, completes the electrical circuit.
- Green or bare copper:Ground wire, prevents electrical shocks.
Match each wire from the pendant to the same color in the ceiling. This step is key for safety and function. Do not connect wires with different colors.
Securing Wire Connections
Twist wires firmly together using your fingers. Cover each connection with a wire nut. Choose the right size wire nut for a tight fit. Tug gently on wires to ensure they do not come loose.
Wrap electrical tape around the wire nuts for extra security. Tuck all wires neatly into the ceiling box. Avoid sharp bends or pinching wires under screws. Loose or exposed wires can cause hazards.
Mounting The Pendant Fixture
Mounting the pendant fixture is where your project starts to take shape. This step requires attention to detail and a steady hand to ensure your light hangs securely and looks great. If you’ve ever wrestled with awkward ceiling mounts, you know how important it is to get this right the first time.
Attaching The Fixture To The Ceiling
First, make sure the power is off at the breaker to avoid any shocks. Next, locate the electrical box in your ceiling and confirm it’s sturdy enough to support the weight of your pendant light.
Use the mounting bracket that comes with your fixture. Secure it tightly with screws, making sure it’s flush against the ceiling. Loose brackets can cause your fixture to wobble or fall, so don’t rush this step.
Once the bracket is in place, connect the fixture wires to the ceiling wires—typically black to black (live), white to white (neutral), and green or copper to the ground wire. Twist wire connectors firmly and tuck the wires neatly into the box.
Adjusting The Height
How low should your pendant hang? This depends on the room and your lighting needs. For example, above a kitchen island, the bottom of the pendant should be about 30 to 36 inches above the surface.
Most pendant lights come with adjustable cords or rods. To set the height, loosen the locking mechanism, slide the cord or rod to your desired length, then tighten it securely.
Take a step back and look at the fixture from different angles. Does it provide enough light? Is it at a comfortable height for the space? Small adjustments now can save you from awkward tweaks later.
Installing The Bulb And Shade
Installing the bulb and shade completes the pendant light setup. This step ensures your light fixture looks great and works perfectly. Handle each part with care to avoid damage and ensure safety.
Choosing The Right Bulb
Select a bulb that matches the fixture’s wattage limit. Use LED bulbs for energy savings and longer life. Consider the bulb shape and size to fit inside the shade.
Inserting The Bulb Safely
Turn off the power before touching the socket. Screw the bulb gently into the socket until secure. Avoid forcing the bulb to prevent breaking it.
Attaching The Shade
Place the shade over the bulb holder carefully. Align any screws or clips that hold the shade. Tighten screws by hand to avoid cracking the shade.
Final Checks
- Ensure the bulb is stable and does not wobble.
- Make sure the shade is firmly attached and level.
- Turn the power on and test the light.
Testing The Light
Testing the light fixture is a key step after installation. It ensures the pendant light works correctly and safely. This process helps identify wiring issues or faulty bulbs early. Proper testing saves time and prevents accidents.
Turn On The Power
Restore power at the circuit breaker or fuse box. Use the light switch to turn on the pendant fixture. Watch for any flickering or dimming. These signs may indicate wiring problems or loose connections.
Check The Bulb
Confirm the bulb is the right type and wattage for the fixture. A wrong bulb can cause poor lighting or damage the fixture. Replace the bulb if it does not light up or flickers.
Inspect The Fixture
Look closely at the pendant fixture for unusual sounds or smells. Buzzing or burning smells mean a wiring issue. Turn off the power immediately if you notice these signs.
Test The Switch
Flip the light switch several times to ensure it works smoothly. A faulty switch can cause intermittent lighting. Replace the switch if it feels loose or doesn’t respond.
Use A Voltage Tester
Use a voltage tester to check electrical connections inside the fixture. This tool confirms power flows safely to the light. No voltage means a wiring or power supply problem.

Credit: 100things2do.ca
Safety Tips And Troubleshooting
Turn off the power before starting to avoid electric shock. Check all wires and connections carefully if the light doesn’t work. Use a sturdy ladder and secure the fixture firmly to prevent accidents.
Installing a pendant light fixture can transform a room, adding both style and functionality. However, the process requires careful attention to safety and the ability to troubleshoot common issues. Whether you’re a seasoned DIY enthusiast or a first-timer, these safety tips and troubleshooting insights will guide you through a smooth and secure installation.Common Installation Issues
It’s not uncommon to face a few hurdles when installing pendant lights. A frequent issue is incorrect wiring, which can lead to the light not turning on. Always double-check the wiring connections, ensuring that wires are connected to their matching colors. Another common problem is the fixture hanging unevenly. This often results from improper mounting of the ceiling bracket. Make sure the bracket is secured tightly and level before attaching the fixture. If the light flickers or dims unexpectedly, it may be due to a faulty bulb or loose connection. Replace the bulb first to see if this resolves the issue. If not, inspect all connections for tightness.When To Call A Professional
Sometimes DIY efforts hit a roadblock that requires professional intervention. If you encounter persistent electrical issues like circuit breaker trips, it’s wise to call an electrician. This could indicate a deeper issue with your home’s wiring. Feeling unsure about the structural integrity of your ceiling? A professional can assess and ensure your light fixture is safely supported. This is especially important for heavy or large pendant lights. Uncertain about local electrical codes and regulations? An electrician can ensure compliance, avoiding potential hazards or future complications. Always prioritize safety over cost savings when in doubt. Remember, while DIY can be rewarding, your safety and peace of mind are priceless. Would you rather struggle with uncertainty or enjoy your new lighting with confidence?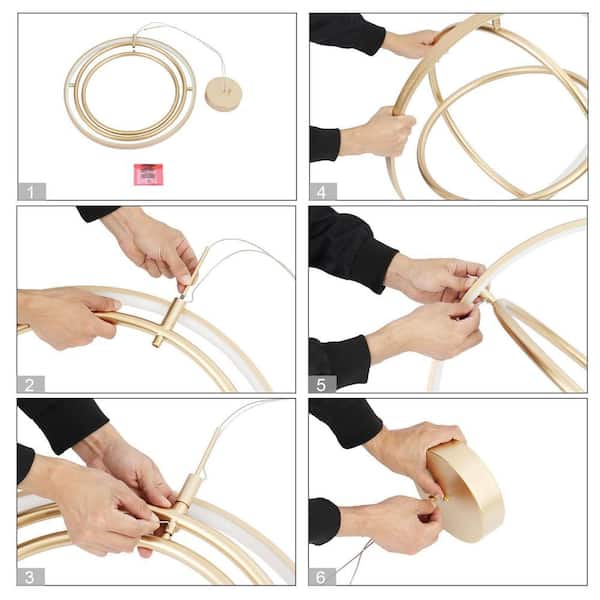
Credit: www.homedepot.com
Frequently Asked Questions
How Do I Prepare To Install A Pendant Light Fixture?
First, turn off power at the circuit breaker. Gather tools like a screwdriver and wire stripper. Read the fixture’s instructions carefully. Ensure the electrical box supports the pendant’s weight. Measure the desired hanging height before installation.
What Tools Are Needed For Pendant Light Installation?
You need a screwdriver, wire stripper, voltage tester, and pliers. A ladder and electrical tape are also helpful. These tools ensure safe and efficient installation of your pendant light fixture.
How High Should I Hang A Pendant Light?
Hang pendant lights 28 to 34 inches above tabletops. For open areas, 7 feet from the floor is ideal. Adjust height based on ceiling height and room function.
Can I Install A Pendant Light Myself Safely?
Yes, if you follow safety steps and have basic electrical knowledge. Always turn off power and test wires before working. Consult a professional if unsure about wiring or mounting.
Conclusion
Installing a pendant light fixture can brighten your room nicely. Take your time and follow each step carefully. Always turn off the power before starting work. Use the right tools to make the job easier. Double-check all connections to stay safe.
Enjoy the new look and feel of your space. Now, your room has a stylish light that fits well. Simple changes like this can improve any home quickly. Keep these tips handy for future lighting projects.


