
Are you tired of the plain look your recessed lights give your room? Imagine transforming those simple ceiling fixtures into stylish pendant lights that add personality and warmth to your space.
Changing a recessed light to a pendant isn’t as hard as you might think, and you can do it yourself with a few easy steps. You’ll discover exactly how to make this upgrade safely and effectively, giving your home a fresh, modern touch.
Keep reading, and you’ll be surprised how simple it is to brighten your space with a beautiful pendant light.

Credit: www.create-enjoy.com
Tools And Materials Needed
Before you start converting a recessed light to a pendant, gathering the right tools and materials is crucial. Having everything at hand not only speeds up the process but also ensures safety and a professional finish. Let’s break down what you’ll need to complete this transformation smoothly.
Essential Tools
- Voltage Tester:Always check if the power is off to avoid any electrical hazards.
- Screwdrivers:Both flat-head and Phillips screwdrivers are necessary for removing and installing fixtures.
- Wire Strippers:These help you safely strip the insulation from wires without damaging them.
- Drill:Sometimes you’ll need to make new holes or secure brackets for the pendant light.
- Measuring Tape:Accurate measurements ensure your pendant hangs at the perfect height.
- Wire Nuts:To safely connect wires together during installation.
Selecting The Right Pendant Light
Choosing the right pendant light is more than just picking a design you like. Consider the size of your room and the ceiling height. You don’t want a pendant that overwhelms the space or hangs too low.
Think about the style and color to match your existing décor. Also, check the wattage requirements and whether the pendant supports dimmable bulbs if that’s important to you. Have you thought about the light’s function—ambient, task, or accent lighting? This affects the type and brightness of the bulb you pick.
Additional Materials
- Ceiling Canopy:Needed to cover the electrical box and give a clean finish.
- Mounting Bracket:Supports the pendant light securely from the ceiling.
- Extension Cord or Wire:Sometimes the pendant needs a longer wire than the existing recessed light provides.
- Electrical Tape:Adds an extra layer of safety to wire connections.
- Light Bulbs:Choose bulbs that fit your pendant’s socket and desired lighting effect.
Have you double-checked that all your materials are compatible? Missing even one small part can stall your project. Getting this step right means your pendant light will look great and work safely for years to come.
Safety Precautions
Converting a recessed light to a pendant fixture is a satisfying upgrade, but safety must be your top priority throughout the process. Handling electrical components without caution can lead to serious injuries or damage. Let’s focus on key safety steps that protect you and your home.
Power Shutoff
Always turn off the power at the circuit breaker before touching any wiring or fixtures. Don’t rely on just switching off the light switch; power can still run through the wires. Label the breaker if needed, so no one accidentally turns it back on while you work.
Using A Voltage Tester
Before you start disconnecting wires, use a voltage tester to confirm that the power is completely off. This simple tool can detect live electricity and gives you peace of mind. If the tester shows any voltage, double-check your breaker or consult an electrician.
Working With Electrical Wiring
Be gentle and precise when handling wires. Strip insulation carefully and avoid nicking the copper wire, which weakens the connection. Use wire nuts or connectors designed for your wire gauge to secure connections firmly.
If you feel unsure about any step, it’s better to pause and seek professional help. Electrical mistakes aren’t just inconvenient—they can be dangerous. Your safety and a solid installation depend on careful wiring work.
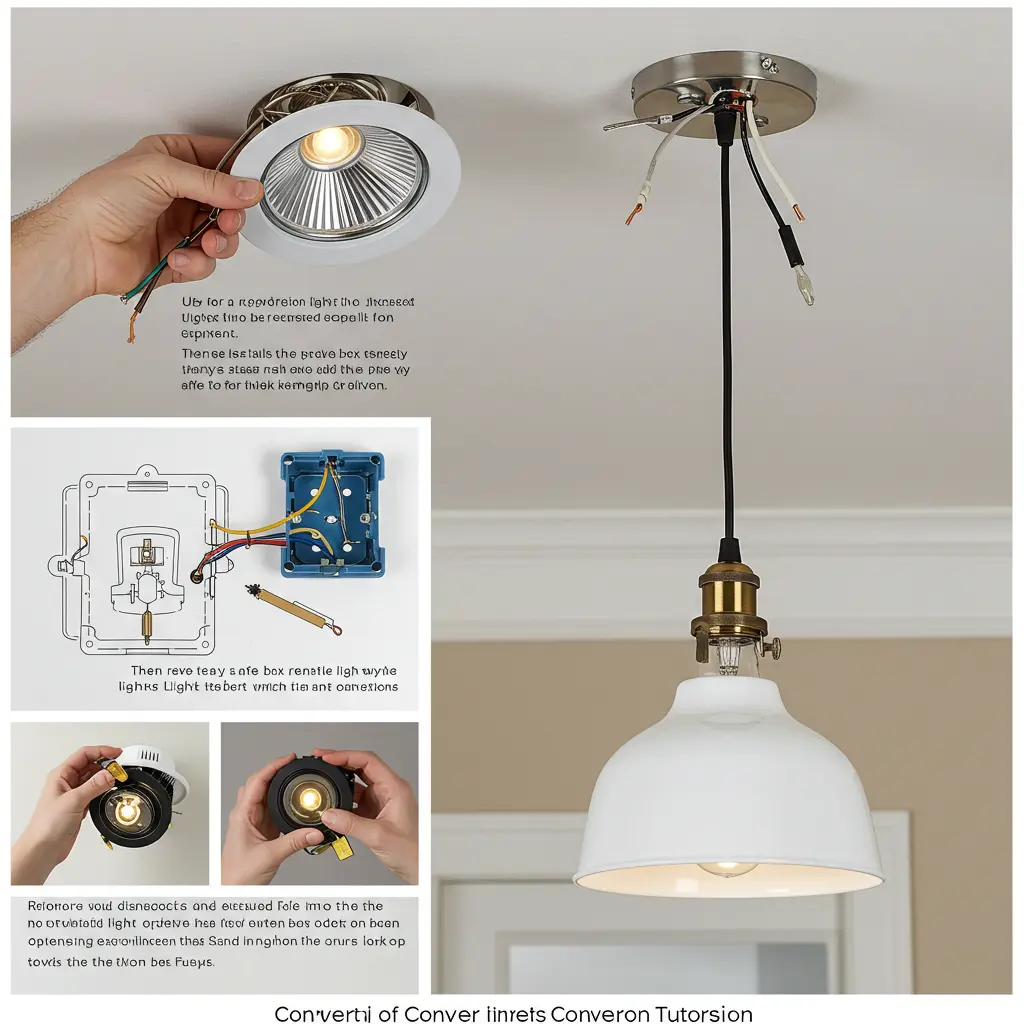
Removing The Recessed Light
Removing a recessed light requires carefully cutting the drywall and disconnecting the wiring. This step prepares the ceiling for installing a pendant light fixture. Safety is key—turn off power before starting any electrical work.
Upgrading your lighting from a recessed light to a pendant can transform the ambiance of your space. However, the first step in this journey is the removal of the existing recessed light. This process, while straightforward, requires a bit of patience and attention to detail. Let’s walk through the steps to ensure you do this safely and efficiently.Accessing The Fixture
Begin by ensuring the power to the recessed light is turned off. This is crucial for your safety. You can confirm the power is off by flipping the wall switch and checking if the light turns on. Next, grab a sturdy ladder to reach the ceiling comfortably. Remove any trim or cover from the recessed light to expose the inner workings. Most trims can be gently pried off with a flathead screwdriver.Detaching The Light Housing
Once you have access, examine how the light housing is secured. Typically, it’s held in place with clips or screws. Use a screwdriver to carefully detach these components. As you do this, support the light housing with one hand to prevent it from falling. Once free, gently lower the housing to expose the wiring.Disconnecting Wiring
With the housing lowered, you’ll see the wiring connections. These are usually secured with wire nuts. Carefully unscrew the wire nuts to disconnect the light from the power source. Remember, handling the wires gently is key to avoiding damage. After disconnection, ensure that the wires are safely tucked back into the ceiling, ready for your new pendant installation. Removing a recessed light is more than just a task—it’s the first step in redefining your space. Are you excited about the change it will bring?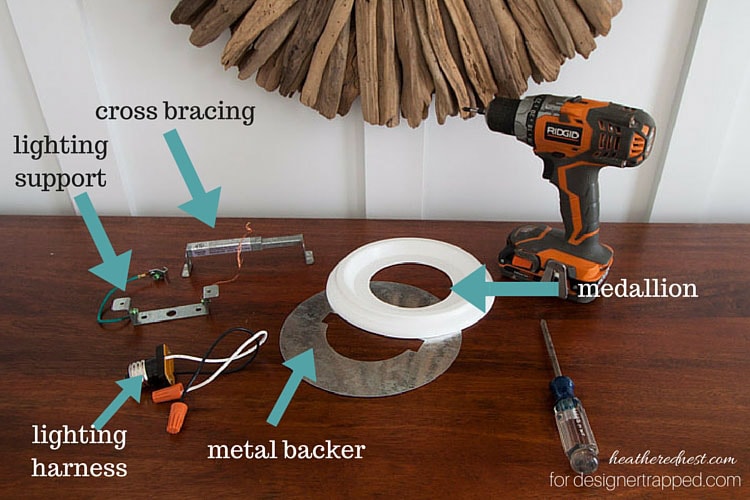
Credit: designertrapped.com
Preparing The Ceiling
Preparing the ceiling is a crucial step when converting a recessed light to a pendant. It ensures your new fixture is safely supported and looks professionally installed. Taking the time to properly prepare can save you headaches and extra costs down the road.
Assessing Ceiling Support
Start by checking the ceiling area where the pendant will hang. Is there a joist or beam nearby that can hold the weight? Pendants, especially larger ones, need solid support to avoid sagging or damage.
If you’re unsure about the support, gently tap or press the ceiling to feel if it’s sturdy. A weak or hollow spot might mean extra reinforcement is necessary. Have you noticed any cracks or sagging near your current recessed light? That’s a warning sign to take action.
Installing A Junction Box
Next, you’ll need to install a junction box if one isn’t already in place. This box safely houses the wiring connections and supports the pendant fixture. Using a remodel or old-work box works well for ceilings without access from above.
Make sure the junction box is rated to hold the weight of your pendant. Secure it firmly to the ceiling joist or use a brace bar designed for ceiling boxes. Loose wiring or boxes can cause serious hazards and lead to fixture failure.
Reinforcing Ceiling If Needed
If your ceiling lacks proper support, reinforcement is necessary before hanging the pendant. Adding a wooden brace between joists provides a strong anchor point. You can also use metal support bars made for lighting fixtures.
Don’t skip this step just because it seems like extra work. A well-reinforced ceiling prevents future damage and keeps your pendant stable. Have you experienced a loose light fixture before? Strengthening the ceiling is the fix you need.
Wiring The Pendant Light
Wiring the pendant light is a critical step in converting your recessed light fixture. It requires careful attention to detail to ensure safety and proper functionality. Handling electrical connections may seem daunting, but with the right approach, you can achieve a professional result that lasts.
Matching Wire Connections
Start by identifying the wires from your ceiling and the pendant light. Usually, you’ll find a black (hot), white (neutral), and green or bare copper (ground) wire. Match each wire from the pendant to the corresponding wire in the ceiling.
Sometimes, colors may vary slightly, especially in older homes. If you’re unsure, use a voltage tester to confirm which wire is live. Never guess—incorrect wiring can cause shorts or hazards.
Securing Wire Nuts
Once wires are matched, twist them together tightly and cover the connection with a wire nut. Choose a wire nut size that fits snugly without leaving exposed wire ends. A loose connection can cause flickering lights or worse, electrical fires.
After securing the wire nuts, give each connection a gentle tug to ensure they won’t come apart. Adding a bit of electrical tape around the wire nut can provide extra security and peace of mind.
Testing The Electrical Connection
Before finalizing the installation, turn the power back on and test the pendant light. Use the wall switch to check if the light turns on and off without issues. If the light flickers or doesn’t work, recheck your wire connections carefully.
Always use a voltage tester on the fixture to confirm power flow before touching wires. Have you ever found a faulty wire after powering up? Testing early saves you from unexpected repairs later.
Mounting The Pendant Fixture
Mounting the pendant fixture is where your project starts to take shape. This step transforms the empty recessed light spot into a stylish pendant centerpiece. Getting this right ensures your pendant hangs securely and looks exactly how you want.
Attaching The Mounting Bracket
First, locate the existing recessed light’s junction box. This box will support the mounting bracket that holds your pendant fixture. Secure the bracket using screws that fit tightly into the box’s pre-drilled holes.
Make sure the bracket is level and firmly attached to avoid any wobbling. If the junction box isn’t sturdy, consider reinforcing it before proceeding. Have you checked if your bracket matches the weight of your pendant? Using the wrong bracket can lead to accidents.
Hanging The Pendant
Once the bracket is firmly in place, it’s time to hang the pendant. Most pendants come with a canopy that covers the junction box and bracket, giving a clean look. Feed the pendant’s wiring through the canopy and connect the wires to the house wiring inside the box.
Double-check your electrical connections for safety—loose wires are a common issue that can cause flickering or worse. After connecting, secure the canopy to the mounting bracket with the provided screws. Does your pendant feel stable when you gently tug it? Stability here is key.
Adjusting Height And Position
Now, focus on the pendant’s height. Many fixtures allow you to slide the cord or chain to your desired length before tightening the lock. Choose a height that complements your room’s size and function—too low can be distracting, too high might lose its visual impact.
Don’t forget to center the pendant over tables or key areas for balanced lighting. Adjusting its position slightly can dramatically change the room’s mood. How does the light fall on your surfaces—are you achieving the ambiance you wanted?
Finishing Touches
After you’ve mounted your pendant light and secured all wiring, the final details make a big difference. These finishing touches ensure your new fixture looks polished and works perfectly. Skipping them can leave your project feeling incomplete or even unsafe.
Installing Bulbs
Choose bulbs that match the pendant’s style and the room’s lighting needs. LED bulbs are energy-efficient and come in various brightness levels and color temperatures. Screw the bulbs in gently to avoid damaging the fixture or the bulb itself.
Have you considered smart bulbs? They can add convenience by letting you adjust brightness or color from your phone. This small upgrade can transform how you use your new pendant light.
Checking Light Operation
Once the bulbs are in place, turn the power back on and test the light switch. Make sure the fixture lights up without flickering or buzzing sounds. If you notice any issues, double-check your wiring connections—loose wires are often the culprit.
Safety matters here. If you’re unsure about electrical components, it’s better to call a professional than risk a faulty installation. Does your light dim smoothly if your switch supports it? Testing now saves headaches later.
Cleaning Up The Workspace
After confirming the light works, tidy up the area. Remove tools, clear debris, and wipe down surfaces to remove dust or fingerprints on the fixture. A clean space helps you appreciate your handiwork and prevents accidents from leftover materials.
Think about where to safely store leftover parts or hardware—you might need them for future adjustments. How does your room feel with the new pendant light? Taking a moment to enjoy the change can motivate your next DIY project.

Credit: hellofromliz.com
Troubleshooting Common Issues
Troubleshooting common issues when converting a recessed light to a pendant can save you time and frustration. Problems like the light not turning on, flickering, or loose fixtures often have simple solutions. Understanding these issues helps you fix them quickly and enjoy your new lighting setup without hassle.
Light Not Turning On
If your pendant light doesn’t turn on, the first thing to check is the power source. Ensure the circuit breaker is on and the switch is functioning properly. Sometimes, the bulb might be the issue—try replacing it with a new one to rule that out.
Double-check the wiring connections inside the ceiling box. Loose or incorrect wiring can prevent the light from working. If you’re unsure about the wiring, it’s safer to consult an electrician rather than guessing.
Flickering Or Dim Light
Flickering or dim light is often caused by a loose bulb or a poor connection. Start by tightening the bulb securely in the socket. If flickering continues, examine the wiring connections for any signs of wear or looseness.
Another common cause is incompatible dimmer switches. Are you using a dimmer designed for LED or the bulb type installed? Using the wrong dimmer can cause flickering or dimming issues.
Loose Fixture Problems
A loose pendant fixture can be annoying and unsafe. Check the mounting bracket and screws to ensure they are tight and secure. Sometimes, the original recessed housing may not support the weight of the new pendant, requiring additional support.
Have you noticed any wobbling when you gently shake the fixture? If yes, adding a mounting plate or using stronger anchors can stabilize it. A well-secured fixture not only looks better but also lasts longer without causing wiring stress.
Frequently Asked Questions
Can I Convert Any Recessed Light To A Pendant?
Yes, most recessed lights can be converted to pendant lights. However, compatibility depends on the existing wiring and ceiling type. Always check electrical connections and support structure before starting the conversion.
What Tools Do I Need To Convert Recessed Lights?
You will need a screwdriver, wire stripper, voltage tester, pendant light kit, and possibly a ladder. These tools help ensure a safe and proper installation of your new pendant light.
Is It Safe To Convert Recessed Lights Myself?
Yes, if you have basic electrical knowledge and follow safety guidelines. Turn off power, use a voltage tester, and follow installation instructions carefully. Consider hiring a professional if unsure.
How Long Does It Take To Convert Recessed Lights?
Converting a recessed light to a pendant usually takes 1 to 2 hours. Time varies based on your experience and ceiling type. Preparation and safety checks may add extra time.
Conclusion
Converting a recessed light to a pendant can change your room’s look. It adds style and brings light closer to you. The process is simple with the right tools and steps. Always turn off power before starting to stay safe.
Take your time and follow instructions carefully. Soon, you will enjoy a fresh and modern lighting feel. Give your space a small update that makes a big difference.


