

Are you ready to transform your space with a stylish pendant light but unsure where to start? Hanging a pendant light from the ceiling might seem tricky, but with the right steps, you can do it yourself and add a touch of elegance to your room.
Imagine the warm glow filling your space, creating the perfect atmosphere for every moment. In this guide, you’ll find simple, clear instructions that make the process easy and safe. Keep reading to discover how you can brighten up your home with a pendant light hanging perfectly from your ceiling.
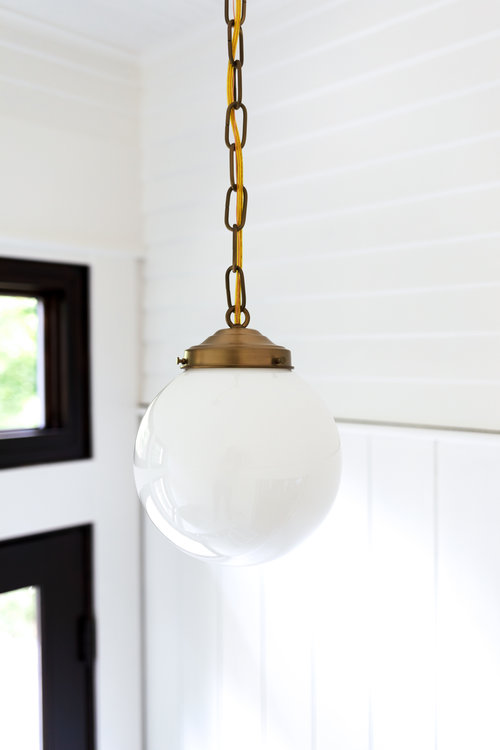
Credit: www.thegritandpolish.com
Choosing The Right Pendant Light
Choosing the right pendant light sets the tone for your entire room. It’s more than just picking a pretty fixture; it’s about matching your space’s personality, size, and electrical setup. Think about how the light will interact with your décor and daily activities before making a decision.
Selecting The Perfect Style
Ask yourself: what mood do you want your pendant light to create? A sleek, modern pendant might add a clean, minimalist vibe, while a vintage-style fixture can bring warmth and character. Don’t be afraid to mix styles—sometimes a bold, unexpected pendant becomes the room’s focal point.
Consider materials and finishes too. Glass, metal, wood, or fabric shades each offer different textures and visual interest. Reflect on your room’s existing elements and pick a pendant that complements or contrasts in a way that feels intentional.
Considering Size And Scale
Size matters when hanging a pendant light. Too small, and it’ll look lost; too large, and it can overwhelm your space. Measure your room’s dimensions and ceiling height to find a pendant that fits comfortably and balances the room.
Think about the pendant’s drop length as well. You don’t want it hanging so low that it bumps your head or blocks sightlines. A good rule is to keep it about 28-34 inches above tables or counters, but adjust based on your ceiling height and room use.
Checking Electrical Requirements
Before buying, check your ceiling’s electrical setup. Does it support the pendant’s wattage? Is there a junction box in place? You might need an electrician if wiring upgrades or new mounts are required.
Also, decide if you want a dimmable fixture. Installing a dimmer switch can dramatically change your room’s ambiance. Make sure the pendant light and your home’s wiring are compatible with dimmers to avoid surprises later.
.jpg)
Credit: www.jimselectrical.com.au
Gathering Necessary Tools And Materials
Gathering all necessary tools and materials is the first step in hanging a pendant light. Having everything ready makes the process smoother and safer. Prepare your workspace to avoid interruptions and delays. Knowing the right tools ensures you do the job correctly and efficiently.
List Of Essential Tools
- Voltage tester – to check electrical power
- Wire strippers – to remove insulation from wires
- Wire nuts – to connect wires securely
- Screwdrivers (flathead and Phillips) – for screws
- Drill with bits – to make holes if needed
- Measuring tape – to measure height and distance
- Level – to keep the light straight
- Ladder or step stool – to reach the ceiling safely
- Electrical tape – for extra wire security
Safety Gear To Use
- Insulated gloves – protect from electric shock
- Safety goggles – shield eyes from dust or debris
- Dust mask – avoid inhaling dust while drilling
- Non-slip shoes – prevent slipping while on a ladder
- Proper clothing – avoid loose sleeves near wires
Preparing The Installation Area
Clear the ceiling area and turn off the power at the circuit breaker. Check for a sturdy support beam to hold the pendant light securely. Gather all tools and materials before starting the installation.
Preparing the installation area is a crucial step when hanging a pendant light from the ceiling. It sets the foundation for a smooth and safe installation. Before you dive into the fun part of seeing your new light fixture brighten up your space, ensure everything is in place and ready for the task.Turning Off Power Supply
Safety first! Always turn off the power supply to the light fixture at your circuit breaker. This simple precaution can prevent dangerous electrical shocks. Double-check by flipping the light switch to ensure there’s no power flowing to your workspace.Removing Existing Fixtures
Once the power is confirmed off, carefully remove any existing light fixtures. Keep a screwdriver handy to detach screws or fasteners. Save any hardware you think might be useful for the new installation.Inspecting Ceiling Box
Take a close look at the ceiling box where the new pendant light will hang. Ensure it’s sturdy enough to support the weight of your new light. If it’s loose or appears damaged, consider replacing it or reinforcing it to prevent any future mishaps. Have you ever installed a pendant light before? What challenges did you face? Share your insights and help others avoid common pitfalls.Installing The Mounting Bracket
Installing the mounting bracket is a crucial step in hanging a pendant light. This small piece supports the entire fixture, so it must be attached firmly and aligned correctly. Taking the time to do this right will save you from wobbly lights or safety hazards later on.
Attaching Bracket Securely
Begin by turning off the power to the light fixture at the circuit breaker to avoid any accidents. Use a stud finder to locate a ceiling joist or solid support where the bracket will be mounted. If you can’t find a joist, use heavy-duty anchors designed for drywall.
Align the bracket’s screw holes with the joist or anchors, then use a drill or screwdriver to drive the screws in tightly. The bracket should not move or wiggle once secured. I learned this the hard way when a loose bracket caused my pendant to tilt after just a week.
Ensuring Proper Alignment
Check that the bracket sits flush against the ceiling—any gaps can throw off the pendant’s balance. Use a level to make sure the bracket is perfectly horizontal. Even a slight tilt can make your pendant look crooked and may stress the wiring over time.
Before tightening all screws completely, hold the pendant light’s canopy to the bracket to see how it fits. Adjust the bracket as needed so the fixture will hang straight and centered. This quick test helps avoid frustrating reinstallation later on.
Wiring The Pendant Light
Wiring your pendant light correctly is crucial for both safety and functionality. It might seem intimidating at first, but with the right approach, you can handle the connections confidently. Let’s break down the process to make sure your pendant light shines bright without any electrical hiccups.
Connecting Wires Safely
Start by turning off the power at the circuit breaker to avoid any shocks. Identify the wires: usually, you’ll find a black (hot), white (neutral), and green or bare copper (ground) wire. Match these wires from your pendant light to the corresponding wires in your ceiling box.
Twist the ends of the matching wires together firmly, ensuring no copper is exposed outside the connection. If you notice any frayed or damaged wires, trim and strip them back carefully for a clean connection. Remember, a secure connection isn’t just about holding wires together—it’s about preventing sparks and shorts.
Using Wire Nuts And Electrical Tape
Wire nuts are your best friends here. After twisting the wires together, screw on a wire nut tightly until it feels secure. Give a gentle tug to check that the wires don’t slip out. If you want extra security, wrap electrical tape around the base of the wire nut and the wires.
This extra step can prevent the wire nut from loosening over time, especially in fixtures that might get a bit of movement. Have you ever seen a light flicker because of a loose wire? This simple habit helps avoid that annoying issue. Taking these precautions ensures your pendant light stays safely connected and working perfectly.
Securing The Pendant Light
Securing your pendant light properly is crucial for both safety and aesthetics. Once you’ve chosen the right spot and wired the fixture, the next step is to make sure it’s firmly attached and correctly positioned. This part often determines how your light will look and function in the room.
Attaching Fixture To Bracket
Start by aligning the pendant light’s mounting plate with the ceiling bracket. Most fixtures come with screws that fit into the bracket’s holes—make sure these are tight but don’t overtighten to avoid damaging the fixture.
Check that the wires are neatly tucked inside the junction box before securing the fixture. This prevents any pinching or wear over time. A loose or improperly attached fixture can cause wobbling, which you definitely want to avoid.
Adjusting Height And Position
After securing the fixture, focus on the height. Many pendant lights come with adjustable cords or rods—loosen the locking mechanism to slide the fixture up or down.
Think about the room’s function and the space under the light. For example, over a dining table, you usually want the bottom of the pendant to hang about 30 to 36 inches above the surface. Too high or too low can throw off the balance and reduce lighting effectiveness.
Once you find the ideal height, tighten everything securely. Give the fixture a gentle nudge to check for stability. Have you ever noticed a pendant light that swings too much? That’s usually because it wasn’t secured properly.
Testing And Final Adjustments
Once your pendant light is securely hung, the next crucial phase is testing and making any final adjustments. This step ensures your new lighting not only works but enhances your space exactly how you imagined. Skipping this can leave you with unexpected issues or a less-than-perfect setup.
Restoring Power And Testing Light
Before you restore power, double-check that all wiring connections are tight and properly insulated. Turn the circuit breaker back on and switch on your pendant light.
Pay close attention to how the light illuminates your room. Is the brightness sufficient? Does the fixture hang at the right height and angle?
If the light flickers or doesn’t turn on, turn off the power immediately and revisit your wiring connections. Safety first—never try to fix electrical issues with the power on.
Troubleshooting Common Issues
It’s normal to face minor issues after installation. Here are some common problems and quick fixes:
- Light won’t turn on:Check the bulb compatibility and ensure the bulb is screwed in tightly. Verify the switch and circuit breaker are functioning properly.
- Flickering light:This often means a loose connection. Turn off power, tighten wire nuts, and secure the fixture’s mounting bracket.
- Pendant hangs unevenly:Adjust the chain or cord length on each side to balance the fixture. Sometimes shifting the canopy slightly can help.
- Excessive glare or dim light:Consider swapping the bulb for a different wattage or type, or add a dimmer switch for better control.
Have you checked the switch type you’re using? Some dimmers aren’t compatible with LED bulbs, which might cause flickering or dimming issues.
Testing and tweaking might take some patience, but the result is a pendant light that fits perfectly and brightens your space just the way you want.

Credit: 100things2do.ca
Maintenance Tips For Pendant Lights
Keeping your pendant lights in top shape not only preserves their look but also ensures they function safely and efficiently. Regular maintenance can extend the life of your fixture and keep your space feeling fresh and inviting. Let’s look at practical ways to care for your pendant lights that anyone can manage.
Cleaning And Care
Dust and grime can quickly dull the shine of your pendant lights. Use a soft, dry cloth or a feather duster to gently wipe the surface every couple of weeks. Avoid harsh chemicals; instead, a mild soap solution works well for tougher spots—just be sure to dry the fixture completely to prevent rust or damage.
If your pendant has glass or fabric shades, remove them carefully for a deeper clean. Wash glass shades with warm, soapy water, rinse, and dry thoroughly before reattaching. Fabric shades can often be vacuumed or spot-cleaned—check the manufacturer’s instructions to avoid mistakes.
Replacing Bulbs Safely
Changing a bulb in a pendant light might seem simple, but safety should come first. Always turn off the power at the switch or breaker before you begin. Using a sturdy ladder or step stool can help you reach the fixture without strain or risk.
Handle bulbs with a clean cloth or gloves to avoid oils from your skin, which can shorten bulb life. Make sure the new bulb matches the recommended wattage and type to prevent overheating or electrical issues. Have you ever noticed how much brighter a room feels after simply changing an old bulb? It’s an easy upgrade that makes a big difference.
Frequently Asked Questions
How Do I Prepare The Ceiling For A Pendant Light?
First, turn off the power at the circuit breaker. Remove any existing fixture and check wiring. Ensure the ceiling box is securely mounted and rated to support the pendant light’s weight before installation.
What Tools Are Needed To Hang A Pendant Light?
You’ll need a screwdriver, wire stripper, voltage tester, drill, ladder, and pliers. These tools help safely mount the fixture and connect electrical wiring properly.
How Do I Adjust The Height Of A Pendant Light?
Most pendant lights have adjustable cords or rods. Loosen the fixture’s locking mechanism, set the desired length, and then securely tighten it to fix the height.
Can I Install A Pendant Light Without An Electrician?
If you have basic electrical knowledge, you can install it safely by following instructions carefully. However, hiring a licensed electrician is recommended for complex wiring or code compliance.
Conclusion
Hanging a pendant light is easier than it seems. Follow each step with care and patience. Double-check all connections before turning the power back on. Choose the right height to fit your space well. A well-hung pendant light can brighten any room nicely.
Enjoy the new look and feel of your home. Keep safety in mind throughout the process. Small changes can make a big difference in your space. Now, your room has a fresh, stylish touch.


