
Are you tired of your plain can lights and ready for a fresh, stylish look? Converting a can light to a pendant light is easier than you might think—and it can completely change the vibe of your room.
Imagine adding a touch of personality and warmth, making your space feel more inviting and modern. In this guide, you’ll discover simple steps to transform your lighting without calling an electrician. Keep reading, and you’ll soon have the confidence to upgrade your lights and elevate your home’s style.

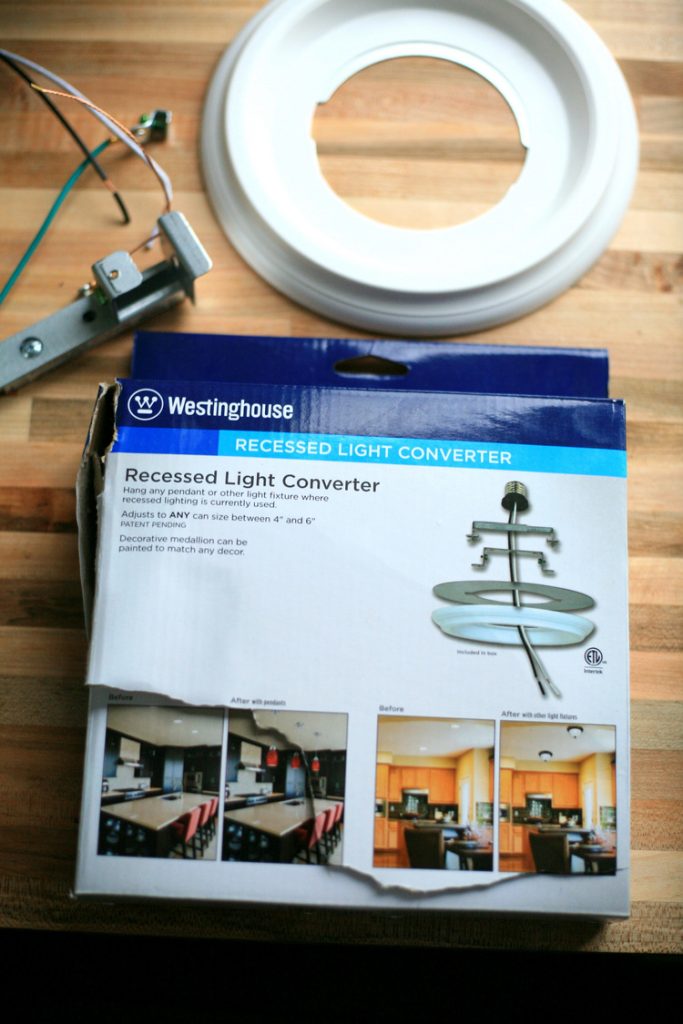
Credit: www.amazon.com
Tools And Materials Needed
Converting a can light to a pendant light requires specific tools and materials. Having the right items ensures a smooth and safe installation. Gather everything before starting your project. This saves time and avoids interruptions.
Essential Tools
- Voltage tester to check power safety
- Wire strippers for clean wire ends
- Screwdriver set for removing and attaching fixtures
- Drill with bits for mounting hardware
- Measuring tape to set pendant height
- Pliers for gripping and twisting wires
- Wire nuts to secure electrical connections
- Utility knife to trim insulation
Choosing The Right Pendant Light
Select a pendant light that fits your room style and size. Consider the light’s weight and mounting type. Ensure it is compatible with your existing electrical box. Check the length of the cord or chain for proper hanging height. Choose a bulb type that matches your lighting needs.
Safety Gear
- Insulated gloves to protect against electric shock
- Safety glasses to shield your eyes from debris
- Dust mask if working in old or dusty areas
- Step ladder for safe access to ceiling fixtures
Preparing The Can Light Fixture
Preparing the can light fixture is a key step before installing a pendant. It ensures safety and a smooth conversion process. This preparation involves turning off the power, removing the existing trim, and checking the wiring carefully. Each step helps avoid mistakes and electrical hazards.
Turning Off Power
Switch off the power at the circuit breaker. Confirm the light is off by flipping the wall switch. Use a voltage tester to double-check no electricity flows to the fixture. This step protects you from shocks during work.
Removing The Can Light Trim
Gently pull down the trim around the can light. Some trims have springs or clips holding them in place. Release these carefully to avoid damage. Set the trim aside for possible reuse or disposal.
Inspecting The Wiring
Look inside the can light housing for the wires. Check for any signs of damage or wear. Confirm the wires are properly connected and secure. Ensure the wires are long enough for the new pendant installation. Fix or replace damaged wiring before proceeding.
Installing The Pendant Light
Begin by turning off the power to ensure safety. Remove the can light trim, then attach the pendant light adapter. Finally, connect the wires and secure the pendant fixture to complete the conversion.
Installing a pendant light is a rewarding project. It adds a stylish touch to any room. Follow these steps to ensure a smooth installation. Safety is key, so always turn off the power before starting.Mounting The Pendant Bracket
Start by removing the existing can light trim. Unscrew it carefully to reveal the mounting plate. Attach the pendant bracket to the junction box. Use the screws provided with your pendant light kit. Ensure the bracket is firmly secured. It must be level for the best results.Connecting The Wiring
Identify the wires from the ceiling. You will see black, white, and green or copper wires. Match them with the pendant light wires. Connect black to black, white to white, and green to the ground wire. Use wire connectors to secure the connections. Double-check to ensure wires are snugly connected.Securing The Pendant
Gently push the wires into the junction box. Align the pendant canopy with the bracket. Secure it using the screws provided. Ensure the canopy covers the junction box completely. Attach the pendant light shade. Adjust the height as desired and tighten any fittings. Turn the power back on to enjoy your new pendant light.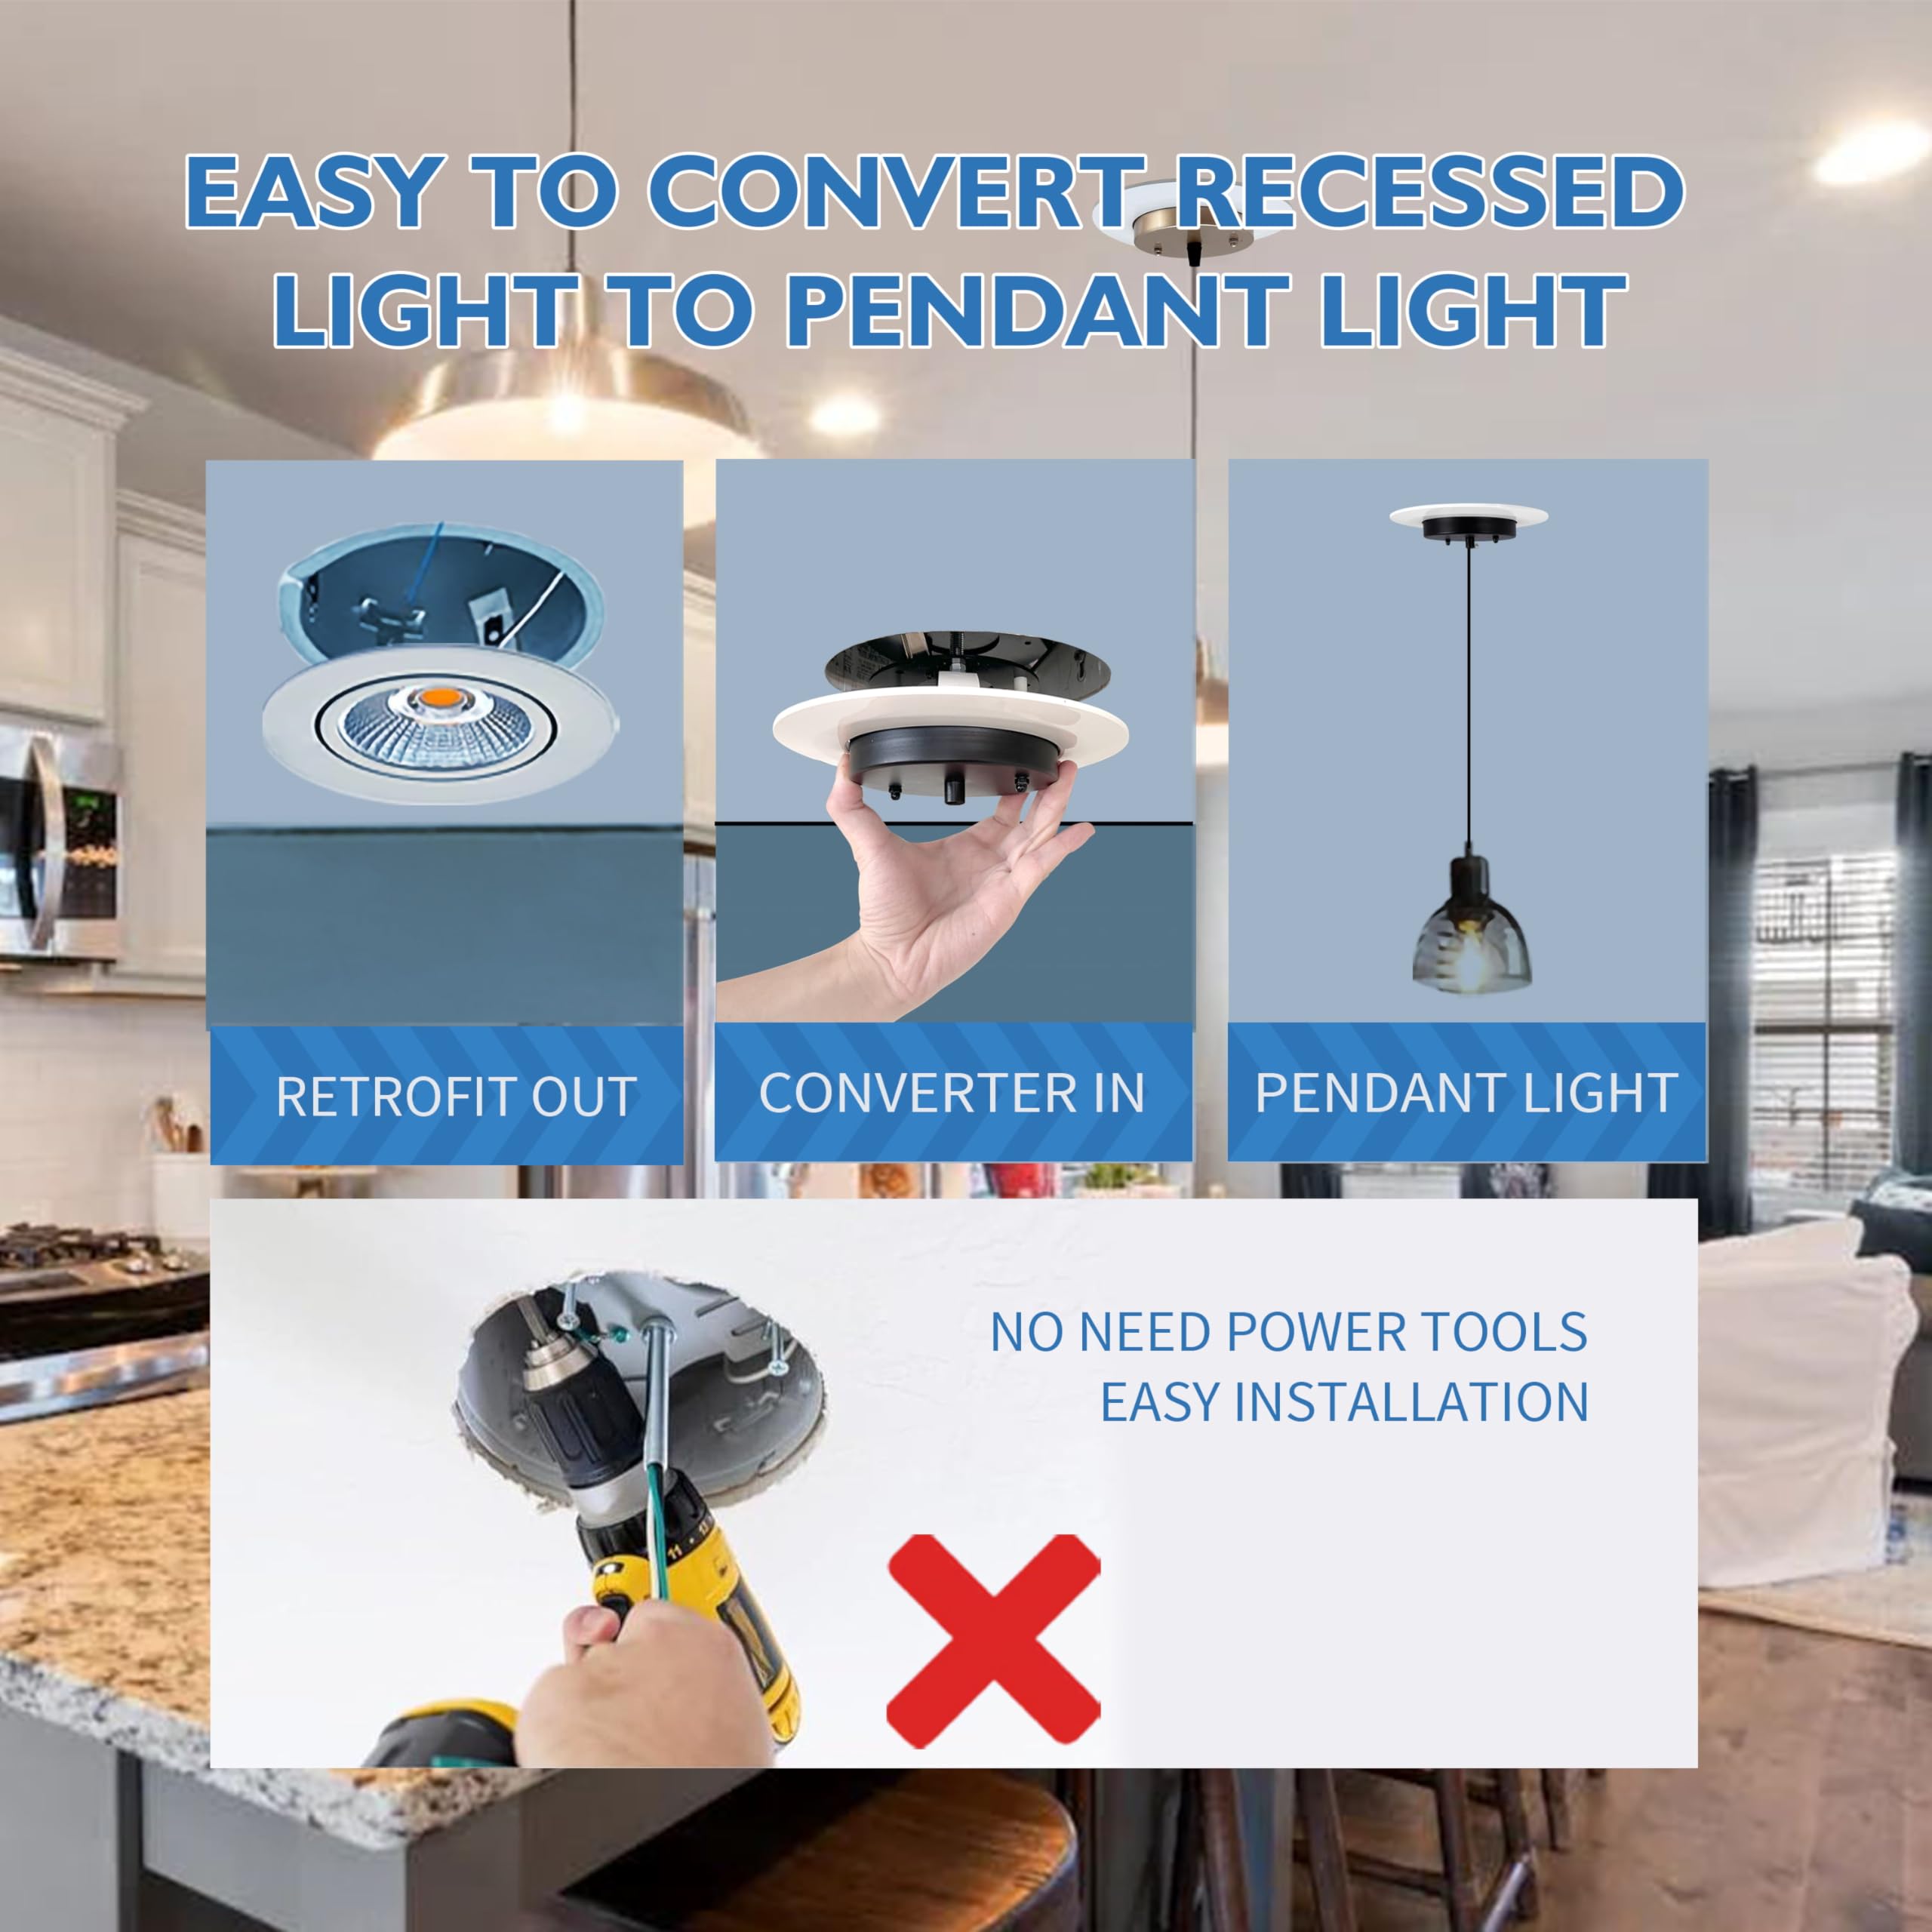
Credit: www.amazon.com
Adjusting Pendant Height
Adjusting the height of your pendant light is crucial for both style and function. Too low, and it might block your view or bump into heads. Too high, and it loses its impact and purpose. Finding the right drop length ensures your new pendant lighting looks intentional and works perfectly in your space.
Measuring Drop Length
Start by deciding where you want the bottom of your pendant to sit. For dining areas, aim for about 28 to 34 inches above the table surface. In open spaces or over kitchen islands, 30 to 36 inches above the counter usually works best.
Use a tape measure to mark the desired height from the ceiling or mounting point. Remember, if you’re installing multiple pendants, keep their heights consistent for a balanced look. Don’t forget to consider the bulb size and fixture shape—they affect the overall height too.
Shortening Or Lengthening Cord
Once you know your ideal drop length, adjust the cord accordingly. To shorten, gently pull the excess cord through the canopy and secure it inside the ceiling box or canopy cover. Some fixtures include a locking mechanism or strain relief to hold the cord firmly.
If you need to lengthen the cord, check if your fixture supports adding extra cord length or extension kits. Be cautious about electrical safety—never splice or extend wires without proper connectors and insulation. If unsure, consulting an electrician is a smart move.
Have you thought about how pendant height changes the room’s mood? Sometimes, small tweaks can make your light feel more inviting or dramatic. Experiment with different lengths before finalizing to see what works best in your space.
Testing And Final Touches
After installing your new pendant light, the final stage is crucial: testing and adding the finishing touches. This ensures everything works perfectly and looks just right in your space. Taking your time here can save you from future headaches and elevate the overall impact of your lighting upgrade.
Restoring Power Safely
Before restoring power, double-check all your wiring connections are secure and insulated. Use a voltage tester to confirm that no live wires are exposed. Always turn the circuit breaker back on carefully, and stand clear as you do—safety first.
Have you ever rushed this step only to face a blown fuse or worse? Taking these precautions protects both you and your home from electrical hazards.
Checking Light Functionality
Once power is restored, switch on your pendant light and observe its operation. Look for flickering, dimness, or unusual noises that might signal wiring issues. If everything glows steadily, you’ve done a great job.
Test the light with different bulb types if possible. This can help you find the perfect balance between brightness and energy efficiency.
Adding Decorative Elements
Now that your pendant light is working, consider adding decorative touches like a stylish canopy cover or a coordinating chain. These small details can make a big difference in blending the fixture with your room’s style.
You might also experiment with bulb shapes or colored glass shades to create a unique vibe. What style will make your space feel more inviting?

Credit: www.xhlux.com
Common Issues And Fixes
Converting a can light to a pendant often brings a fresh look to any room. Some common issues can occur during or after the conversion. Knowing how to fix these problems helps keep your new pendant light safe and functional. The most frequent concerns include loose connections, flickering lights, and pendant stability.
Loose Connections
Loose connections cause the pendant light to stop working or spark. Check the wires inside the ceiling box carefully. Make sure all wires are tightly twisted together and secured with wire nuts. Use electrical tape to hold wire nuts in place for extra safety. Turn off the power before handling any wiring.
Flickering Lights
Flickering often means a poor electrical connection or a bad bulb. Test the bulb in another fixture to see if it works well. If flickering continues, check the wiring connections again. Replace any damaged wires or connectors. Use bulbs that match the pendant’s recommended wattage and type.
Pendant Stability
A pendant must hang securely to avoid swaying or falling. Make sure the mounting bracket is firmly attached to the ceiling box. Tighten all screws holding the pendant in place. Adjust the chain or cord length evenly to balance the fixture. If the ceiling box is loose, replace or reinforce it before installing the pendant.
Tips For Stylish Pendant Choices
Choosing the right pendant light can transform your space and enhance the vibe of any room. Stylish pendant choices are about more than just looks—they should complement your room’s personality, suit your lighting needs, and be energy-smart. Here are some practical tips to help you pick the perfect pendant for your converted can light.
Matching Room Decor
Your pendant should blend well with your room’s style and color scheme. If your room has a modern feel, sleek metals or minimalist shapes work well. For rustic or farmhouse looks, consider pendants with wood accents or vintage finishes.
Think about scale too. A large, dramatic pendant might overpower a small kitchen, while a tiny one could get lost in a big dining area. Matching the material and finish of your pendant with other fixtures or furniture pieces ties the room together nicely.
Choosing Bulb Types
The bulb you choose affects both the look and function of your pendant light. Warm, soft bulbs create a cozy atmosphere, while bright, cool bulbs are perfect for task lighting. Some pendants work best with exposed bulbs, adding to the style, so pick bulbs that look good on their own.
Consider dimmable bulbs if you want flexible lighting. This lets you adjust brightness depending on the mood or activity. Have you tried LED filament bulbs? They give off a vintage vibe but use modern technology.
Energy Efficiency
Energy-efficient bulbs save money and reduce your environmental impact. LEDs are the top choice—they use less power and last much longer than traditional bulbs. When switching from a can light, ensure your pendant fixture supports LED bulbs for the best results.
Also, check if your pendant works with smart bulbs. These let you control brightness and color from your phone, adding convenience and energy savings. Are you ready to make your lighting stylish and smart at the same time?
Frequently Asked Questions
How Do You Convert A Can Light To A Pendant Light?
To convert a can light, turn off power first. Remove the can light trim and housing. Install a pendant light adapter kit. Connect the wiring following the kit instructions. Secure the pendant and restore power to test the light.
What Tools Are Needed To Convert Can Light To Pendant?
You need a screwdriver, wire stripper, voltage tester, and pendant light kit. Safety gloves and ladder help. These tools ensure a safe and smooth conversion process.
Can I Convert A Recessed Light To Pendant Myself?
Yes, with basic electrical knowledge and safety precautions, you can. Always turn off power and follow instructions carefully. If unsure, consult a professional electrician to avoid hazards.
Is It Safe To Convert Can Lights To Pendant Lights?
Yes, if done correctly following electrical codes and safety guidelines. Use quality kits and switch off power before starting. Improper wiring can cause hazards, so proceed with caution or hire an expert.
Conclusion
Converting a can light to a pendant is simple and rewarding. It changes the room’s look and feel quickly. You only need a few tools and basic skills. Always turn off power before starting to stay safe. Choose a pendant that fits your style and space.
Take your time to follow steps carefully for best results. This small update can brighten your home nicely. Give your ceiling a fresh, new touch today!


