
Are your fairy lights flickering, or do you need to replace the batteries but don’t know how to open the battery box? You’re not alone.
Many people find this tiny compartment tricky to access without the right steps. In this guide, you’ll learn exactly how to open the battery box on your fairy lights quickly and safely. Whether you want to change batteries, fix a connection, or just check inside, these simple tips will make the process easy for you.
Keep reading to save time and avoid any frustration with your beautiful lights.
Tools Needed
Opening the battery box on fairy lights needs a few simple tools. Having the right tools makes the task easy and safe. You can prepare everything quickly and avoid damage to the box or lights.
Most battery boxes have small screws or clips. Using the correct tools helps you open the box gently. Keep all tools ready before you start to avoid interruptions.
Small Screwdriver
A small screwdriver is often needed. Flathead or Phillips types work depending on the screws. It fits into tiny screws and helps you loosen them carefully.
Plastic Pry Tool
A plastic pry tool helps open clips without breaking the box. It slides between the edges to pop open the cover gently. This tool prevents scratches or cracks.
Tweezers
Tweezers help to handle small parts inside the box. They are useful for removing batteries or wires safely. Tweezers give better control than fingers.
Soft Cloth
A soft cloth protects the surface of the battery box. It also helps to keep your workspace clean. Use it to hold the box steady while working.
Identify The Battery Box Type
Knowing the type of battery box your fairy lights use is the first step to opening it safely and efficiently. Battery boxes vary in design, size, and locking mechanisms, so identifying the right type helps you avoid damage. This also ensures you can replace batteries quickly and get your lights glowing again without frustration.
Common Battery Box Designs
Battery boxes for fairy lights often come in a few common styles:
- Slide-off cover:These have a small tab or lip that you slide or push to remove the cover.
- Screw-secured cover:Some boxes have tiny screws holding the cover in place.
- Snap-fit cover:These snap into place and require gentle prying to open.
Spotting which design you have helps you prepare the right tools or technique.
Materials And Durability
Battery boxes can be made from plastic or metal. Plastic boxes are lighter and more common, but they may crack if forced open.
Metal boxes are sturdier but often have screws or clips for added security. Knowing the material can guide how much force to apply and what tools to use.
Battery Type Inside The Box
Different battery boxes hold different battery types like AA, AAA, or coin cells. Checking the size of the box or any visible markings can hint at what battery fits inside.
This helps you prepare replacement batteries ahead of time and avoid opening the box multiple times.
Identifying Hidden Locks Or Tabs
Some battery boxes have hidden clips or tabs that keep the cover secure. These are often small and easy to miss.
Take a close look around the edges for tiny indentations or raised areas that might need to be pressed or lifted.
Have you ever tried opening a battery box only to find it won’t budge because of a hidden latch? Spotting these can save you time and prevent damage.
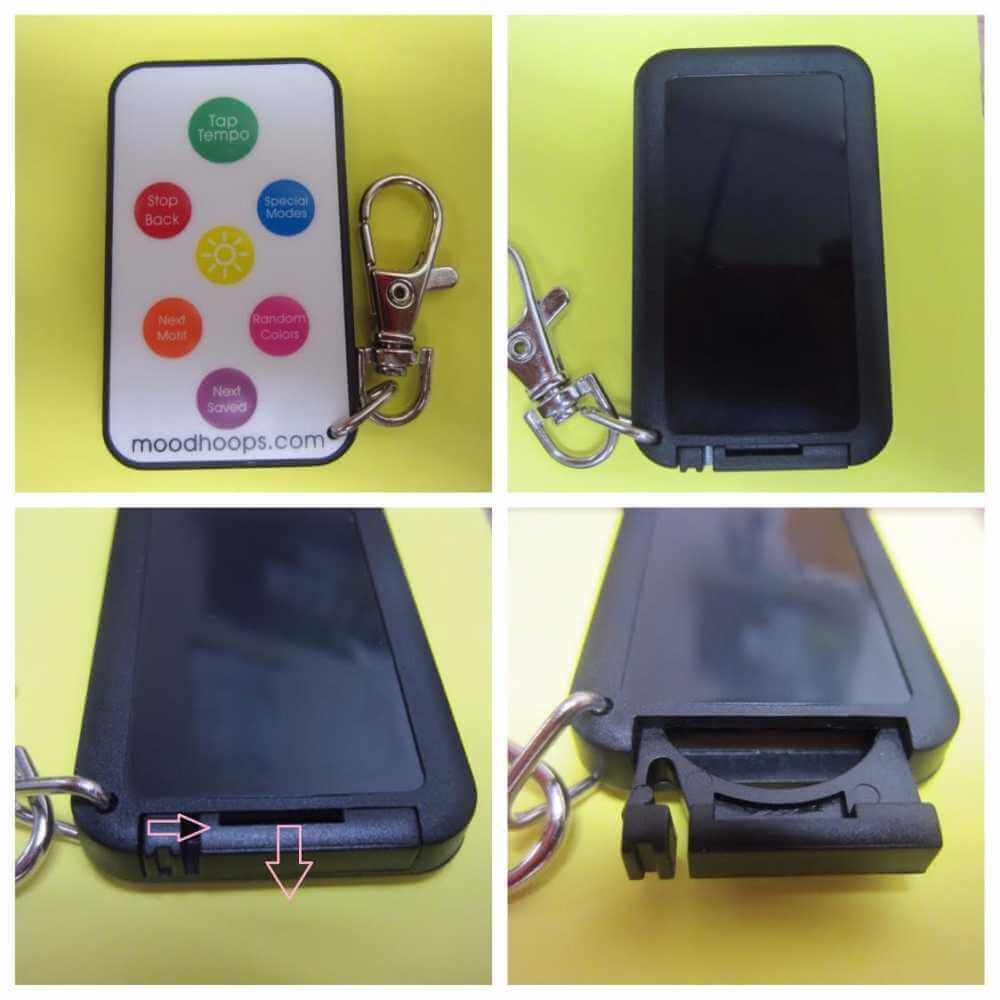
Locate The Opening Mechanism
Check the battery box closely to find a small latch or sliding cover. This part usually opens by pressing or sliding gently. Identifying the right spot makes opening easy and prevents damage.
Locating the opening mechanism of a battery box on fairy lights can seem tricky. But with a little guidance, it becomes simple. First, you’ll need to identify where the battery box is located. Usually, it is at the end of the string of lights. Once found, inspect the box closely.Identify The Seam
Look for a seam or gap along the edges of the battery box. This seam indicates where the box opens. It might be subtle, so take your time to spot it. Gently run your fingers over the box’s surface to feel for any indentations or separations.Check For Clips Or Latches
Examine the edges for clips or latches. These hold the box securely closed. They are often small and might blend in with the box. Carefully press or slide these clips to release them. This step requires a gentle touch to avoid breaking them.Inspect For Screws
Some battery boxes have screws securing them. Look for tiny screws at the corners or along the edges. If present, use a small screwdriver to remove them. Place the screws in a safe spot to avoid losing them.Use A Flat Tool
If no clips or screws are visible, a flat tool might help. A small flathead screwdriver or a similar object can be useful. Insert it gently into the seam. Apply a slight pressure to pry the box open. Be cautious to avoid damaging the box or its contents.Read The Manufacturer’s Instructions
Sometimes, the manufacturer’s instructions provide helpful guidance. Check any included manuals or packaging for opening instructions. These can offer specific tips tailored to your fairy light model.
Credit: womenshealthcenter.in
Step-by-step Opening Process
Opening the battery box on fairy lights is simple when following clear steps. This process helps you replace batteries safely and keep your lights working well. Taking care during opening prevents damage to the box and batteries.
Remove Screws Or Clips
Check the battery box for small screws or clips holding the cover. Use a small screwdriver to remove screws carefully. For clips, gently press or slide them to unlock. Keep screws or clips in a safe place to avoid loss.
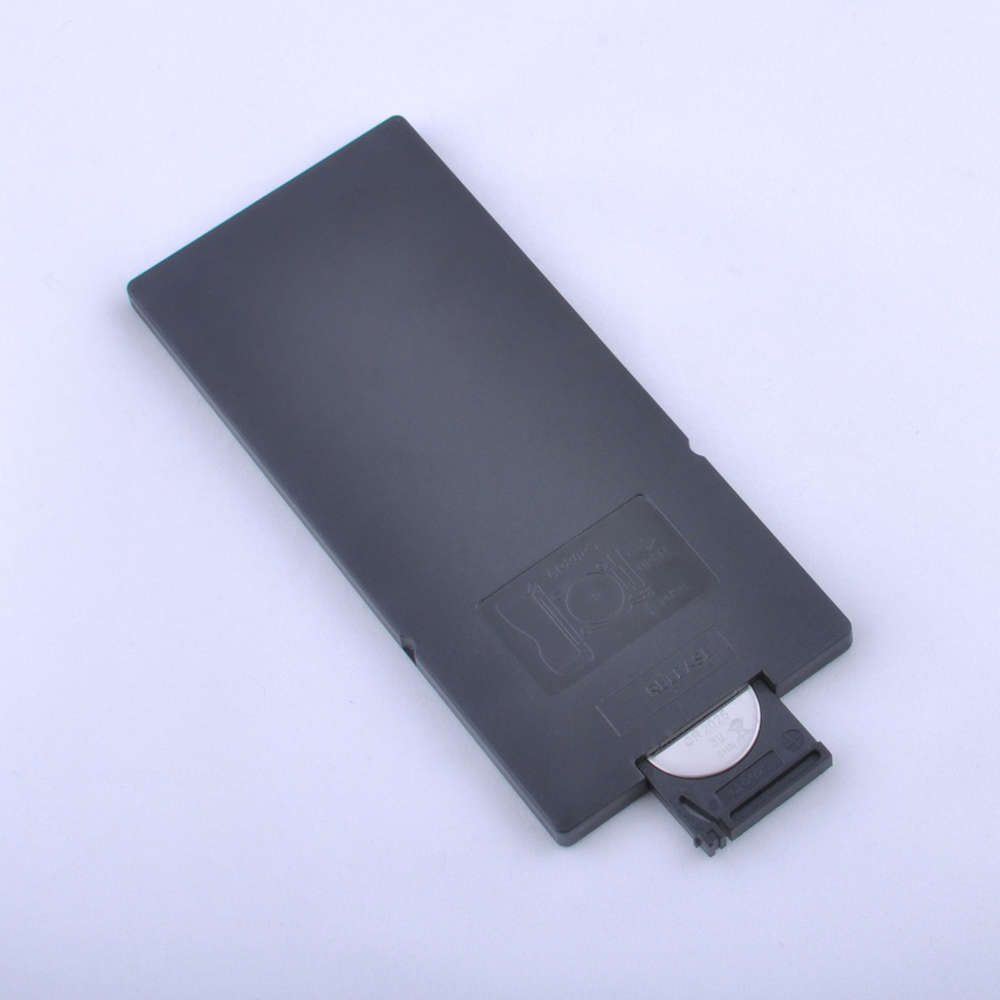
Slide Or Pry Open The Cover
After removing fasteners, slide the cover in the direction it moves easily. If sliding is not possible, use a flat tool to pry the cover gently. Avoid using force to prevent breaking the box. Work slowly and carefully for best results.
Handle Batteries Safely
Once open, remove old batteries carefully. Check batteries for leaks or damage before disposal. Insert new batteries matching the correct size and polarity. Close the cover securely to keep batteries in place. Wash hands after handling batteries for safety.
Troubleshooting Common Issues
Troubleshooting common issues with your fairy lights’ battery box can save you time and frustration. Many problems stem from simple causes that you can fix at home. Understanding what might be wrong helps you avoid unnecessary replacements and keeps your lights shining bright.
Stuck Battery Box
If your battery box won’t open, it’s often because the cover is stuck or tightly sealed. Sometimes dirt or sticky residue builds up around the edges, making it hard to pry open. Try gently tapping the sides or using a thin, flat tool like a butter knife to carefully lift the cover without breaking it.
Applying a little rubbing alcohol around the edges can help dissolve grime and loosen the seal. Be patient and avoid forcing it open, as you could damage the box. Have you ever struggled with a stuck battery box and found that a small twist or wiggle made all the difference?
Damaged Clips Or Screws
Clips and screws hold the battery box securely, but they can wear out or break over time. If clips are cracked or missing, the cover won’t stay closed properly, causing the lights to flicker or turn off unexpectedly.
Check if screws are loose or stripped; tightening or replacing them with similar ones from a hardware store often fixes the problem. Sometimes, using a tiny dab of super glue on broken clips can provide a temporary hold. What small fixes have you tried that saved your fairy lights from permanent damage?
Credit: moodhoops.com
Tips For Battery Replacement
Replacing the batteries in your fairy lights keeps the magic alive without interruption. Knowing how to do it right saves you time and prevents damage to the battery box. Here are some practical tips that make battery replacement easy and safe for your delicate lights.
Check Battery Type And Size Before Buying
Using the correct battery type is crucial. Different fairy lights require specific sizes like AA, AAA, or button cells. Look at the old batteries or the label inside the battery box to confirm the exact type.
Have you ever bought new batteries only to find they don’t fit? Avoid this by double-checking the size before you shop. It saves you a trip and keeps your fairy lights glowing.
Handle Batteries With Clean, Dry Hands
Moisture and dirt can cause poor battery contact or corrosion. Always dry your hands thoroughly before handling batteries. This small step helps maintain good electrical connection and extends battery life.
Insert Batteries Following Correct Polarity
Pay close attention to the positive (+) and negative (-) signs inside the battery box. Inserting batteries the wrong way can stop the lights from working or even damage the circuitry. If your lights don’t turn on, check the polarity again before assuming the batteries are dead.
Clean The Battery Contacts Regularly
Battery contacts can get dirty or corroded over time, leading to flickering or dim lights. Wipe them gently with a cotton swab dipped in a little rubbing alcohol. This simple maintenance step can save you from replacing the entire battery box.
Dispose Of Old Batteries Responsibly
Used batteries contain chemicals harmful to the environment. Always recycle them at designated collection points. Keeping this habit protects the planet and encourages responsible battery use.
Maintaining Your Fairy Lights
Maintaining your fairy lights keeps them bright and working longer. Proper care prevents damage and makes sure the lights stay safe to use. Small steps can protect the battery box and wiring. Regular checks help catch problems early.
Cleaning The Battery Box
Dust and dirt can build up on the battery box. Use a soft cloth to wipe it gently. Avoid water or liquid cleaners to protect the electrical parts. Keep the battery box dry to prevent rust and corrosion.
Checking Battery Contacts
Battery contacts must be clean and free of corrosion. If you see white or green residue, clean it with a cotton swab dipped in vinegar or lemon juice. Dry the contacts completely before inserting new batteries. This ensures good power flow.
Storing Fairy Lights Properly
Store your fairy lights in a dry, cool place. Avoid folding or twisting the wires tightly to prevent breaks. Use a box or a container to keep them safe from dust and damage. Remove batteries if you do not plan to use the lights soon.

Credit: www.youtube.com
Frequently Asked Questions
How Do I Open The Battery Box On Fairy Lights?
To open the battery box, locate the latch or sliding cover. Gently press or slide it in the direction indicated. Avoid using excessive force to prevent damage to the box or wiring.
What Tools Are Needed To Open A Fairy Lights Battery Box?
Most battery boxes open without tools using a latch or sliding cover. If stuck, a small flathead screwdriver may help gently pry it open. Always use tools carefully to avoid damage.
Can I Replace Batteries Without Damaging The Fairy Lights?
Yes, you can replace batteries safely. Open the battery box carefully, remove old batteries, and insert new ones matching the correct polarity. Close the box securely to ensure proper function.
Why Is My Fairy Lights Battery Box Hard To Open?
The box may be tight due to design or dirt buildup. Clean the edges gently and try sliding or pressing the latch again. Avoid forcing it to prevent breaking the box.
Conclusion
Opening the battery box on fairy lights is simple and quick. Just follow the steps carefully to avoid damage. Use the right tools and gentle pressure. Always check the battery type before replacing. Keep your fairy lights working longer with this easy tip.
Now, you can enjoy your lights without any hassle. Brighten your space with confidence and ease. Try it yourself and see how smooth the process is.


