
Are you tired of your plain recessed lights and want to add a fresh, stylish touch to your space? Converting recessed lighting to pendant lights can instantly transform the look and feel of any room.
Imagine the warm glow of a beautiful pendant light making your kitchen or living area more inviting. In this guide, you’ll discover simple steps to make this change yourself, saving money and adding a personal flair to your home. Ready to upgrade your lighting and create the perfect atmosphere?
Let’s dive in and make your vision a reality!
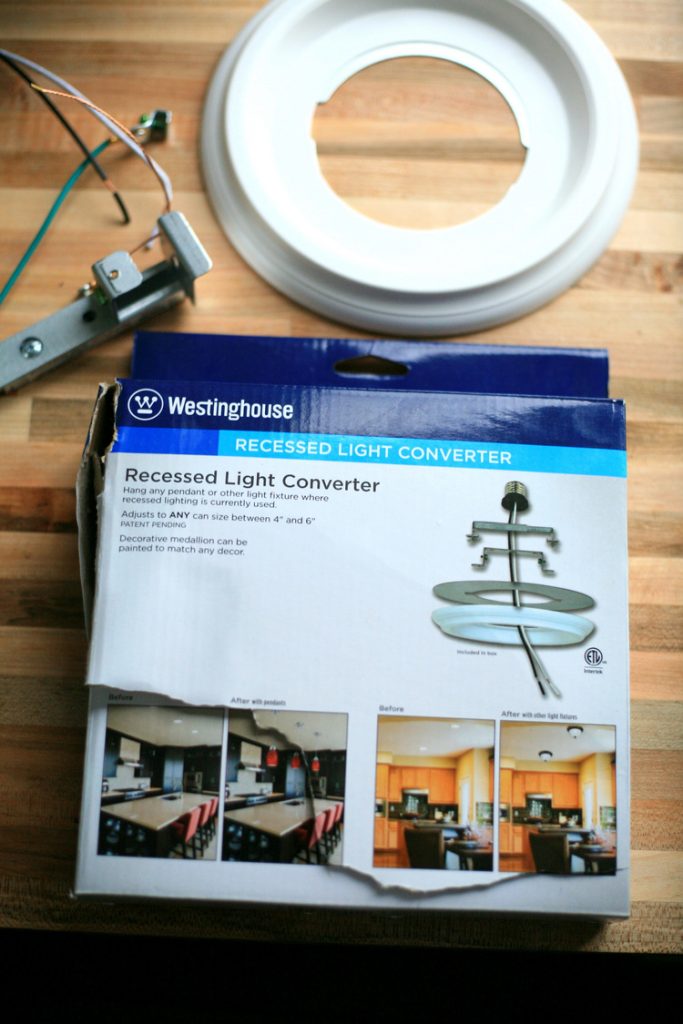
Credit: www.amazon.ca
Tools And Materials Needed
Switching from recessed lighting to pendant lights changes the entire vibe of your space. But before you start, gathering the right tools and materials is crucial. Having everything ready not only saves time but also makes the process smoother and safer.
Essential Tools
You’ll need a reliable set of tools to handle the wiring and installation. A voltage tester is a must to ensure the power is off before you touch any wires. Wire cutters and strippers help you prepare the cables neatly, while a screwdriver set will be essential for both removing the recessed fixture and installing the new pendant.
Don’t forget a drill if your new pendant requires ceiling anchors. A ladder or step stool will also keep you steady while working at height. Having these tools within reach can prevent frustrating interruptions.
Choosing The Right Pendant Light
Not all pendant lights are created equal. Pick a style and size that matches your room’s décor and ceiling height. Oversized pendants in a small kitchen can feel overwhelming, while tiny fixtures might get lost in a large living room.
Consider the light output too. Do you want a soft glow or bright task lighting? Some pendants come with adjustable cords or chains, which offer flexibility if you need to tweak the height later. Think about the bulb type as well—LEDs save energy and last longer.
Safety Gear
Safety should never be an afterthought. Protect your eyes with safety goggles, especially when drilling or cutting wires. Insulated gloves reduce the risk of electric shock when handling live wires.
Wear a dust mask if you’re working in an older home where ceiling dust can be a problem. And always make sure the power to the circuit is turned off at the breaker box before you start. Are you prepared to prioritize safety to avoid costly mistakes?
Preparing The Workspace
Preparing your workspace is a crucial first step before converting recessed lighting to pendant fixtures. A well-organized and safe area helps you work efficiently and reduces the risk of accidents. Taking time to prepare also ensures you won’t have to pause the project midway due to unexpected obstacles.
Turning Off Power
Safety starts with cutting off the electricity supply to the area where you’ll be working. Locate your home’s circuit breaker panel and switch off the breaker that controls the recessed lighting. Double-check by flipping the light switch to make sure the power is completely off.
Using a voltage tester before touching any wires can save you from dangerous shocks. It’s tempting to skip this step if you think you know the circuit, but trust me—testing adds an extra layer of protection. Would you rather spend a few extra minutes testing or risk an injury?
Clearing The Area
Clear the workspace around your lighting fixture to give yourself plenty of room to move. Remove furniture, decorations, and any items that could get damaged or cause tripping hazards. This makes it easier to handle tools and materials without distractions or obstructions.
Lay down a drop cloth or old sheet to catch dust and debris. I once skipped this and ended up with drywall dust all over my floors—it was a headache to clean. Preparing the area not only protects your home but also keeps your project area organized and stress-free.
Removing Recessed Lighting
Removing recessed lighting involves carefully disconnecting and taking out old fixtures. Converting to pendant lights requires installing new wiring and mounting hardware for a stylish, updated look.
Removing recessed lighting can be an exciting start to transforming your space with a trendy pendant light. The process involves a few careful steps, but with the right approach, you can handle it like a pro. Whether you’re updating your kitchen or adding flair to your dining room, removing recessed lighting is the first step toward a striking makeover.Detaching The Fixture
Begin by switching off the power at your circuit breaker to ensure safety. Use a ladder to reach the recessed light and remove the trim by gently pulling it down. Most trims are held by clips or springs that you can easily detach. After removing the trim, unscrew the bulb and keep it aside safely. You will find the housing unit secured to the ceiling. Carefully unscrew or unclip the housing from its position. If you’re unsure how to handle the clips, take a moment to observe how they’re attached before proceeding.Handling Wiring Safely
Safety is paramount when dealing with electrical wiring. After detaching the housing, you will see wires connected to the light fixture. Use a voltage tester to confirm there’s no electricity running through them. Once confirmed, gently twist off the wire nuts and separate the wires. Note their configuration and consider taking a picture for reference. This step ensures you can reconnect everything correctly when installing your new pendant light. Handling wires can seem intimidating, but with patience and careful attention, it’s entirely manageable. Are you ready to transform your space with a stylish pendant light? Take the plunge and enjoy the process!Installing The Pendant Light
Installing the pendant light is where your project really takes shape. This step transforms a recessed fixture into a stunning focal point in your room. Each part of the installation requires care to ensure safety and style come together seamlessly.
Mounting The Bracket
Start by securing the mounting bracket to the electrical box in your ceiling. The bracket holds the weight of your new pendant, so make sure it fits tightly and is screwed in firmly.
If your electrical box isn’t designed to support a pendant, you might need to upgrade it to a fan-rated box for extra strength. Have you checked if your box can handle the new fixture’s weight?
Connecting The Wires
Turn off power at the breaker before touching any wires. Then, connect the pendant’s wires to the corresponding house wires—typically black to black (hot), white to white (neutral), and green or copper to ground.
Use wire nuts to secure each connection tightly and wrap them with electrical tape for added safety. Have you tested your connections with a voltage tester to make sure everything is safe before moving on?
Securing The Pendant
Once the wiring is connected, carefully tuck the wires into the electrical box. Attach the pendant’s canopy to the mounting bracket, aligning it so it sits flush against the ceiling.
Make sure the pendant hangs straight and at your desired height. Adjust the chain or cord length before tightening all screws to prevent future hassle.
Adjusting Pendant Height
Adjusting the height of a pendant light is key to achieving the right look and function. The height affects both the room’s style and the light’s effectiveness. Setting the perfect length ensures the pendant complements the space without blocking views or creating glare. It also helps balance the room’s proportions and lighting needs.
Measuring Ideal Length
Start by measuring the distance from the ceiling to where the pendant will hang. Consider the room’s ceiling height and the furniture below the light. For dining tables, hang the pendant about 30 to 36 inches above the surface. In open areas, keep the pendant at least 7 feet from the floor.
Use a tape measure or laser measure for accuracy. Mark the desired length on the cord before adjusting. This step prevents mistakes and helps visualize the final placement.
Modifying The Cord
Once the ideal length is marked, adjust the cord to fit. Most pendant lights allow easy cord shortening. If needed, cut the excess wire carefully with wire cutters. Strip the insulation off the ends before reconnecting.
Secure the cord inside the ceiling canopy or fixture cover. Double-check the pendant height by holding it in place. Make sure the light hangs straight and stable before final installation.

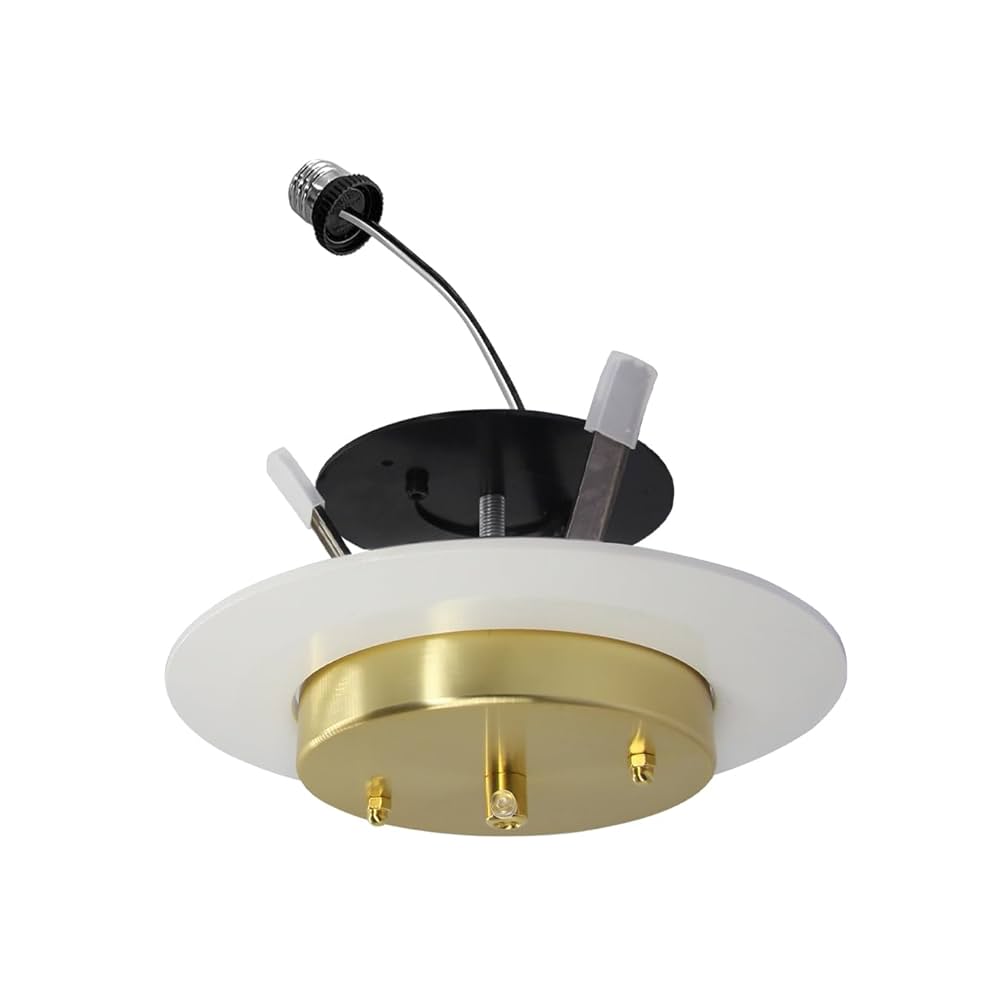
Credit: hellofromliz.com
Testing And Finishing Touches
After installing your new pendant light, testing and finishing touches are crucial. These steps ensure the fixture works perfectly and looks great. Careful checks prevent any future problems and guarantee safety.
Restoring Power
Turn the circuit breaker back on to restore electricity. Use a voltage tester to confirm power is active. Ensure the switch controlling the light is off before turning on power. This prevents any electrical shocks during testing.
Checking Light Functionality
Flip the light switch to test the pendant. The bulb should illuminate without flickering. Listen for buzzing sounds, which indicate wiring issues. Adjust or tighten connections if the light does not work properly. Replace the bulb if necessary.
Final Adjustments
Adjust the pendant height for the perfect look. Use a level to keep the fixture straight. Secure any loose wires inside the ceiling box. Clean the fixture and surrounding area for a neat finish. Double-check all screws and fittings for safety.
Troubleshooting Common Issues
Switching from recessed lighting to pendant fixtures can transform your space, but it’s not always a smooth process. You might encounter issues that seem tricky at first. Knowing how to tackle these common problems will save you time and frustration.
Flickering Lights
If your pendant lights flicker, it could be more than just a bulb problem. Loose connections or incompatible dimmer switches are often the culprits. Check if your new bulbs match the dimmer’s specifications—LED bulbs, for example, need dimmers designed for LEDs.
Another quick fix is tightening the bulb and fixture connections. Flickering can also signal voltage fluctuations in your home’s wiring, so if tightening and switching bulbs doesn’t help, consider consulting an electrician.
Loose Fixtures
Loose pendant fixtures can feel unsafe and look unprofessional. This usually happens if the mounting bracket isn’t secured properly or if the ceiling box isn’t rated to support the pendant’s weight.
Make sure to use the right hardware for your fixture’s weight. You might need to install a stronger ceiling box or additional support, especially if your pendant is heavy or hangs low. Have you checked if the fixture wobbles when you gently pull on it? That’s a clear sign to reinforce the mount.
Wiring Problems
Wiring issues are common when converting lighting types. If your pendant doesn’t light up or trips the circuit breaker, the wiring might be incorrect or damaged. Always switch off the power before inspecting wires.
Look for loose wire nuts, exposed copper, or mismatched wire colors. If the wiring inside the recessed box isn’t compatible with the pendant’s wiring, you may need to extend or replace cables. Don’t hesitate to get professional help if you’re unsure—electrical mistakes can be dangerous.

Credit: www.xhlux.com
Safety Tips For Diy Lighting
Converting recessed lighting to pendant lighting can transform your space, but safety must come first. Handling electrical components without care can lead to serious accidents. Before you start, understanding key safety tips helps you work confidently and avoid costly mistakes.
Avoiding Electrical Hazards
Always turn off the power at the circuit breaker before touching any wiring. Double-check that the power is off by using a voltage tester on the wires.
Wear insulated gloves to protect yourself from accidental shocks. Keep your work area dry—water and electricity don’t mix.
Are you certain about which wires are live, neutral, or ground? Mistakes here can cause short circuits or fires, so label wires if needed before disconnecting anything.
Using Proper Tools
Using the right tools makes your job easier and safer. A voltage tester, wire strippers, screwdrivers with insulated handles, and a sturdy ladder are essential.
Avoid makeshift tools or damaged equipment. I once tried using a dull screwdriver, which slipped and almost caused injury—don’t let that happen to you.
Invest in tools designed for electrical work. They might cost more upfront, but they save you pain and hassle later.
When To Call A Professional
If you feel unsure about any step, don’t hesitate to call an electrician. Complex wiring or older homes with outdated electrical systems often require expert handling.
Remember, a small mistake can lead to major problems down the road. If your project involves modifying circuit breakers or adding new wiring, professional help is the safest choice.
Ask yourself: Is your comfort with electrical work worth risking safety? Sometimes, the best DIY move is to bring in a pro.
Frequently Asked Questions
How Do I Convert Recessed Lighting To Pendant Lights?
To convert recessed lighting to pendant lights, first turn off power. Remove the recessed fixture carefully. Install a compatible junction box and mount the pendant light. Connect wires securely, then restore power and test the new fixture for proper operation.
What Tools Are Needed For This Lighting Conversion?
You will need a voltage tester, screwdriver, wire stripper, wire nuts, electrical tape, a drill, and a compatible pendant light fixture. Safety gloves and goggles are also recommended for protection during installation.
Can I Replace Recessed Lights With Pendant Lights Myself?
Yes, if you have basic electrical skills and follow safety protocols. Always turn off the power at the breaker. If unsure, consult a licensed electrician to avoid hazards and ensure compliance with local codes.
How Much Does Converting Recessed Lighting To Pendant Cost?
Costs vary but typically range from $50 to $200 per fixture. This includes the pendant light, electrical supplies, and any necessary labor. DIY installation can reduce expenses significantly.
Conclusion
Converting recessed lighting to pendant fixtures can change your room’s look. It adds style and better light where you need it most. The process is simple if you follow the right steps. Make sure to turn off power before starting any work.
Choose the pendant style that fits your space and taste. Take your time to install it safely and securely. Enjoy the fresh, new feel your lighting brings to the room. Small changes can make a big difference in your home’s atmosphere.


