
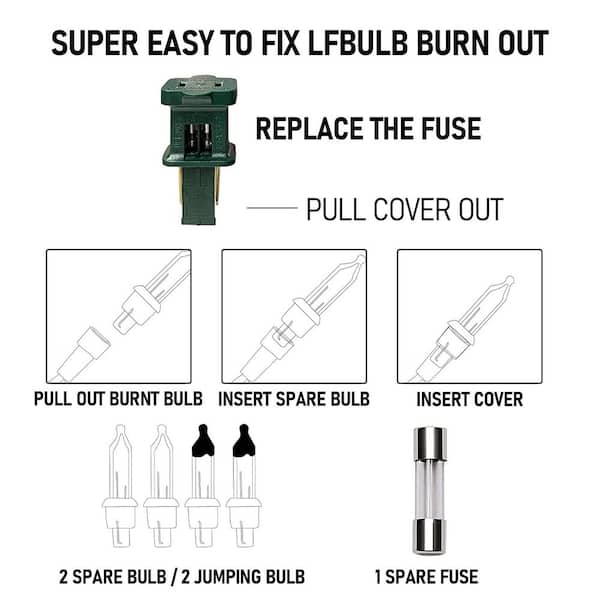
Are your string lights suddenly not working? Before you toss them out or buy new ones, there’s a simple fix you can try yourself—replacing the fuse.
You might think it’s tricky, but with the right steps, you can do it quickly and safely. In this guide, you’ll learn exactly how to replace the fuse in your string lights, saving you time, money, and frustration. Keep reading, and by the end, your lights will be glowing bright again.

Credit: www.youtube.com
Safety First
Replacing a fuse in string lights requires careful attention to safety. Working with electrical items can be risky without proper precautions. Taking safety steps helps avoid accidents and damage. Always prepare before handling the fuse or wires.
Unplugging The Lights
Always unplug the string lights before starting any work. This stops electricity flow and reduces shock risk. Never touch the fuse or wires while the lights are plugged in. Double-check the plug to ensure no power is running through the lights.
Gathering Safety Gear
Wear safety gear to protect yourself from injuries. Use insulated gloves to avoid electric shocks. Safety glasses keep your eyes safe from sparks or debris. Have a clean, dry workspace to prevent slips or falls. Keep tools like screwdrivers and pliers handy and in good condition.
Tools And Materials Needed
Replacing a fuse in string lights needs specific tools and materials. Having the right items ensures a smooth and safe process. Gather everything before starting to avoid interruptions.
Types Of Fuses
String lights use different fuse types based on design and voltage. The most common fuse types include:
- Glass Tube Fuse: Small cylindrical glass with metal caps
- Blade Fuse: Flat, plastic body with two metal prongs
- Cartridge Fuse: Larger cylindrical shape for high power
Check the fuse type in your string lights manual or on the fuse itself. Using the exact fuse type is crucial for safety and function.
Essential Tools
Having the right tools makes fuse replacement easier and safer. Basic tools needed:
- Small Screwdriver: To open the fuse holder cover
- Needle-Nose Pliers: To safely remove the old fuse
- Replacement Fuse: Match the fuse type and rating
- Multimeter (Optional): To test fuse continuity
Keep a clean workspace and good lighting. It helps prevent mistakes and accidents.
Locating The Fuse Holder
The fuse holder is usually found near the plug of the string lights. It often looks like a small plastic box or compartment. Opening it reveals the fuse that needs replacement.
Locating the fuse holder in your string lights can be a straightforward task if you know where to look. It’s crucial to identify this component because the fuse plays a vital role in keeping your lights functioning safely. By ensuring the correct fuse is in place, you prevent potential electrical hazards and prolong the life of your lighting setup.Common Fuse Holder Locations
Most string lights have a fuse holder integrated into the plug. Check the male end of the plug, as this is the most typical location. Some designs have a sliding compartment or a small door that you can access with a fingernail or a small screwdriver. If you’re using older or specialty string lights, the fuse holder might be located along the string itself. Inspect the cord for any small, box-like structures that could house the fuse. Always unplug your lights before attempting to locate or access the fuse holder to avoid electric shock.Identifying The Fuse Type
Once you’ve located the fuse holder, it’s essential to identify the correct fuse type for replacement. Many string lights use small, cylindrical glass fuses. These can typically be found at hardware stores or online. Check the fuse for any markings or inscriptions indicating its amperage and voltage. This information ensures you purchase the correct replacement. Using the wrong type of fuse can lead to short circuits or damage to your lights. Are you ready to tackle this small but crucial maintenance task on your own? Remember, understanding your string lights’ components can save you from future headaches and keep your festive decorations shining bright.
Credit: www.youtube.com
Removing The Old Fuse
Removing the old fuse is the first task when fixing string lights. This step ensures safety and prepares for a new fuse. Careful handling prevents damage to the lights and avoids electrical risks.
Follow simple instructions to open the fuse holder and take out the old fuse. Use the right tools and work in a well-lit area. Keep the string lights unplugged during this process.
Opening The Fuse Holder
Locate the fuse holder on the plug of your string lights. It is often a small compartment or sliding cover. Use your fingernail or a small flat tool to gently open it.
The fuse holder may have a clip or latch. Press or slide it carefully without forcing. Avoid breaking the plastic or damaging the wires inside.
Safely Extracting The Fuse
Once open, identify the fuse inside the holder. It looks like a small glass tube or a cylinder with metal ends. Handle it with care to avoid breaking it.
- Use tweezers or gently pull with your fingers.
- Do not use sharp tools that might damage the fuse or holder.
- Inspect the fuse for any visible damage or burn marks.
Dispose of the old fuse properly. Keep the fuse holder open only as long as needed to replace the fuse. Close it securely after removing the old fuse.
Installing The New Fuse
Installing the new fuse in your string lights is a simple task that ensures your decorations shine safely and brightly. Taking care during this step prevents future electrical issues and keeps your lights functioning properly. Let’s focus on the key points that will make this process smooth and effective.
Matching Fuse Ratings
Always check the fuse rating printed on the old fuse or in the string light’s manual before you buy a replacement. Using a fuse with the wrong rating can cause your lights to blow out again or even create a safety hazard.
Look for both the amperage (A) and voltage (V) ratings. For example, if your old fuse is rated 3A/125V, your new fuse should match exactly.
Have you ever tried fixing something only to realize the replacement part was wrong? Matching ratings is a small detail that saves time and frustration.
Proper Insertion Techniques
Once you have the correct fuse, insert it gently but firmly into the fuse holder. Make sure it fits snugly without forcing it.
Check the orientation if your fuse has polarity markings. Although many fuses are non-polarized, some require correct positioning to work properly.
After inserting the fuse, close the fuse holder securely. A loose cover can cause poor contact or let moisture in, damaging the fuse and your lights.
Have you noticed flickering lights after replacing a fuse? It’s often because the fuse wasn’t seated properly. Taking a moment here prevents that annoyance.
Credit: www.homedepot.com
Testing The Lights
Testing your string lights after replacing a fuse is crucial. It confirms whether your repair worked and ensures your lights are safe to use. Skipping this step can leave you guessing if the issue is truly fixed or if there’s another problem at play.
Plugging In And Checking
Start by plugging your string lights into a power source. Watch closely to see if the bulbs light up as expected. If they glow evenly, you’ve likely done a good job replacing the fuse.
Pay attention to any flickering or dim spots. These signs might mean a loose connection or a partially damaged bulb. You can gently wiggle the string or bulbs to check for unstable contacts.
Troubleshooting Common Issues
If the lights don’t turn on, don’t panic. It’s easy to miss simple things like the fuse not seated properly or the power outlet being faulty. Try testing the outlet with another device to rule out power supply issues.
Also, inspect the fuse holder again. Sometimes the fuse looks fine but doesn’t sit tightly, preventing the circuit from completing. Double-check the fuse rating matches what your string lights require; using the wrong fuse can cause them not to work or blow out quickly.
Have you noticed certain bulbs always stay dark? Replacing or rearranging those bulbs can help. Sometimes one bad bulb can stop the entire string from lighting up. Testing each bulb individually can save you time and frustration.
Maintenance Tips
Keeping your string lights in great shape goes beyond just replacing a fuse when it blows. Regular maintenance can save you from frequent fuse replacements and keep your lights shining bright for longer. Here are some practical tips that I’ve found useful through hands-on experience with holiday decorations.
Regular Fuse Checks
Check your string light fuses before plugging them in. A quick visual inspection can reveal if a fuse is burnt out or damaged. This simple step prevents unexpected outages and helps you spot potential problems early.
Make it a habit to carry spare fuses that match your string lights. When I started doing this, I never had to pause my decorating because of a missing fuse. It’s a small effort that keeps your setup hassle-free.
Extending String Light Lifespan
Handle your string lights gently. Avoid pulling or twisting the cords tightly, as this stresses the wiring and can cause fuse issues. Store them loosely coiled in a dry place to prevent damage over time.
Consider using a surge protector to shield your string lights from power spikes. I once lost several bulbs and had to replace fuses multiple times after a sudden storm surge. Using a surge protector can protect your investment and reduce fuse problems.
- Keep lights away from moisture and direct sunlight when not in use.
- Replace any damaged bulbs immediately to prevent electrical issues.
- Test lights in sections to identify and fix problems quickly.
Have you noticed your lights flickering or going out more frequently? This might be a sign that maintenance is overdue. Regular care ensures your string lights stay reliable and beautiful year after year.
Frequently Asked Questions
How Do I Identify A Blown Fuse In String Lights?
To identify a blown fuse, check the fuse holder in the plug. Open it and inspect the fuse wire. If the wire is broken or burnt, the fuse is blown and needs replacement.
What Type Of Fuse Is Needed For String Lights?
Use the fuse type specified on your string lights’ packaging or manual. Most string lights require 3-amp or 5-amp fuses. Using the correct fuse ensures safety and proper function.
Can I Replace String Light Fuses Without Tools?
Yes, some string lights have fuse holders that open by hand. However, a small screwdriver may help to open tight holders safely. Always unplug the lights before replacing the fuse.
How Often Should I Check Or Replace String Light Fuses?
Check the fuse whenever the string lights stop working. Replace the fuse only if it is blown. Routine checks during the holiday season help prevent unexpected outages.
Conclusion
Replacing a fuse in string lights is simple and safe. Always unplug the lights before starting. Use the right fuse type for best results. Check the fuse holder carefully to avoid damage. After replacement, test the lights to see if they work.
Regular checks keep your lights bright and safe. Now, you can enjoy your string lights without worry. Small steps make a big difference in home safety. Keep these tips handy for easy fuse fixes anytime.


