
Is your light with a pull string not working right? It can be frustrating when you reach up to turn on the light, and nothing happens.
But don’t worry—you don’t need to call an electrician just yet. You can fix it yourself with a few simple steps. In this guide, you’ll learn exactly what to check and how to get your pull-string light working again quickly and safely.
Keep reading, and soon your room will be bright once more.
Tools And Materials Needed
Before you fix a light with a pull string, gathering the right tools and materials can save you time and frustration. Having everything ready means you can focus on the repair instead of hunting for items mid-task. It also helps you avoid unnecessary trips to the store or interruptions in your workflow.
Essential Tools For The Repair
- Screwdriver set:Both flathead and Phillips screwdrivers are often needed to open the light fixture or remove screws holding parts in place.
- Needle-nose pliers:Perfect for gripping small parts and pulling or twisting wires safely.
- Wire stripper:If you need to replace or reconnect the pull string mechanism, stripping wires cleanly is crucial.
- Voltage tester:Always test to ensure the power is off before touching any wiring to avoid shocks.
- Step ladder:A sturdy ladder helps you reach ceiling fixtures safely without stretching or risking a fall.
Materials You Will Need
- Replacement pull string switch:If the existing switch is broken, having a compatible replacement ready is key.
- Pull string cord:Choose a durable string that fits your switch mechanism; cotton or nylon cords are common choices.
- Electrical tape:Useful for securing wire connections and ensuring safety.
- Wire connectors (wire nuts):These help join wires securely without exposed ends.
- Light bulb:Sometimes, the issue might be the bulb itself, so having a spare on hand avoids extra trips.
Why Preparation Matters
I once started fixing a pull string light only to realize I didn’t have the right replacement switch. It meant stopping halfway, ordering parts, and extending the repair over days. Have you ever faced a similar situation where missing one tool delayed your project?
Preparing your tools and materials before you begin helps you stay focused and finish faster. It also boosts your confidence, knowing you can handle unexpected challenges during the repair.

Credit: www.familyhandyman.com
Safety Precautions
Fixing a light with a pull string might seem straightforward, but safety should always come first. Ignoring basic precautions can lead to electrical shocks or injury. Let’s look at the key safety steps you must take before you start working on your pull-string light.
Turn Off The Power
Never begin any electrical repair without cutting off the power supply. Locate the correct circuit breaker or fuse box and switch off the power to the light fixture. Double-check that the light does not turn on by trying the pull string once more.
Have you ever assumed the power was off, only to get a shock? It’s a mistake that can happen to anyone but is easily avoided with this simple check.
Use The Right Tools
Using improper tools can cause damage or injury. Make sure you have insulated screwdrivers and pliers designed for electrical work. These tools protect you from accidental electric shocks.
If you don’t have these tools, pause and get them first. It’s better to spend a little extra time preparing than risk harm.
Work In A Dry Environment
Water is a conductor of electricity. Avoid working on the light if the area is wet or damp. If you notice moisture near the fixture or on your hands, wait until everything is completely dry.
Have you checked your surroundings for wet spots or leaks? This small step can save you from serious accidents.
Wear Safety Gear
Protect your eyes with safety glasses, especially if you’re dealing with old fixtures that might have dust or debris. Wearing gloves can also shield your hands from sharp edges and reduce shock risk.
Think about how often small shards or dust can cause irritation—safety gear minimizes this risk and keeps you comfortable during the repair.
Follow Manufacturer Instructions
Every light fixture can have different components and wiring. Read the manufacturer’s guide or label instructions carefully before you begin. This helps you understand specific safety warnings and proper handling methods.
Have you ever skipped the manual and faced unexpected problems? Taking time to read instructions often prevents costly mistakes.
Test The Pull String Mechanism Carefully
Once you believe the repair is done, test the pull string gently. Avoid pulling it too hard or quickly to prevent damage. If the string feels stuck or unusual, stop and inspect the mechanism again.
How many times have you pulled too hard and broken something? A gentle approach saves your light and your patience.
Identifying The Problem
Check if the light bulb is loose or burned out. Listen for any unusual sounds when pulling the string. Look for visible damage to the pull string or switch mechanism.
Identifying the problem with a light pull string is crucial. A faulty pull string can disrupt your lighting. To fix it, identify the exact issue. This requires examining various components. Let’s explore these components one by one.Checking The Pull String
Start by gently pulling the string. Is it loose or stuck? A loose string might need tightening. A stuck string could indicate wear. Check for visible damage. Frays or knots can hinder function. Replace the string if necessary.Inspecting The Switch Mechanism
Next, focus on the switch itself. Listen for a click when you pull the string. No sound might mean a broken switch. Also, feel if the switch is stuck or jammed. This could require cleaning or replacement. Ensure the switch moves smoothly.Examining The Wiring
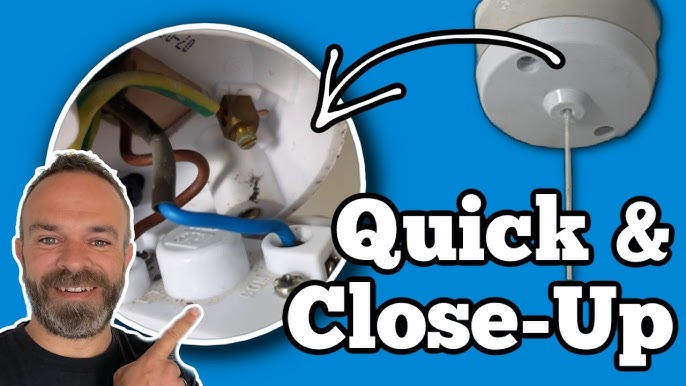
Finally, check the wiring inside the fixture. Loose wires can cause connection issues. Look for burnt or damaged wires. These need immediate attention. Use a voltage tester for safety. Always ensure power is off before inspection.Removing The Light Fixture
Removing the light fixture is a necessary step to fix a light with a pull string. It lets you access the wiring and the pull switch inside. Doing this safely avoids electrical hazards and helps you work comfortably.
Before starting, make sure to turn off the power at the circuit breaker. Use a voltage tester to confirm no electricity flows to the fixture. This precaution protects you from shocks.
Gathering The Necessary Tools
- Screwdriver (flathead and Phillips)
- Voltage tester
- Ladder or step stool
- Flashlight
- Small container for screws
Turning Off The Power Safely
Locate the correct circuit breaker in your home’s electrical panel. Switch it off to cut power to the light fixture. Use a voltage tester on the fixture wires to double-check.
Removing The Light Bulb And Shade
Unscrew the light bulb carefully and set it aside. Remove the light shade or cover by loosening screws or clips. This gives clear access to the fixture base.
Unscrewing The Fixture From The Ceiling
Look for screws or mounting brackets holding the fixture. Use the screwdriver to remove them slowly. Support the fixture as you loosen it to prevent falls.
Disconnecting The Wiring
Gently pull the fixture down to reach the wires. Note how wires connect—take a photo for reference. Unscrew wire nuts and separate the wires carefully.
Fixing Or Replacing The Pull String
Fixing or replacing the pull string on a light fixture can restore its function quickly. The pull string often gets tangled, stretched, or broken. Repairing it might only take a few simple actions. Sometimes, replacing the string is the best choice for long-term use.
Untangling Or Adjusting The String
First, check if the pull string is tangled or caught inside the light. A twisted string can stop the light from turning on or off. Gently pull the string to see if it moves freely. If it feels stuck, try untangling knots carefully.
Adjust the string length by pulling it slightly to shorten or lengthen. Make sure the string hangs straight and can be pulled easily. Avoid pulling too hard to prevent breaking it.
Replacing The Pull String
Start by removing the old string from the light fixture. Most pull strings are tied or looped inside the switch. Use scissors to cut the damaged string close to the knot.
Choose a new string of similar thickness and strength. Nylon or cotton cords work well. Thread the new string through the hole or slot where the old string was.
Tie a secure knot inside the switch to hold the string in place. Test the pull action before closing the fixture. Trim any extra string length for a neat finish.

Credit: www.youtube.com
Repairing The Switch
Repairing the switch on a light with a pull string can often restore functionality without the need for a full replacement. Sometimes the issue lies in dirt or corrosion inside the switch, which can be cleaned for a quick fix. Other times, the switch may be damaged and require swapping out for a new one.
Cleaning The Switch
Start by turning off the power to the light to keep yourself safe. Remove the switch cover and gently inspect the inside for dust, grime, or corrosion. You might be surprised how much dirt can build up inside a switch that hasn’t been cleaned for years.
Use a small brush or a cotton swab dipped in rubbing alcohol to clean the contact points. This removes any buildup that might be preventing proper electrical flow. After cleaning, let everything dry completely before testing the switch again.
Have you ever ignored a flickering light only to find a simple cleaning fixed it? Sometimes, the solution is easier than you think.
Replacing The Switch
If cleaning doesn’t solve the problem, it’s time to replace the switch. First, make sure the power is off at the breaker to avoid electric shock. Carefully disconnect the wires from the old switch, noting where each wire goes.
Pick up a replacement switch that matches the original’s voltage and type. Connect the wires to the new switch exactly as they were on the old one. Tighten the screws securely but don’t overtighten to avoid damaging the wires.
Once reassembled, turn the power back on and test the pull string. If the light works smoothly, you’ve successfully fixed the problem. If not, double-check your connections—sometimes the smallest mistake can cause the biggest headaches.
Reassembling And Testing
Reassembling and testing the light with a pull string is a crucial step. It ensures the repair is complete and the light works safely. Take your time to put everything back in place carefully.
Start by aligning all parts exactly as they were before disassembly. Check the pull string mechanism to ensure it moves smoothly. Avoid forcing any parts to prevent damage.
Reattaching The Light Fixture Cover
Place the cover back over the light fixture gently. Match the screw holes and avoid cross-threading screws. Tighten screws evenly to secure the cover firmly. Loose covers can cause the fixture to wobble or fall.
Securing The Pull String Mechanism
Make sure the pull string is threaded correctly through the mechanism. It should move freely without sticking or catching. Adjust the string length to suit your reach and comfort. A well-set string improves ease of use.
Testing The Light Functionality
- Turn the power back on at the switch or breaker.
- Pull the string slowly to check if the light turns on and off.
- Listen for any unusual sounds or resistance in the mechanism.
- Repeat the pull a few times to confirm consistent operation.
Check the light bulb for a proper fit and brightness. If the light flickers or fails to turn on, recheck connections. Confirm the pull string is not tangled or too tight.
Tips For Preventing Future Issues
Preventing future issues with a light that uses a pull string saves time and effort. Taking simple steps can keep the light working smoothly. Regular care helps avoid common problems like a stuck or broken pull string.
Follow these easy tips to keep your pull string light in good condition for a long time.
Use Gentle Pulling Motions
Always pull the string slowly and gently. Avoid sharp or quick tugs. This reduces wear on the string and the internal mechanism. A smooth pull extends the life of the light switch.
Check The Pull String Regularly
Look at the string often for signs of fraying or damage. Replace the string if it starts to wear out. A strong string prevents sudden breaks and keeps the light working well.
Keep The Pull String Clean
Dust and dirt can make the pull string sticky or hard to use. Wipe the string and the switch area with a dry cloth. Clean strings move freely and last longer.
Secure The String Properly
Make sure the pull string is tied tightly to the switch. Loose knots can slip and cause the string to come off. A secure knot keeps the string in place and working.
Avoid Overloading The Light Fixture
Use the correct wattage bulbs for the fixture. High wattage bulbs can cause heat damage to the switch parts. Proper bulbs help maintain the switch’s function and safety.
Schedule Periodic Switch Inspections
Set a reminder to check the pull string and switch every few months. Early checks help spot issues before they become bigger problems. Fixing small problems saves money and effort.

Credit: www.reddit.com
Frequently Asked Questions
How Do I Fix A Light With A Broken Pull String?
First, turn off the power. Remove the light cover. Replace the pull string mechanism carefully. Reassemble and test the light.
Why Is My Pull String Light Not Turning On?
The pull string switch might be faulty or disconnected. Check the wiring and replace the switch if needed.
Can I Replace A Pull String Switch Myself?
Yes, with basic tools and safety precautions, you can replace the switch. Always turn off electricity first.
What Tools Are Needed To Fix A Pull String Light?
You need a screwdriver, replacement switch, wire stripper, and electrical tape. Safety gloves are recommended.
Conclusion
Fixing a light with a pull string is simple and quick. Follow each step carefully to avoid mistakes. Check the string and switch for any damage first. Replace broken parts with the right tools. Test the light after repair to ensure it works well.
Regular care helps your light last longer. This guide makes the process clear and easy to follow. You can now handle this common problem yourself. No need to call a professional every time. Save time and money by doing it right.


