
Are you ready to add a unique touch to your workspace? Building your own wooden desk lamp is easier than you think, and it gives you a chance to create something both beautiful and practical.
Imagine having a lamp that fits perfectly with your style and lights up your desk just the way you want. In this step-by-step guide, you’ll discover simple techniques and handy tips to bring your DIY project to life. Keep reading, and by the end, you’ll have a lamp that’s not just functional but truly yours.
Let’s get started!
Materials And Tools Needed
Building a wooden desk lamp requires careful selection of materials and tools. Choosing the right wood and tools ensures a smooth crafting process. Having all supplies ready saves time and avoids interruptions.
This section outlines the essential materials and tools needed for your DIY wooden desk lamp project.
Selecting The Wood
Pick wood that is strong and easy to shape. Common options include pine, oak, or maple. Pine is soft and affordable, ideal for beginners. Oak and maple are harder and last longer. Ensure the wood is dry and smooth to avoid cracks.
Essential Tools
- Hand saw or electric saw for cutting wood pieces
- Sandpaper or electric sander for smooth surfaces
- Drill with bits for making holes
- Screwdriver for assembling parts
- Measuring tape or ruler to ensure accuracy
- Clamps to hold pieces in place while gluing
Additional Supplies
- Wood glue for strong joints
- Light socket and bulb compatible with your design
- Electrical wire and plug for power connection
- Wood finish or paint to protect and beautify
- Screws and nails for extra support
- Protective gear like gloves and safety glasses

Credit: www.youtube.com
Designing Your Desk Lamp
Designing your wooden desk lamp is the first step in creating a unique and functional piece. This phase shapes how the lamp will look and work. Careful planning saves time and materials later. Focus on style and size to fit your space and needs. A good design balances beauty and practicality.
Choosing The Style
Select a style that matches your room and taste. Think about simple shapes like cubes or cylinders for a modern look. Rustic designs use rough wood and natural finishes. Vintage styles include ornate details and classic shapes. Minimalist lamps focus on clean lines and few parts. Choose a style that feels right and suits your skills.
Measuring And Sketching
Start with clear measurements to ensure the lamp fits your desk. Measure the height and width of your workspace. Decide how tall the lamp should be to light your work properly. Sketch your design on paper with all parts and sizes. Use simple drawings to plan the lamp’s base, arm, and shade. Label each part with its dimensions. This sketch guides you through building and helps avoid mistakes.
Cutting The Wood Pieces
Cutting the wood pieces accurately is essential for a sturdy desk lamp. Use a saw to cut according to your design. Make sure each piece fits well to ensure stability and a polished look.
Cutting the wood pieces is a crucial step in crafting a wooden desk lamp. The precision during this stage ensures that all parts fit together seamlessly. Proper technique and safety are paramount to achieving the desired results. Below, we will explore how to mark the wood accurately and employ safe cutting techniques.Marking The Wood
Begin by gathering your wooden planks and a measuring tape. Measure the dimensions needed for each part of the lamp. Use a pencil to mark the cutting lines clearly. Ensure your marks are visible but light enough to sand away later. A ruler or a square tool helps keep lines straight. Double-check measurements before moving to the next step. This prevents waste and ensures all pieces fit perfectly.Safe Cutting Techniques
Safety is key when cutting wood. Wear safety goggles to protect your eyes from dust and debris. Use a stable workbench to support your wood. A saw with a sharp blade makes cleaner cuts. Secure the wood with clamps to prevent movement. Follow the marked lines steadily and slowly. This reduces the chance of splintering. Use a sanding block to smooth out edges after cutting. This ensures safety and improves the lamp’s appearance. Always unplug power tools when not in use.Assembling The Lamp Base
Building the base of your wooden desk lamp sets the foundation for the entire project. This stage requires precision and care to ensure the lamp not only looks great but stands firm and functions well. Let’s dive into how you can assemble the base effectively, focusing on connecting the wood parts and making sure the structure stays stable.
Joining Wood Parts
Start by lining up your wooden pieces exactly as they will appear in the final lamp base. Use clamps to hold them in place while you work—this keeps everything aligned and prevents shifting.
Choose the right adhesive for wood, like wood glue, and apply it evenly on the joining surfaces. Press the parts together firmly and wipe away any excess glue before it dries.
For added strength, consider drilling pilot holes and securing the joints with screws or small nails. This combination of glue and screws creates a bond that lasts.
Ensuring Stability
Once the parts are joined, test the base’s stability by gently pressing down and checking for any wobble. If it moves, add small wooden shims or adjust the joints to level the base.
You can also add a wider bottom plate or rubber feet to prevent slipping and improve balance. These small additions make a big difference in everyday use.
Ask yourself: Is the base sturdy enough to support the lamp’s weight without tipping? If not, reinforce it before moving forward.
Wiring The Lamp
Wiring the lamp is a key part of this wooden desk lamp project. It brings your design to life by providing light. This stage requires focus and care to ensure the lamp works safely and well. The right parts and careful connections make all the difference.
Selecting The Right Bulb And Socket
Choose a bulb that fits the style and size of your lamp. LED bulbs are energy-saving and last a long time. Check the bulb’s wattage to avoid overheating. Select a socket that matches the bulb and fits your lamp’s design. Standard sockets are easy to find and install. Make sure the socket can handle the bulb’s power.
Connecting Electrical Components
Use good-quality wires made for lamps. Strip the wire ends carefully to expose the metal. Attach wires to the socket terminals firmly. Connect the power cord wires to the lamp’s switch and socket. Secure all connections with wire nuts or electrical tape. Double-check that no wires touch each other. This prevents short circuits and sparks.
Safety Tips
- Unplug the lamp while working on wiring.
- Use insulated tools to avoid electric shocks.
- Check for damaged wires and replace them.
- Do not exceed the recommended bulb wattage.
- Test the lamp in a safe area before final assembly.
- Keep the lamp away from water and flammable materials.
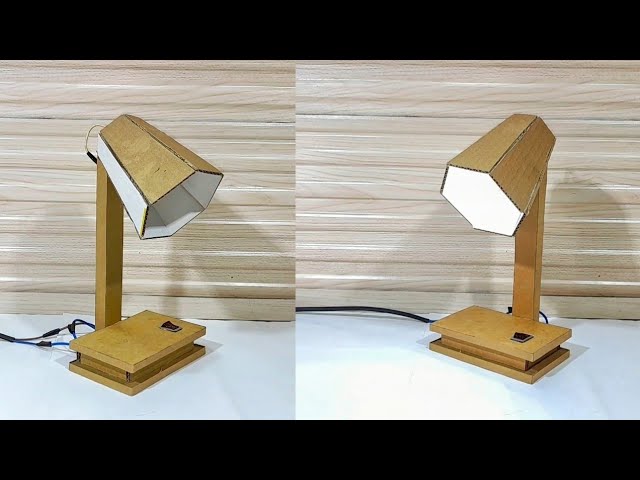
Adding The Lampshade
Adding the lampshade to your wooden desk lamp is where creativity meets function. The shade not only controls the light’s brightness but also defines the style of your lamp. Choosing or making the right lampshade can transform a simple wooden base into a statement piece for your workspace.
Choosing Or Making A Shade
Think about the atmosphere you want to create at your desk. Do you prefer soft, warm light or something brighter and more direct? Lampshades come in many materials like fabric, paper, metal, or even wood, each offering different light diffusion.
If you enjoy hands-on projects, making your own shade allows you to customize size, shape, and color. Using materials like parchment paper or thin fabric stretched over a wire frame can create a unique look. Have you considered repurposing old lampshades or using unexpected items like a wooden slat frame to match your desk’s aesthetic?
Attaching The Shade Securely
Your lampshade needs to sit firmly on the lamp without wobbling or tilting. A loose shade can not only look sloppy but also pose a safety risk near the bulb. Check if your lamp base has a harp or a socket ring designed to hold the shade in place.
If your lamp design doesn’t include these, simple hardware like clips or brackets can help. Use screws or strong glue designed for wood and fabric to secure attachments. Don’t forget to test the balance by gently moving the lamp after installation—does it stay steady?
Finishing Touches
Finishing touches give your wooden desk lamp a professional look. These final steps protect the wood and enhance its beauty. Careful attention here makes a big difference in the lamp’s lifespan and style.
Sanding And Smoothing
Start by sanding all surfaces with fine-grit sandpaper. This removes rough spots and splinters. Sand in the direction of the wood grain for a smooth finish. Use a soft cloth to wipe away dust after sanding. Smooth wood feels better and looks cleaner.
Applying Stain Or Paint
Choose a stain or paint that matches your room’s style. Stain shows the wood grain and adds color. Paint can give a bold or subtle look. Apply a thin, even coat with a brush or cloth. Let it dry completely before adding more layers. Multiple coats improve color depth and coverage.
Sealing The Wood
Seal the wood to protect it from moisture and wear. Use a clear polyurethane or wood sealer. Apply with a brush in long, smooth strokes. Allow each coat to dry before adding another. Sealing also adds shine and makes cleaning easier. Your lamp will stay beautiful for years.

Credit: m.youtube.com
Testing And Troubleshooting
Testing and troubleshooting are key parts of building your wooden desk lamp. These steps ensure your lamp works safely and efficiently. Careful checks help spot issues early. Fixes prevent damage and save time. Follow simple tests to confirm every connection is solid. Learn to identify common problems and their easy solutions. This way, your lamp will shine bright and last long.
Checking Electrical Connections
Start by inspecting all wire connections. Make sure wires are tightly twisted and secure. Loose wires can cause flickering or no light. Use a small screwdriver to tighten any loose terminals. Check for any exposed wire strands. Cover them with electrical tape for safety. Confirm the bulb socket is firmly attached. Test the power switch by turning it on and off. If possible, use a multimeter to check voltage at key points. This tool helps verify electricity flows correctly through the lamp.
Common Issues And Fixes
Some problems are simple to fix. Here are frequent issues and solutions:
- Lamp won’t turn on:Check if the bulb is screwed in properly. Replace the bulb if it is burned out.
- Flickering light:Tighten loose wire connections. Make sure the bulb is compatible with the lamp.
- Switch feels loose or doesn’t click:Replace the switch. Loose switches can fail to complete the circuit.
- Overheating lamp base:Use a bulb with lower wattage. Ensure proper ventilation around the lamp.
- Electric shock sensation:Stop using the lamp immediately. Check for damaged wires and fix or replace them.
Tips For Customization
Customizing your wooden desk lamp makes the project truly yours. It lets you match the lamp to your style and needs. Small changes can create a big impact on the final look and function.
Personalizing Designs
Choose wood types that fit your room’s color and feel. Light woods like pine give a bright, airy look. Dark woods like walnut add warmth and elegance.
Carve or engrave simple patterns or shapes on the lamp base. Paint or stain the wood in colors that match your decor. Use fabric or leather for the lamp shade to add texture and style.
Try unique shapes for the lamp arm or base. Curves or angles can make the lamp stand out. Mix wood with metal parts for a modern touch.
Adding Functional Features
- Use a dimmer switch to control light brightness easily.
- Add USB ports or wireless charging pads for convenience.
- Include adjustable arms or swivels to direct light where needed.
- Install a touch sensor for smooth on/off control.
- Place storage compartments for pens or small items in the base.
These features improve how you use the lamp daily. They make your desk more organized and efficient.

Credit: www.youtube.com
Frequently Asked Questions
What Materials Do I Need For A Wooden Desk Lamp Diy?
You need wood, a lamp kit, screws, sandpaper, wood glue, and a drill. Choose durable wood like oak or pine for stability and aesthetics.
How Long Does It Take To Build A Wooden Desk Lamp?
Building a wooden desk lamp usually takes 3 to 5 hours. This depends on your skill level and the complexity of the design.
Can I Customize The Lamp Design And Size?
Yes, you can customize the design and size to fit your space. Adjust the wood pieces and lamp height according to your preference.
What Safety Tips Should I Follow During The Project?
Wear safety goggles and gloves while cutting and drilling wood. Work in a well-ventilated area and handle electrical components carefully.
Conclusion
Building a wooden desk lamp is a fun and rewarding project. You can customize it to fit your style and space. The steps are simple and don’t need special skills. Working with wood and light gives a great sense of achievement.
This lamp will brighten your desk and your day. Try it yourself and enjoy the process. Small projects like this help you learn new skills. Start with basic tools and materials, then see your idea come alive. Keep your workspace safe and take your time.
Enjoy crafting something useful and beautiful.


