
Is your desk lamp’s on-off switch not working anymore? Don’t worry—you don’t have to buy a new lamp or call an expensive electrician.
You can fix it yourself, even if you’ve never done electrical repairs before. Imagine saving money and getting your lamp back to perfect working order in just a few simple steps. In this guide, you’ll discover exactly how to replace the on-off switch on your desk lamp quickly and safely.
Keep reading, and you’ll be lighting up your workspace again in no time!

Credit: www.amazon.com
Tools And Materials Needed
Replacing the on-off switch on a desk lamp requires specific tools and materials. Having the right items ready makes the task smoother and safer. This section lists everything needed to complete the job efficiently.
Essential Tools
- Screwdriver set (flathead and Phillips)
- Wire stripper or cutter
- Needle-nose pliers
- Multimeter for testing
- Electrical tape
- Soldering iron (optional, for soldered connections)
Materials Required
- Replacement on-off switch matching lamp specifications
- Electrical wires (if old wires are damaged)
- Heat shrink tubing (for insulation)
- Wire connectors or terminal caps
Safety Equipment
- Insulated gloves
- Safety glasses
- Non-conductive work surface
Gathering these tools and materials before starting will save time and reduce mistakes. Always prioritize safety by using protective gear and working on a stable surface.
Safety Precautions
Replacing the on/off switch on your desk lamp might seem straightforward, but skipping safety steps can lead to accidents or damage. Taking the right precautions protects you and your lamp. Let’s focus on key safety measures to keep you safe while working.
Disconnect Power Before Starting
Always unplug your lamp from the power source before touching the switch. This simple step prevents electric shocks. Even if the lamp is off, it can still carry current if plugged in.
Use Insulated Tools
Use tools with insulated handles to avoid accidental electric shock. I once tried using a regular screwdriver and got a mild shock that could have been worse. Investing in insulated tools is worth it for safety.
Check For Damaged Wires
Inspect the lamp’s cord and internal wires before you start. Frayed or exposed wires increase the risk of shock and short circuits. If you find damaged wires, replace or repair them first.
Work In A Dry Environment
Never work on electrical components near water or in damp conditions. Moisture can conduct electricity and cause shocks. Keep your workspace dry and your hands free of moisture.
Wear Protective Gear
Wearing rubber-soled shoes and, if possible, gloves adds an extra layer of protection. This practice reduces the chance of electrical conduction through your body. Have you ever thought about how small steps like these can prevent serious injury?
Removing The Old Switch
Removing the old switch from your desk lamp is a critical step that requires care and attention. Handling electrical components safely is essential to avoid any risk of shock or damage. Taking your time and following clear steps will make this task manageable, even if you’re new to DIY repairs.
Unplugging The Lamp
Always start by unplugging your desk lamp from the power outlet. This simple action cuts off electricity and keeps you safe while working on the switch. Have you ever tried to fix something electrical without unplugging it first? It’s easy to forget, but it’s the most important safety rule.
Double-check that the lamp is completely disconnected. If your lamp has a switch that stays on, unplugging is the only way to ensure no current flows.
Accessing The Switch
Next, locate the switch housing on your lamp. Usually, this is a small box or button on the cord or base. You may need a screwdriver to remove any screws holding the cover in place.
Once open, you’ll see the switch attached to the wires. Keep track of how the switch fits in the housing — taking a photo can help you remember how to reassemble it later.
Disconnecting The Wires
Before touching the wires, confirm again that the lamp is unplugged. The switch will typically have two wires connected to it. These wires may be attached with screws or push-in connectors.
Carefully loosen the screws or gently pull the wires free. Avoid pulling on the wires themselves; instead, grip the connectors or terminals. This prevents damage to the wiring and makes reconnecting the new switch easier.
Choosing A Replacement Switch
Select a switch that matches your desk lamp’s voltage and size. Ensure it fits the wiring and mounting space for easy installation. Choose a durable switch for safe, long-lasting use.
Choosing the right replacement switch for your desk lamp is crucial to ensure both functionality and safety. Not all switches are created equal, and selecting one that matches your lamp’s specifications can save you time and hassle. This section will guide you through the key considerations in picking the perfect switch.Understand The Type Of Switch You Need
Desk lamps typically use one of several types of switches, such as toggle, rocker, or rotary switches. Identify the type your lamp currently uses by examining its appearance and mechanism. This step ensures compatibility and seamless integration with your lamp’s design.Check The Switch’s Electrical Rating
Every switch comes with a specific electrical rating, which indicates the maximum voltage and current it can handle. Compare the replacement switch’s rating with your lamp’s requirements to avoid electrical hazards. Using a switch with a lower rating than your lamp needs can lead to overheating and potential fire risks.Consider The Switch’s Aesthetic And Design
Aesthetics matter, especially if your lamp is a centerpiece in your room. Choose a switch that complements the lamp’s style and color scheme. A well-chosen switch can enhance the overall look of your lamp, making it both functional and stylish.Ensure Ease Of Installation
Look for replacement switches that come with clear installation instructions or even video tutorials. This can save you time and frustration, especially if you’re not a DIY expert. Some switches are designed with user-friendly features like snap-in installation, which can make the process much simpler.Consider Compatibility With Smart Features
If you’re tech-savvy, you might want to explore switches that offer smart features. These switches can connect to your home automation system, allowing you to control the lamp with your smartphone or voice commands. This adds an extra layer of convenience and modernity to your lighting setup. By focusing on these aspects, you’ll ensure that your lamp functions optimally and complements your living space. Have you ever faced challenges in choosing the right component for your DIY project? Let us know in the comments!Installing The New Switch
Installing the new switch is a key part of fixing your desk lamp. This process involves careful handling of wires and secure placement of the switch. Follow the instructions to ensure a safe and effective installation.
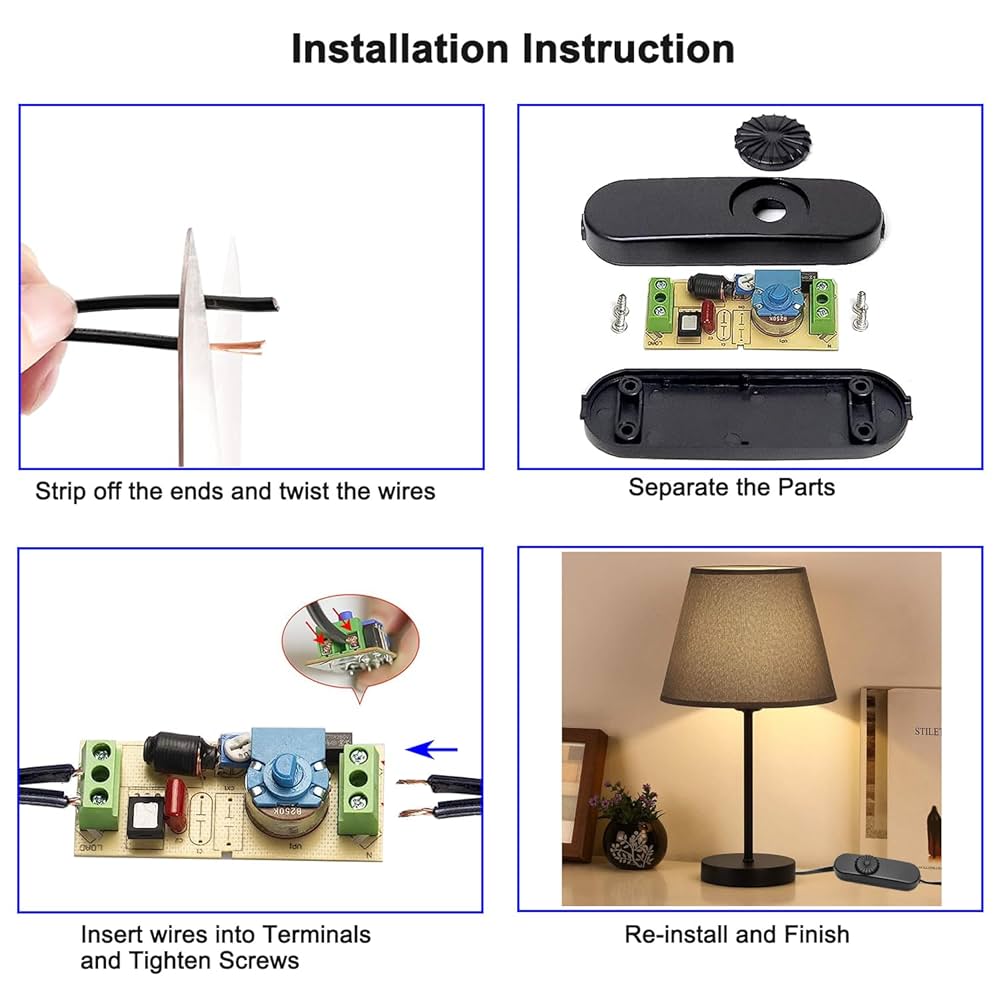
Connecting The Wires
First, identify the wires coming from the lamp. Usually, there are two wires that connect to the switch. Match each wire to the correct terminal on the new switch.
Use a screwdriver to loosen the terminal screws. Insert the wire ends under the screws. Tighten the screws firmly to hold the wires in place.
Make sure no bare wire is exposed outside the terminals. This prevents short circuits and electrical hazards.
Securing The Switch
Place the new switch into the switch holder or lamp frame. Align it properly so it fits snugly without forcing it. Use screws or clips provided to secure the switch.
Check that the switch moves smoothly without wobbling. A loose switch can cause poor contact and malfunction.
Testing The Connection
Before closing the lamp cover, plug the lamp into a power outlet. Turn the switch on and off several times. Look for a steady light without flickering.
If the lamp works well, unplug it and finish assembling the lamp. If not, recheck the wire connections and switch placement.
Reassembling The Lamp
Reassembling the lamp after replacing the on/off switch is a crucial step to ensure your desk lamp works safely and smoothly. Taking your time and paying attention to detail will help you avoid common problems like loose connections or misaligned parts. Let’s focus on how you can put everything back together correctly.
Aligning The Lamp Components Properly
Start by lining up the lamp base, arm, and shade just like they were before. Double-check that the switch fits snugly into its slot without forcing it. If parts don’t seem to fit well, pause and review the wiring and switch placement—you don’t want to damage anything now.
Securing Screws And Fasteners Firmly
Use a screwdriver to tighten all screws and fasteners carefully. Avoid over-tightening, which can strip threads or crack plastic parts. If a screw feels loose after tightening, consider replacing it with a new one to keep your lamp stable and safe.
Testing The Switch Before Final Assembly
Before snapping everything shut, plug in the lamp and test the switch. Does the light turn on and off smoothly? If not, check the wiring connections again. This step saves you from having to reopen the lamp after fully assembling it.
Reattaching The Lamp Shade And Bulb
Once the switch works well, carefully reattach the lamp shade and screw in the bulb. Make sure the bulb matches the lamp’s wattage recommendation to avoid overheating. Handle the bulb by its base to avoid oils from your fingers shortening its lifespan.
Final Safety Check
Finally, inspect the entire lamp for any exposed wires or loose parts. Is the cord free from damage and positioned safely? Your lamp should feel solid and look as neat as it did before you started.
Troubleshooting Common Issues
When your desk lamp’s on/off switch stops working, it can be frustrating. Before replacing the switch, it’s important to identify the real issue. Troubleshooting helps you avoid unnecessary parts replacement and saves time.
Checking The Power Source And Cord
Start by making sure your lamp is actually receiving power. Try plugging it into a different outlet to rule out a faulty socket.
Inspect the power cord for any visible damage like cuts or frays. Even a small break inside the cord can stop your lamp from turning on.
Have you noticed any flickering or intermittent power? That often points to a damaged cord or loose connection rather than a switch problem.
Testing The Switch With A Multimeter
If the power source and cord are fine, the next step is to test the switch itself. A multimeter can check if the switch is making a proper connection when toggled.
Set your multimeter to continuity mode, then touch the probes to the switch terminals. If the meter doesn’t beep or show continuity when switched on, the switch is faulty.
This simple test saves you from guessing and ensures you only replace the switch when necessary.
Inspecting Internal Wiring Connections
Sometimes the problem isn’t the switch but loose wires inside the lamp. Carefully open the lamp’s base or housing where the switch is located.
Look for wires that are disconnected, corroded, or poorly connected. Tightening or reattaching these wires might fix the issue without swapping the switch.
Wiring problems can cause the switch to seem broken, so it’s worth checking before buying a new part.
Identifying Signs Of Wear Or Damage On The Switch
Physical signs like cracks, corrosion, or sticky buttons usually mean the switch needs replacing. You might notice the switch feels loose or doesn’t click properly.
When I once ignored a sticky switch, the lamp stopped working altogether after a few days. Replacing the switch fixed it immediately.
Don’t overlook these visual clues—they often tell you exactly where the problem lies.

Credit: www.amazon.com
Credit: www.amazon.com
Frequently Asked Questions
How Do I Identify The Correct Switch For My Desk Lamp?
Check the lamp’s model and switch type before buying a replacement. Match voltage and size to ensure compatibility. Consult the lamp’s manual or manufacturer website for exact details.
What Tools Are Needed To Replace A Desk Lamp Switch?
You typically need a screwdriver, wire stripper, and electrical tape. These tools help safely remove and install the new switch. Always unplug the lamp before starting work.
How Can I Safely Remove The Old On/off Switch?
Unplug the lamp and open the switch housing carefully. Disconnect wires by loosening screws or clips. Avoid pulling wires to prevent damage or shorts.
Is It Necessary To Test The New Switch Before Reassembling?
Yes, test the new switch with a multimeter or by plugging in the lamp. Ensure it turns the lamp on and off properly before final assembly.
Conclusion
Replacing the on-off switch on your desk lamp is simple and quick. Take your time and follow each step carefully. Use the right tools and work safely with electricity. Fixing the switch can save money and keep your lamp working well.
You don’t need to call a professional for this small repair. Try it yourself and enjoy the bright light once again. A little effort goes a long way. Feel confident to handle this task now.


