
Are you ready to transform your outdoor space into a thriving garden? Setting up a garden bed is the first step to growing healthy plants, fresh vegetables, or beautiful flowers right at home.
Whether you have a small backyard or a cozy balcony, creating your own garden bed can be simple and rewarding. In this guide, you’ll discover easy-to-follow steps that anyone can do, even if you’re new to gardening. By the end, you’ll have everything you need to start planting with confidence and watch your garden flourish.
Let’s dive in and make your gardening dreams a reality!

Credit: migardener.com
Choosing The Location
Choosing the right location for your garden bed sets the stage for healthy plants and a thriving garden. The spot you pick affects everything from sunlight to soil quality, and even how easy it is to care for your plants. Taking time to evaluate these factors will save you frustration and help your garden flourish.
Assessing Sunlight Needs
Most plants need at least six hours of direct sunlight daily, but some prefer shade or partial sun. Watch your yard at different times of the day to see which areas get the most light.
Think about the types of plants you want. Do they thrive in full sun or shade? Mapping sunlight can prevent surprises like wilted leaves or stunted growth.
Considering Soil Drainage
Good drainage keeps roots healthy by preventing water from pooling around them. To test drainage, dig a small hole and fill it with water—if it drains within a few hours, the soil is likely suitable.
If water stays too long, you might need to improve the soil or choose a different spot. Raised beds are a great option for areas with poor drainage.
Accessibility And Space
Ask yourself: How easy will it be to reach your garden bed? Close proximity to your home encourages regular care and harvesting.
Also, consider the space around the bed for walking and tools. Crowded areas make maintenance harder and can damage plants.
Choosing a spot with enough room to expand or add features like trellises can save you effort later on.
Selecting The Garden Bed Type
Choosing the right type of garden bed sets the stage for your gardening success. It affects everything from soil quality and drainage to ease of maintenance and plant health. Think about your space, budget, and how much effort you want to put in before deciding.
In-ground Beds
In-ground beds are simply garden plots dug directly into the earth. They work well if your soil drains well and is relatively free of rocks or roots.
One advantage is that you can tap into the natural soil ecosystem, which often supports plant growth. However, you might need to improve the soil with compost or amendments before planting.
Ask yourself: Does your soil have a good texture, and is your area free from flooding? If yes, in-ground beds might suit you perfectly.
Raised Beds
Raised beds are built above ground level, often with wooden, stone, or metal borders. They offer excellent control over soil quality and drainage.
I started with a raised bed when my backyard soil was mostly clay. The difference was immediate—plants thrived and weeds were easier to manage.
Raised beds warm up faster in spring and extend your growing season. They are ideal if you want to garden on poor soil or reduce bending and kneeling.
Container Gardens
Container gardening uses pots, barrels, or other containers to grow plants. This option is perfect for small spaces, balconies, or patios.
Containers give you flexibility to move plants around to catch sunlight or protect them from harsh weather. Plus, they limit weed growth and soil pests.
Consider your watering habits, as containers dry out faster. Also, pick containers with good drainage to keep roots healthy.
Preparing The Soil
Clear the area of weeds and debris before loosening the soil. Mix in compost or organic matter to improve soil texture and nutrients. This creates a healthy base for plants to grow strong roots.
Preparing the soil is the foundation of a successful garden bed. Healthy soil supports robust plant growth. It provides essential nutrients. Let’s explore how to get your soil ready.Clearing The Area
Remove weeds, rocks, and debris. Use a garden fork or spade. Clear at least six inches deep. This ensures roots grow unhindered. A clean area also reduces pests and diseases.Testing Soil Quality
Test your soil for pH and nutrients. Use a simple home testing kit. Follow the instructions carefully. This helps identify nutrient deficiencies. Healthy pH levels range from 6 to 7.5. Adjust based on plant needs.Amending Soil With Compost
Add compost to enrich the soil. Spread a layer about two inches thick. Mix it into the topsoil. Compost improves soil structure. It enhances water retention and provides nutrients. Regularly adding compost boosts soil health.Building The Bed Structure
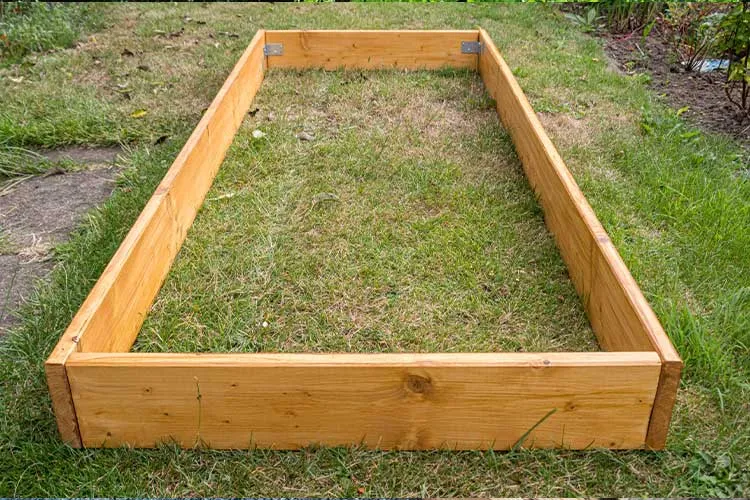
Building the bed structure is a crucial part of setting up your garden bed. A well-constructed frame not only defines the growing space but also supports healthy plant development. Getting this right can make a huge difference in your gardening success.
Gathering Materials
Start by choosing sturdy materials that will last through seasons. Wood is a popular choice because it’s easy to work with and looks natural in any garden. Cedar and redwood resist rot better, but pressure-treated wood is more budget-friendly.
Besides wood, you’ll need screws or nails, a drill or hammer, and a saw to cut the boards. Don’t forget landscape fabric if you want to keep weeds out. Gathering all your materials before starting saves time and frustration.
Constructing Frames
Lay out your boards on a flat surface to form a rectangle or square. Use a drill to secure the corners with screws—this creates a strong, stable frame. Make sure the corners are square by measuring diagonally; the measurements should match.
If you want a more custom shape, like a circle or tiered beds, you can bend flexible materials or build multiple frames of different sizes. I once built a hexagonal bed, and it was easier than expected once I planned the angles carefully.
Ensuring Proper Height And Size
The height of your bed affects soil quality and drainage. Aim for at least 12 inches tall to give roots room to grow, but 18 to 24 inches is better if you have poor soil or want to avoid bending over too much. Keep width under 4 feet so you can reach the center without stepping inside.
Think about the plants you want to grow. Deep-rooted vegetables like carrots need more depth, while herbs do fine in shallower beds. What size will give you enough space to grow what you love without overwhelming your garden?
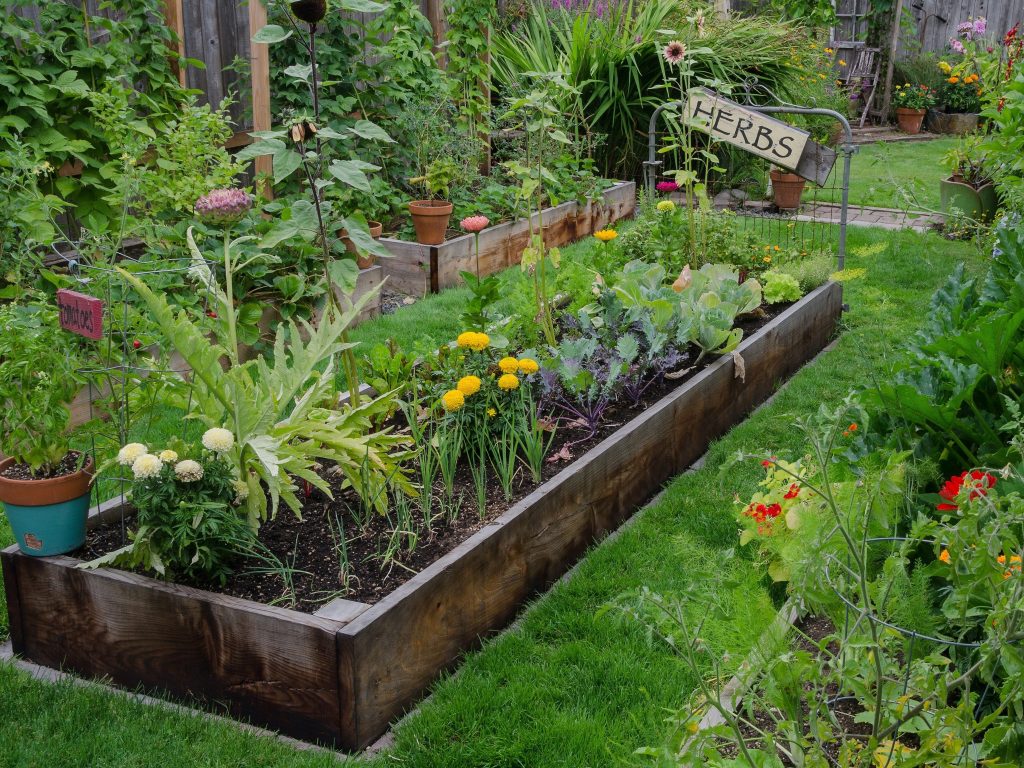
Plant Selection And Arrangement
Choosing the right plants and arranging them well is key to a thriving garden bed. Each plant has unique needs and growth habits. Proper selection and placement help plants grow strong and healthy. This section guides you through picking plants, pairing them wisely, and spacing them correctly for the best results.
Choosing Suitable Plants
Start by knowing your garden’s climate and soil type. Pick plants that match these conditions. Consider how much sunlight your bed receives daily. Some plants need full sun, while others prefer shade. Choose plants with similar water needs to simplify care. Think about your garden’s purpose too—flowers for beauty, vegetables for food, or herbs for cooking.
Companion Planting Tips
Some plants help each other grow better. This is called companion planting. For example, basil grows well near tomatoes and can improve their flavor. Marigolds keep pests away from many vegetables. Avoid planting strong-smelling herbs near delicate plants. Group plants that attract beneficial insects together. This can reduce the need for chemicals.
Spacing And Layout
Give each plant enough room to grow. Crowded plants compete for water, light, and nutrients. Check seed packets or plant tags for spacing advice. Taller plants should be at the back or center of the bed. Shorter plants go in front or around the edges. Use paths or stepping stones to reach plants without stepping on soil.

Credit: www.sproutboxgarden.com
Planting Techniques
Planting techniques play a key role in starting a healthy garden bed. The right approach helps plants grow strong and produce well. Understanding how to start seeds, choose planting depth, and water correctly is essential for success.
Seed Starting Vs Transplants
Seeds are an affordable way to start many plants. They need warm soil and proper moisture to sprout. Starting seeds indoors gives young plants a head start. Transplants are seedlings bought from a nursery. They save time and usually grow faster. Choose seeds for plants that do well in your region. Use transplants for vegetables that take longer to grow.
Planting Depth And Timing
Plant seeds at the right depth to protect them and help growth. A simple rule: plant seeds two to three times as deep as their size. Large seeds go deeper; small seeds stay near the surface. Timing depends on your climate and plant type. Plant after the last frost date for tender plants. Root vegetables and greens can go in earlier.
Watering After Planting
Watering is critical after placing seeds or transplants in the soil. Use gentle watering to avoid washing seeds away. Keep the soil moist but not soggy. Water daily until seeds germinate or transplants settle. Then, reduce watering frequency as plants grow stronger. Proper watering helps roots develop and prevents stress.
Maintenance And Care
Maintaining a garden bed ensures healthy plants and a vibrant space. Regular care helps plants grow strong and resist problems. Small daily efforts lead to big results over time.
Watering Schedules
Keep soil moist but not soaked. Early morning is the best time to water. This reduces evaporation and helps plants absorb water better. Adjust watering based on weather and soil type. Use a drip system or watering can for control.
Mulching Benefits
Mulch keeps soil cool and retains moisture. It also stops weeds from growing and protects roots. Organic mulches like straw or wood chips improve soil as they break down. Spread mulch in a 2-3 inch layer around plants. Avoid piling mulch against plant stems.
Pest And Weed Control
Check plants often for pests and damage. Remove bugs by hand or use natural sprays. Keep the garden bed clean to reduce hiding spots for pests. Pull weeds regularly to stop them from spreading. Use barriers or companion plants to protect crops naturally.
Seasonal Adjustments
Adjusting your garden bed to the changing seasons can make a huge difference in your harvest and soil health. Each season brings unique challenges and opportunities that you can prepare for in advance. Thinking ahead about seasonal needs helps you keep your garden productive year-round.
Preparing For Different Seasons
Before winter arrives, clear out spent plants and add a layer of mulch to protect your soil from frost. In spring, loosen the soil and mix in compost to boost nutrients. Summer requires consistent watering and shade for heat-sensitive plants.
Have you noticed how some plants thrive better after you change your soil care with the seasons? That’s because soil moisture and temperature affect root growth and nutrient uptake. Adjusting your garden bed according to the season lets your plants grow strong and healthy.
Crop Rotation Ideas
Rotating crops prevents soil depletion and reduces pest buildup. Try planting leafy greens like spinach or lettuce where root vegetables like carrots grew last season. Legumes such as beans and peas help add nitrogen back into the soil, making them great follow-ups to heavy feeders like tomatoes.
Consider grouping your crops into three categories:
- Heavy feeders:tomatoes, cabbage, corn
- Light feeders:carrots, onions, herbs
- Soil builders:beans, peas, clover
Switching these groups around your garden bed each season keeps the soil balanced and healthy. What combinations might work best for your space and climate?
Extending The Growing Season
Using simple tools like row covers, cold frames, or even cloches can protect plants from early frost or late spring chills. These help you start planting earlier or keep harvesting later than usual.
Raised beds warm up faster in spring and drain better in wet weather, giving you a head start. Adding organic matter also improves soil warmth and moisture retention, which supports longer growth periods.
Think about trying hardy greens like kale or Swiss chard that can handle cooler temperatures. Would you consider experimenting with these to enjoy fresh produce beyond the typical growing months?
Credit: www.melnor.com
Frequently Asked Questions
What Materials Do I Need To Set Up A Garden Bed?
You need soil, compost, garden tools, seeds or seedlings, and edging materials. Quality soil and compost ensure healthy plants. Tools like a spade and rake help prepare the bed efficiently. Edging materials keep the bed tidy and defined.
How Do I Choose The Best Location For A Garden Bed?
Pick a spot with 6-8 hours of sunlight daily. Ensure good drainage to avoid waterlogging. Avoid shaded or windy areas to protect plants. Proximity to a water source helps with easy irrigation.
How Deep Should A Garden Bed Be?
A garden bed should be at least 12-18 inches deep. This depth allows roots to grow well and access nutrients. For root vegetables, consider deeper beds of 18-24 inches. Proper depth promotes healthy plant growth and yield.
How Often Should I Water A New Garden Bed?
Water the bed immediately after planting to settle soil. Maintain consistent moisture, watering 2-3 times a week depending on weather. Avoid overwatering to prevent root rot. Adjust frequency based on soil type and plant needs.
Conclusion
Setting up a garden bed is simple and rewarding. Choose a good spot with enough sunlight. Prepare the soil by removing weeds and adding compost. Build your bed using wood or stones. Plant seeds or seedlings carefully. Water regularly and watch your plants grow.
Gardening brings joy and fresh food. Start small and learn as you go. Enjoy the process and see your garden thrive.


