
If you want to save time watering your garden and help your plants grow healthier, setting up drip irrigation for your raised beds is the way to go. Imagine your plants getting just the right amount of water, right at their roots, without any waste.
You don’t need to be a gardening expert or spend hours figuring it out. In this guide, you’ll learn simple steps to set up an efficient drip irrigation system that fits your raised beds perfectly. Keep reading, and you’ll discover how easy it is to keep your garden thriving with less effort.

Credit: www.youtube.com
Benefits Of Drip Irrigation
Drip irrigation offers several advantages that make it an ideal choice for raised beds. It delivers water directly to plant roots, making every drop count. Understanding these benefits can help you decide if this system fits your gardening needs and lifestyle.
Water Conservation
Drip irrigation targets water right where plants need it, reducing waste significantly. Unlike overhead watering, it minimizes evaporation and runoff. You might be surprised how much water you can save—sometimes up to 50% compared to traditional methods.
Have you ever noticed water pooling around plants or running off the edges of your raised beds? Drip systems prevent this by controlling the flow precisely. This efficiency not only helps your garden thrive but also lowers your water bill.
Improved Plant Health
Delivering water directly to the roots keeps the soil evenly moist without waterlogging. This balance reduces the risk of diseases caused by excess moisture on leaves. You’ll see stronger, healthier plants with less effort on your part.
One gardener shared that after switching to drip irrigation, their tomatoes produced bigger, juicier fruits with fewer signs of leaf fungus. When plants get consistent moisture, they focus energy on growth and fruit production instead of recovering from stress.
Time And Labor Savings
Setting up drip irrigation might take a bit of time upfront, but it saves hours every week. You don’t have to drag hoses or carry watering cans around your raised beds. Instead, a timer can automate watering, giving you more freedom to enjoy your garden.
Imagine spending less time on routine chores and more time experimenting with new plants or simply relaxing outdoors. With drip irrigation, your garden practically waters itself, freeing you to focus on other tasks or hobbies.

Credit: www.seattleurbanfarmco.com
Materials Needed
Setting up a drip irrigation system for your raised beds requires gathering the right materials. Each component plays a specific role in ensuring your plants receive water efficiently and consistently. Knowing exactly what you need can save you time, money, and frustration during installation.
Drip Tubing And Emitters
Drip tubing is the backbone of your irrigation system. Choose flexible tubing that fits your bed layout and is durable enough to handle weather changes. Emitters control water flow, delivering it directly to the plant roots.
You can find emitters with different flow rates—consider plants with varying water needs. For example, heavier feeders like tomatoes require emitters with a higher flow rate compared to herbs. Using the right combination ensures each plant gets the water it needs without waste.
Connectors And Fittings
Connectors and fittings link your tubing sections and help shape the system around your raised beds. These include tees, elbows, and end caps. They let you customize the layout, especially if your beds are irregularly shaped or you want to add more zones later.
Look for connectors that snap or screw tightly to avoid leaks. If you’ve ever struggled with a dripping connection, you know how crucial a good seal is. Having a variety of fittings on hand makes adjustments easier as your garden grows.
Timers And Filters
Timers automate watering schedules so you don’t have to remember every day. This consistency helps plants thrive and conserves water. Digital timers offer precise control, while simpler mechanical ones can be more budget-friendly.
Filters protect your system by preventing debris from clogging emitters. Installing a filter at the water source is a smart move, especially if your water supply isn’t crystal clear. Think about how much time you’ll save avoiding constant emitter cleaning.
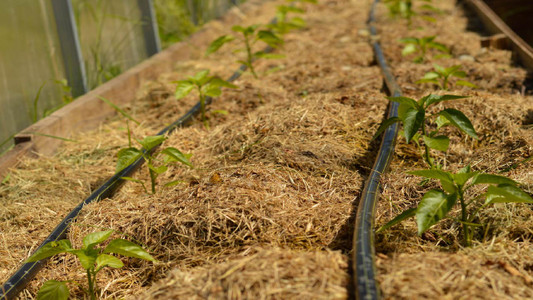
Planning Your Layout
Start by measuring your raised bed and sketching the drip line layout. Place emitters near each plant to ensure even water delivery. Plan for easy access to the main water source and avoid overlapping lines.
Planning your layout is crucial for an effective drip irrigation system. A well-thought-out plan ensures water reaches every plant efficiently. This section guides you through measuring, designing, and placing emitters in your raised beds.Measuring Raised Beds
Start by measuring the length and width of each raised bed. Accurate measurements help determine the amount of tubing needed. Use a measuring tape for precision. Note these dimensions on paper for reference. This step ensures you purchase the right materials.Designing Irrigation Lines
Create a simple sketch of your raised beds layout. This visual guide helps plan where to lay the lines. Consider the distance between each bed. Ensure the main line can reach every bed easily. Decide the path of the tubing to avoid obstacles.Placement Of Emitters
Place emitters near the base of each plant. This placement ensures water reaches the roots directly. Space emitters evenly for consistent water coverage. For larger plants, use more than one emitter. Adjust placement based on plant size and water needs. This careful positioning maximizes efficiency and conserves water.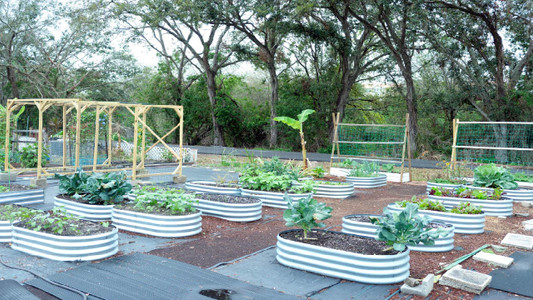
Credit: www.dripworks.com
Installing The System
Installing your drip irrigation system is the moment your raised beds start transforming into efficient, water-smart gardens. Proper setup ensures each plant receives the right amount of water without waste. Let’s break down the key parts of getting your system in place.
Laying Tubing
Begin by unrolling the main tubing along the length of your raised bed. Plan your layout so the tubing reaches all areas where plants grow. Cut the tubing to fit your bed’s shape, keeping it close to the soil surface for easy access.
Think about your plant spacing. If you have rows of vegetables, run the tubing parallel to each row. For mixed beds, consider a grid pattern to cover more ground evenly. This setup minimizes dry spots and ensures every root zone gets water.
Connecting To Water Source
Attach the tubing to your water source, usually an outdoor faucet or rain barrel. Use a filter if your water has debris to prevent clogs in your emitters. Adding a pressure regulator is smart—it keeps water flow steady and protects your system from bursts.
Have you checked the water pressure before? Too much pressure can damage the tubing, while too little means slow watering. Adjusting this upfront saves frustration later and keeps your plants happy.
Securing Tubing And Emitters
Secure the tubing with stakes or clips, especially around curves and corners, to keep everything neat and prevent shifting. Insert emitters where plants sit, either by piercing the tubing or using pre-installed holes.
Choose emitter flow rates based on each plant’s needs—some might need more water, others less. Test the system by running water and watch for leaks or dry spots. Adjust emitter placement until your raised beds are evenly and efficiently watered.
Testing And Adjustments
Testing and adjusting your drip irrigation system ensures plants get the right amount of water. It helps avoid water waste and keeps your raised beds healthy. Proper testing finds leaks and checks water flow. Adjusting the system allows better control over watering times and amounts.
Checking For Leaks
Inspect all tubing and connections closely. Look for wet spots or puddles near the lines. Small leaks reduce water pressure and waste water. Tighten loose fittings and replace damaged tubes. Check emitters for clogging or damage. A leak-free system saves water and keeps plants happy.
Adjusting Water Flow
Ensure each plant gets enough water without flooding. Turn on the system and watch water drip from emitters. Adjust valves or emitter flow rates to control output. Some emitters allow easy flow control by twisting. Balance the flow to reach all parts of the raised bed evenly.
Scheduling Watering Times
Set watering times based on plant needs and weather. Early morning or late evening reduces evaporation loss. Use a timer to automate watering and save effort. Adjust schedule seasonally to match plant growth and rainfall. Consistent watering times help maintain healthy roots and soil moisture.
Maintenance Tips
Proper maintenance keeps your drip irrigation system working well. Regular checks prevent clogs and leaks. This saves water and helps plants grow better. Follow these tips to maintain your raised bed irrigation.
Cleaning Filters
Filters stop dirt from reaching the drip emitters. Clean them often to avoid blockages. Remove the filter and rinse it with water. Use a soft brush for stubborn dirt. Check the filter screen for damage. Replace filters if they look worn out.
Inspecting Tubing
Look over the tubing for cracks or holes. Small leaks waste water and reduce pressure. Repair holes with waterproof tape or replace tubing sections. Make sure emitters are not clogged or broken. Clear any dirt or debris around the emitters.
Seasonal Shutdown
Drain the system before winter to stop freezing damage. Turn off the water supply and open all valves. Let water flow out from the tubing completely. Store the timer and other electronic parts indoors. Restart the system in spring with a full check.
Frequently Asked Questions
What Materials Are Needed For Drip Irrigation Setup?
You need drip tubing, emitters, connectors, a pressure regulator, a filter, and a timer. These ensure efficient water delivery and system control.
How Do I Install Drip Irrigation In Raised Beds?
Lay drip tubing along the bed rows, connect emitters near plants, and attach tubing to a water source. Test and adjust flow for even watering.
How Often Should I Water With Drip Irrigation?
Water frequency depends on plant type, soil, and climate. Generally, water deeply 2-3 times weekly, adjusting for weather and soil moisture.
Can Drip Irrigation Save Water In Raised Beds?
Yes, drip irrigation delivers water directly to roots, minimizing evaporation and runoff. It conserves water compared to traditional watering methods.
Conclusion
Setting up drip irrigation for raised beds saves water and time. It delivers water directly to the plants’ roots. This method helps plants grow healthy and strong. You can control how much water each plant gets. Installation is simple and does not need special tools.
Regular checks keep the system running well. Try this easy way to water your garden efficiently. Your plants will thank you with better growth and less effort. Start today and enjoy a greener, healthier garden.


