
Have you ever faced the tricky task of removing a bathroom mirror that’s glued tightly to the wall? It can feel frustrating and even a little scary, especially if you’re worried about damaging your wall or the mirror itself.
But don’t worry—you’re not alone, and this guide is here to help you every step of the way. By following simple, clear instructions, you’ll learn how to safely and effectively remove that stubborn mirror without stress or mess. Keep reading, and you’ll gain the confidence to tackle this project like a pro.
Credit: bfymirror.com
Tools And Materials Needed
Removing a bathroom mirror glued to the wall requires the right tools and materials to avoid damage and ensure safety. Having everything prepared before you start will save you time and frustration. Below, you’ll find a breakdown of what you’ll need to get the job done effectively.
Essential Tools
- Utility Knife:Perfect for cutting through caulk or adhesive around the edges of the mirror.
- Putty Knife or Thin Pry Bar:Useful for gently prying the mirror away from the wall without causing damage.
- Heat Gun or Hair Dryer:Helps soften the adhesive, making it easier to remove the mirror.
- Painter’s Tape:To secure the mirror surface before removal, preventing shards from falling if it breaks.
- Buckets or Towels:Ready to catch any drips or debris during the process.
Safety Gear
Safety should be your top priority. Mirrors can shatter unexpectedly, so protect yourself accordingly.
- Safety Glasses:Shield your eyes from glass shards or dust.
- Work Gloves:Prevent cuts and improve grip.
- Long Sleeves and Pants:Protect your skin from sharp edges.
- Dust Mask:Use this if the adhesive or wall materials create dust when removed.
Optional Supplies
These items aren’t mandatory but can make the task easier and cleaner.
- Adhesive Remover:Helps dissolve stubborn glue residue left on the wall.
- Plastic Scraper:Good for cleaning off adhesive without damaging the surface.
- Drop Cloth:Keeps your floor safe from debris and adhesive drips.
- Masking Tape:Use to mark and protect surrounding areas.
Have you ever started a home project only to realize halfway through you’re missing a crucial tool? Planning your toolkit in advance keeps you in control and helps you avoid those frustrating pauses.

Credit: www.angi.com
Preparing The Area
Clear the area around the mirror to avoid damage and make space for tools. Cover surfaces with a cloth or plastic sheet to catch debris and protect your floor. Ensure good lighting for better visibility during the removal process.
Preparing the area before attempting to remove a bathroom mirror glued to the wall is crucial. You want to ensure everything is in place to avoid damage and make the process smoother. Proper preparation can prevent unnecessary frustration and safeguard your bathroom.Clearing The Space
Before you even touch the mirror, clear the surrounding area. This means removing any toiletries, towels, or decorations that might get in the way. It’s surprising how much more manageable the task becomes when there’s ample room to move around. Consider the last time you tackled a home project. The chaotic clutter might have slowed you down. By clearing the space, you’re setting yourself up for success, creating an efficient workspace.Protecting Surfaces
Protecting surfaces is an essential step that can save you from costly repairs. Lay down a drop cloth or old sheets to shield your floor and vanity. Imagine the peace of mind knowing that any stray shards of glass won’t damage your tiles or countertops. Think about using painter’s tape on the mirror itself. This can help contain any potential breakage. You wouldn’t want to deal with scattered glass bits, right? By taking these simple precautions, you’re not just protecting your bathroom. You’re also ensuring your safety and preserving the integrity of your space. Have you considered how much easier your next project might be with these insights?Loosening The Adhesive
Removing a bathroom mirror glued to the wall needs care and patience. The key is to loosen the adhesive without breaking the glass or damaging the wall. Using heat or solvents can help soften the glue, making the mirror easier to lift off. Each method works differently depending on the type of adhesive and mirror size. Choose the best way that suits your bathroom mirror and tools available.
Using Heat
Heat helps soften many types of glue, making it easier to remove the mirror. Use a hairdryer or heat gun on a low setting. Move the heat source slowly across the edges of the mirror. Keep the heat steady but avoid overheating one spot to prevent damage. After a few minutes, test the edge gently with a plastic scraper or putty knife. The glue should feel softer and less sticky. Continue applying heat and checking until the mirror starts to loosen.
Applying Solvents
Certain solvents can break down the glue holding the mirror. Acetone or rubbing alcohol are common choices. Use a cotton ball or cloth to apply the solvent along the mirror’s edges. Let it sit for 10 to 15 minutes to soak into the adhesive. This weakens the glue, making it easier to separate the mirror from the wall. Always wear gloves and work in a well-ventilated area. Test a small spot first to ensure the solvent does not damage the wall paint or surface.

Credit: www.youtube.com
Removing The Mirror Safely
Removing a bathroom mirror glued to the wall requires care to avoid damage. Safety is the top priority. Protect yourself and the wall during this task. Using the right techniques helps prevent accidents and keeps the mirror intact for reuse or disposal.
Prepare the area by clearing nearby objects. Wear safety gloves and goggles. Use soft cloths or padding to protect the wall and floor. Work slowly and patiently to loosen the mirror without force.
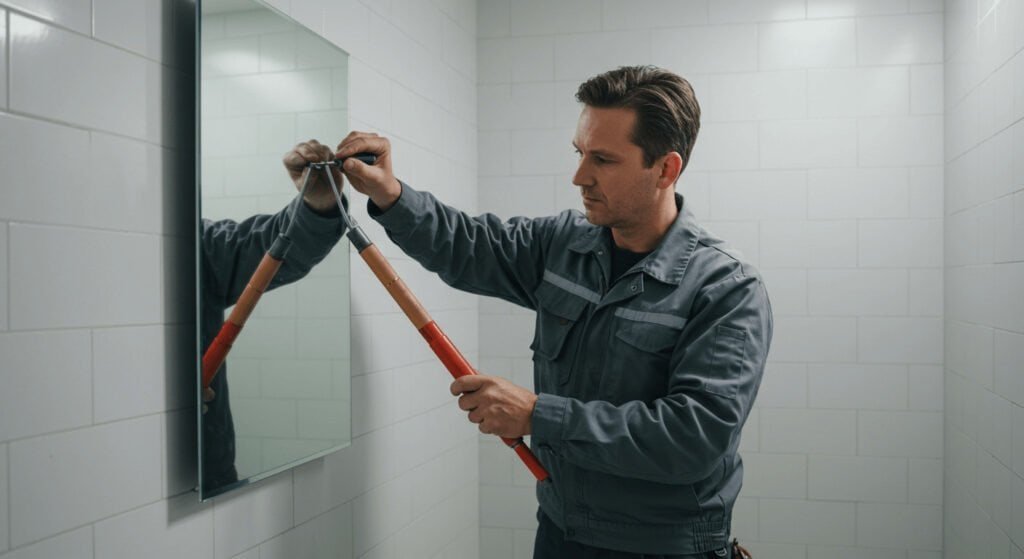
Prying Techniques
Start by sliding a thin, flexible tool between the mirror and wall. Use a putty knife or paint scraper for this job. Gently wiggle the tool to create a small gap.
Insert a wider tool, like a pry bar, into the gap. Apply slow, steady pressure to lift the mirror. Avoid sudden moves that could crack the glass.
- Work from the edges toward the center.
- Use wooden shims to keep the gap open.
- Tap tools lightly with a rubber mallet if needed.
Take breaks if the glue resists. Heat can soften many adhesives. Use a hairdryer to warm the glue for easier removal. Keep the heat moving to avoid wall damage.
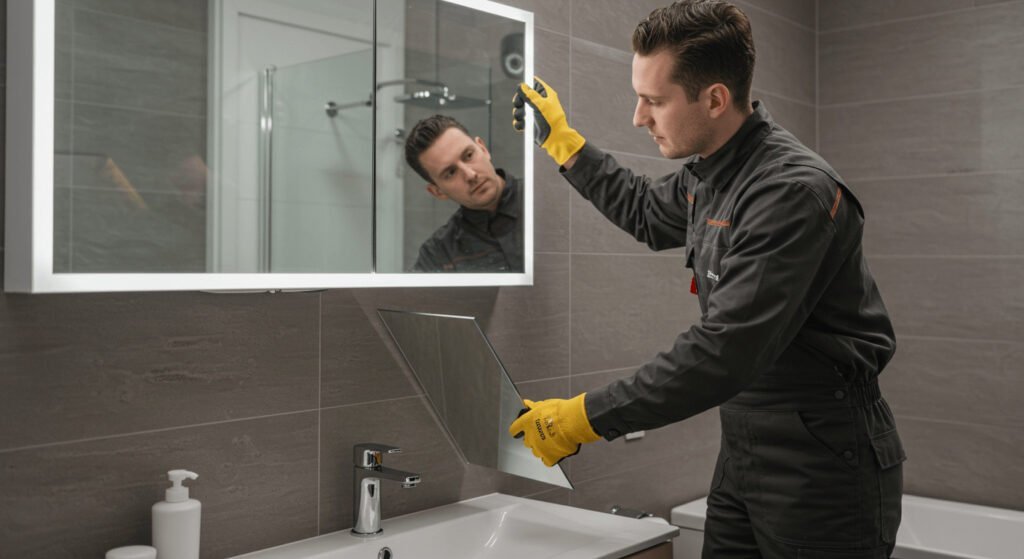
Handling Large Mirrors
Large mirrors require extra care and help. Ask someone to assist you for safety. Support the mirror’s weight during removal to prevent breakage.
- Use suction cups designed for glass handling.
- Lift the mirror evenly from multiple points.
- Keep the mirror close to the wall as you pull it off.
Place the mirror on a soft surface immediately after removal. Wrap it in blankets or bubble wrap for protection. Dispose of or store the mirror safely to avoid injuries.
Cleaning Residual Glue
Cleaning residual glue after removing a bathroom mirror can be a tricky part of the process. The leftover adhesive tends to be stubborn and can damage your wall if not handled carefully. Tackling this mess requires patience and the right technique to restore your wall’s smooth surface without causing harm.
Scraping Off Glue
Start by gently scraping off the thickest glue patches with a plastic scraper or an old credit card. Avoid metal tools as they can scratch the wall surface. Hold the scraper at a low angle and work slowly to lift the glue without gouging the paint or drywall.
If you notice the glue is particularly hard, try softening it first by applying a warm, damp cloth for a few minutes. This heat and moisture can loosen the adhesive, making scraping easier. Have you ever tried scraping dry glue and ended up with wall damage? Softening it first saves you that headache.
Using Cleaning Agents
After scraping, some sticky residue will likely remain. Use a gentle cleaning agent like rubbing alcohol or an adhesive remover designed for walls. Apply it with a soft cloth and rub in circular motions to break down the glue.
Test the cleaning agent on a small, hidden area first to make sure it doesn’t discolor your paint. You can also try household items like vinegar or a baking soda paste if you want a natural solution. What’s your go-to cleaner for tough residues? Sometimes the simplest kitchen staples work best.
Once the glue is gone, wipe the area with a clean, damp cloth to remove any leftover cleaning solution. This step prevents future peeling or damage when you repaint or rehang anything on the wall.
Repairing The Wall Surface
After removing a bathroom mirror glued to the wall, you’ll often find damage like holes, cracks, or uneven surfaces. Repairing these imperfections is key to restoring your wall’s smooth look and preparing it for painting or a new fixture. Taking time to fix the wall properly prevents future issues and gives your bathroom a refreshed feel.
Filling Holes And Cracks
Start by cleaning the damaged area to remove dust and loose debris. Use a putty knife to apply spackling compound or wall filler into holes and cracks. Press firmly to fill gaps completely, then smooth the surface with the knife.
Don’t rush this step. Filling too shallowly will cause the patch to shrink or crack later. If the hole is deep, add filler in layers, letting each dry before adding more. This approach ensures a strong, lasting repair.
Sanding And Smoothing
Once the filler dries, sanding is essential to blend the repaired spots with the rest of the wall. Use fine-grit sandpaper and sand gently in circular motions. Keep checking by running your hand over the surface to feel for bumps or ridges.
Be careful not to sand too hard or you’ll damage the surrounding paint. If the patched area feels rough after sanding, apply a thin layer of primer before painting. This step improves paint adhesion and keeps the finish looking even.
Frequently Asked Questions
How Do I Safely Remove A Glued Bathroom Mirror?
To safely remove a glued bathroom mirror, use a wire or fishing line to cut through the adhesive. Work slowly to avoid breaking the glass. Wear safety gloves and goggles to protect yourself from sharp edges.
What Tools Are Needed To Remove A Glued Mirror?
You need fishing line or wire, a putty knife, adhesive remover, safety gloves, and goggles. These tools help cut the glue and safely detach the mirror without damage.
Can I Reuse The Mirror After Removal?
Reusing the mirror is possible if it remains intact without cracks. Clean off all adhesive residue carefully. Handle the mirror gently during removal to prevent damage.
How To Remove Adhesive Residue From The Wall?
Use an adhesive remover or rubbing alcohol on a cloth to wipe the residue. Scrape gently with a putty knife if needed. Avoid damaging the wall surface during cleaning.
Conclusion
Removing a bathroom mirror glued to the wall takes patience and care. Use the right tools and work slowly to avoid damage. Always protect your hands and eyes during the process. Take your time to loosen the glue safely. After removal, clean the wall to prepare for a new mirror.
This task is doable with simple steps and caution. Now, you can handle mirror removal confidently and safely.


