
Removing a bathroom mirror might seem tricky, but you can do it yourself without damaging the wall or the mirror. Whether you want to replace it with a new design or simply need to fix something behind it, knowing the right steps will save you time and frustration.
In this guide, you’ll discover simple, clear instructions that anyone can follow. Keep reading to learn how to safely and easily remove your bathroom mirror like a pro!
Tools Needed
Removing a bathroom mirror might seem straightforward, but having the right tools makes the job safer and easier. Without the proper equipment, you risk damaging your wall or even injuring yourself. Getting these tools ready before you start saves time and frustration.
Protective Gear
Safety should be your top priority. Use safety glasses to protect your eyes from shards or dust. Thick gloves will guard your hands against sharp edges and broken glass.
Consider wearing long sleeves to avoid scratches. If you’ve ever handled glass without gloves, you know how easy it is to get cuts. Don’t skip this step.
Utility Knife
A sharp utility knife helps cut through any caulking or adhesive holding the mirror. This tool lets you carefully separate the mirror from the wall without excessive force.
Replace the blade if it’s dull. A fresh blade makes cleaner cuts and reduces the chance of slipping. Have you noticed how a dull blade makes everything harder?
Putty Knife Or Scraper
Once the adhesive is cut, a putty knife or scraper helps gently pry the mirror away from the wall. Choose a flexible but sturdy one to slide behind the mirror.
This tool prevents you from pulling too hard and cracking the mirror. It also protects your wall from damage. Using a thin scraper can make all the difference.
Painter’s Tape
Before lifting the mirror, apply painter’s tape in a grid pattern across its surface. This keeps the glass from shattering into big pieces if it breaks.
It’s a simple step that adds a big layer of safety. Have you ever regretted skipping small precautions like this?
Step Ladder Or Stool
If your mirror is mounted high, a stable step ladder or stool is essential. It gives you the right height and balance to work comfortably.
Don’t stretch or climb on unstable furniture. Your balance is crucial to avoid accidents during removal.
Cleaning Supplies
After removing the mirror, you’ll need cleaning supplies like a sponge, mild detergent, and a cloth to clean leftover adhesive or dust. It makes the wall ready for your next project.
Preparing these in advance means you can finish the job neatly without extra trips to the store.
Credit: bfymirror.com
Prepare The Area
Preparing the area before removing a bathroom mirror is key to avoiding damage and making the process smoother. Taking a few simple precautions can save you from unexpected messes and injuries. What’s the best way to protect your space and yourself before you start prying that mirror off the wall?
Clear The Surrounding Space
Remove any items on nearby shelves, countertops, or the sink. This prevents accidental breakage or spills. You want a clean, open area to work comfortably and safely.
Move towels, toiletries, and decorative objects out of the way. You’ll thank yourself later when nothing gets knocked over during the removal.
Protect Surfaces And Floors
Lay down a drop cloth or old towels under the mirror to catch any falling glass shards or dust. This makes cleanup easier and protects your floor from scratches or adhesive residue.
Consider taping cardboard or plywood on the floor if you have delicate tiles or wood. It’s a small extra step that prevents costly damage.
Wear Safety Gear
Put on thick gloves and safety glasses before you start. Mirrors can shatter unexpectedly, and protecting your hands and eyes is crucial.
If you’ve ever had a surprise cut from a broken mirror, you know how important this is. Don’t skip this step, even if the mirror looks sturdy.
Turn Off Bathroom Lighting
Switch off the bathroom light fixtures near the mirror to avoid any electrical hazards. If your mirror has built-in lights, make sure the power is completely off.
This reduces the risk of shocks or short circuits when you start loosening the mirror or its frame.
Turn Off Electricity
Before you touch the mirror on your bathroom wall, turning off the electricity is a crucial safety step. Electrical outlets or wiring might be hidden behind the mirror frame, and you don’t want to risk shocks or damage. Taking a moment to cut power protects both you and your home.
Locate The Correct Circuit Breaker
Head to your home’s electrical panel and identify which breaker controls the bathroom. If you’re unsure, it’s safer to switch off the main breaker. This eliminates any risk of live wires while you work.
Use A Voltage Tester For Extra Safety
Even after switching off the breaker, use a voltage tester to confirm no electricity flows to the mirror area. This simple tool gives you confidence that it’s safe to proceed. It’s better to double-check than to guess.
Inform Others In Your Home
Let everyone know you’ve turned off the electricity to the bathroom. This prevents someone from accidentally turning it back on while you’re working. Communication helps keep the project safe and smooth.
Consider The Wiring Behind The Mirror
Some mirrors have built-in lights or outlets. If yours does, cutting power is even more important. Have you noticed any cords or switches near your mirror? If yes, don’t skip this step.
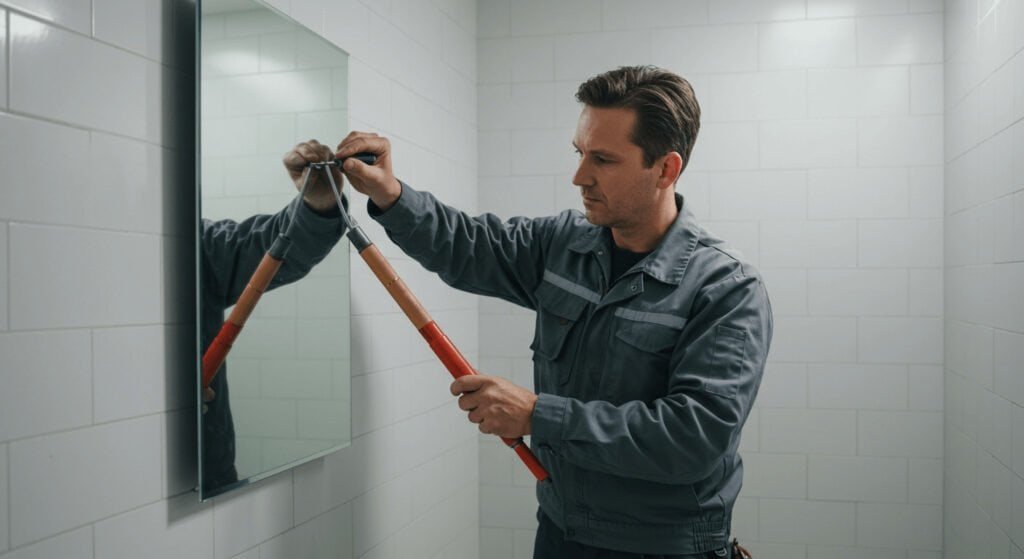
Loosen Mirror Edges
Removing a mirror from a bathroom wall requires careful steps. The first essential step is to loosen the mirror edges. This ensures you can safely detach the mirror without causing damage to the wall or the mirror itself. Let’s explore the methods to ease this process.
Use A Utility Knife
Begin by using a utility knife to cut through any adhesive. Gently slide the blade along the mirror edges. This will help break the seal between the mirror and wall. Be cautious to avoid scratching the mirror. A steady hand is crucial for this task. Move slowly to prevent accidents or damage.
Apply Heat If Necessary
If the adhesive is stubborn, apply heat. Use a hairdryer on the edges of the mirror. The heat will soften the adhesive, making it easier to cut. Hold the dryer several inches from the mirror. Move it back and forth for even heating. Once softened, try sliding the utility knife again. This should help in loosening the mirror edges more effectively.
Remove Mirror Clips Or Screws
Removing mirror clips or screws is a key step when taking down a bathroom mirror. These small holders keep the mirror firmly attached to the wall, so handling them carefully protects both your mirror and your wall surface.
Before you start, examine how the mirror is fixed. Are there metal clips gripping the edges? Or screws drilled into the wall? Knowing this helps you choose the right tools and avoid damage.
Gather The Right Tools
Having the correct tools makes this task easier and safer. You will typically need:
- A flathead screwdriver to pry off clips gently
- A Phillips screwdriver for removing screws
- Gloves to protect your hands from sharp edges
- A helper if the mirror is heavy or large
Do you have these tools ready? Taking a moment to prepare saves frustration later.
Loosen And Remove Mirror Clips
If your mirror is held by clips, start by loosening them carefully. Use a flathead screwdriver to gently pry the clips away from the wall or mirror edge.
Work slowly to avoid bending the clips or cracking the mirror. Once loose, slide the clips off and set them aside for reinstallation or disposal.
Unscrew The Mirror Screws
For mirrors attached with screws, use a screwdriver to turn them counterclockwise until they come out. Keep a firm grip on the mirror as you remove the last screws so it doesn’t fall.
Sometimes screws are painted over or stuck. Apply a little penetrating oil and wait a few minutes before trying again.
Handle The Mirror Safely After Removal
After the clips or screws are off, the mirror should come free easily. If it doesn’t, double-check for hidden fasteners or adhesive.
Always hold the mirror from the edges and ask someone to assist if it is large. Where will you store your mirror to avoid scratches or breaks?

Credit: www.youtube.com
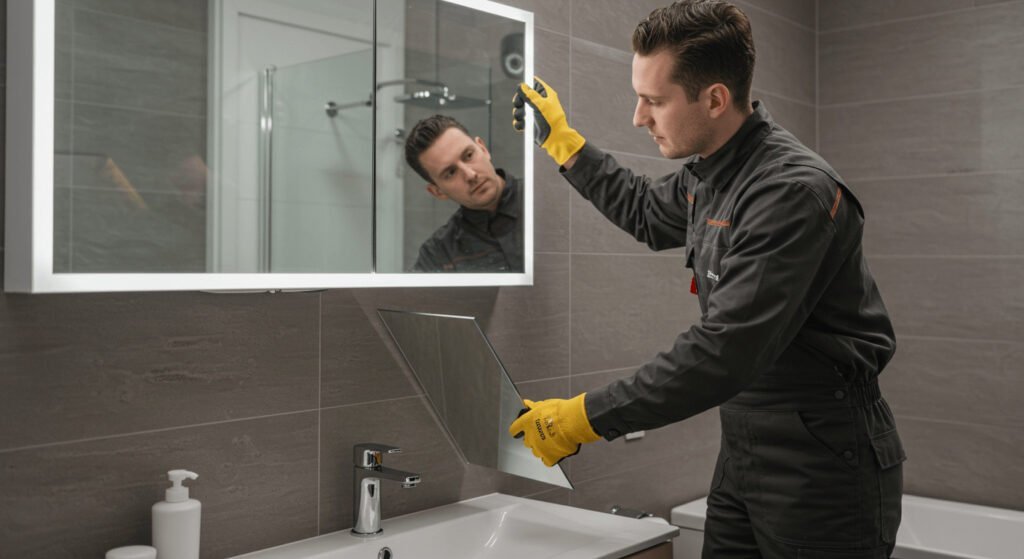
Detach The Mirror
Detaching a bathroom mirror from the wall requires patience and care. The goal is to remove it without damaging the wall or the mirror itself. Use the right tools and techniques to make the process smooth and safe.
Lift Carefully
Start by gently lifting the mirror at its edges. Use both hands to support its weight evenly. Avoid sudden or sharp movements that might crack the glass. If the mirror is large, ask for help to hold it steady. Lift slowly and steadily to separate it from the wall.
Use A Suction Cup
A suction cup tool helps to grip the mirror safely. Attach the suction cup firmly to the glass surface. Make sure it sticks well before pulling. Use slow, gentle pressure to pull the mirror away from the wall. This method reduces the risk of dropping or breaking the mirror. Suction cups are especially useful for smooth, flat mirrors.
Clean The Wall After Removal
After removing the mirror from the bathroom wall, cleaning the surface is crucial. The wall often has leftover adhesive or small damages that need attention. Proper cleaning prepares the wall for a fresh coat of paint or a new mirror installation. It keeps the bathroom looking neat and tidy.
Remove Adhesive Residue
Adhesive residue can be sticky and hard to remove. Use a gentle adhesive remover or warm soapy water. Apply it with a soft cloth or sponge. Rub the area gently to avoid damaging the wall paint.
For tougher spots, try using a plastic scraper. Avoid metal tools as they can scratch the wall. Wipe the area clean with a damp cloth after removing the adhesive.
Repair Wall Damage
Check the wall for holes, cracks, or peeling paint. Small holes can be filled with spackling paste. Use a putty knife to spread the paste evenly. Let it dry completely before sanding it smooth.
If the paint is chipped, lightly sand the area. Apply a primer to prepare the wall for repainting. This step helps the new paint stick better and last longer.
Safety Tips
Removing a bathroom mirror can be risky without proper safety steps. Broken glass and sharp edges can cause injury. Protecting yourself and your space is crucial before starting the removal process.
Take time to prepare. Safety gear and careful planning reduce accidents. Follow these safety tips for a smooth mirror removal.
Wear Protective Gear
- Use thick gloves to protect your hands from glass cuts.
- Wear safety goggles to shield your eyes from shards.
- Consider wearing long sleeves to protect your arms.
Clear The Area
- Remove all items near the mirror to avoid damage.
- Cover the sink and countertop with a towel or cloth.
- Keep children and pets away from the workspace.
Use Proper Tools
- Use a utility knife to cut through any caulk or adhesive.
- Have a flat putty knife or pry bar ready for gentle prying.
- Use a suction cup tool for better grip on the mirror surface.
Work Slowly And Carefully
- Do not rush; sudden moves may break the glass.
- Apply even pressure when prying the mirror away from the wall.
- Have a helper hold the mirror if it is large or heavy.
Dispose Of Broken Glass Safely
- Use a broom and dustpan to collect small shards.
- Place broken glass in a sturdy container or wrap in thick paper.
- Label the container clearly to warn others.

Credit: www.angi.com
Frequently Asked Questions
How Do I Safely Remove A Bathroom Mirror?
Start by protecting the area with a drop cloth. Use a utility knife to cut any caulk or adhesive. Gently pry the mirror with a putty knife or suction cups, applying even pressure to avoid breakage.
What Tools Are Needed To Remove A Bathroom Mirror?
You will need a utility knife, putty knife, suction cups, gloves, and safety goggles. These tools help cut adhesive and safely pry the mirror from the wall without damage.
Can I Remove A Glued Bathroom Mirror Without Damage?
Yes, by carefully cutting the adhesive and using suction cups or putty knives, you can safely remove the mirror. Work slowly to avoid cracking or breaking the glass.
How To Prepare The Wall After Removing A Bathroom Mirror?
Remove all adhesive residue with a scraper or adhesive remover. Clean the wall with soap and water. Repair any holes or damage with spackle before painting or installing a new mirror.
Conclusion
Removing a bathroom mirror is easier than it seems. Take your time and work carefully. Use the right tools to avoid damage. Always protect your hands and eyes. Clean the wall after removing the mirror. Fix any leftover marks or holes.
This simple task can refresh your bathroom space. Now, you can hang a new mirror or try a fresh look. Small steps make a big difference in home care. Keep safety first and enjoy your updated bathroom!


