
Are you worried about the air you breathe inside your home? Dirty ventilation ducts can trap dust, allergens, and even mold, affecting your health and comfort without you even realizing it.
Cleaning your ventilation ducts might sound complicated, but it’s easier than you think—and the benefits are huge. In this guide, you’ll discover simple, effective steps to clean your ducts yourself, improve your indoor air quality, and keep your home fresh and healthy.
Keep reading to learn how you can take control of your air and breathe easier every day.
Tools And Materials Needed
Cleaning ventilation ducts requires the right tools and materials to get the job done effectively. Having everything prepared before you start saves time and effort. Let’s look at what you need to gather to ensure a thorough and safe cleaning process.
Basic Cleaning Supplies
Start with everyday cleaning items that you likely have around the house. A sturdy vacuum cleaner with a long hose attachment is essential for sucking out dust and debris.
- Microfiber cloths or rags for wiping surfaces
- Soft-bristle brushes or paintbrushes to loosen dirt
- Dish soap or mild detergent to clean removable vent covers
- Spray bottle with water or gentle cleaner
These basics help remove surface dust and grime. Have you ever tried cleaning vents with just a vacuum? You might be surprised how much dust it can pull out before you even get to the specialized tools.
Specialized Equipment
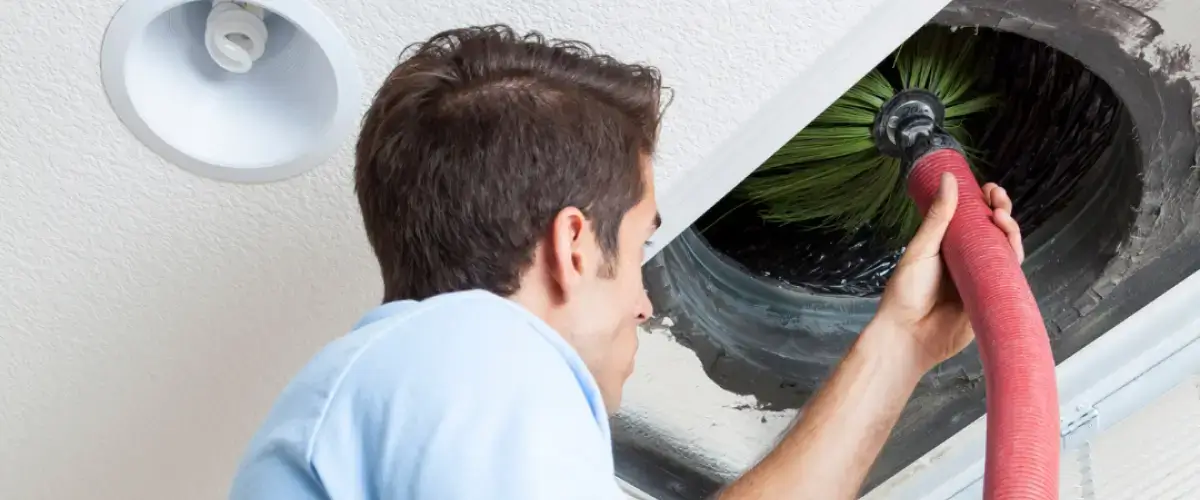
Some parts of your ducts require more than just basic supplies. A flexible brush or duct cleaning brush is designed to reach deep inside narrow passages. These brushes often attach to a drill for power cleaning, making the job easier and more effective.
- Rotary brush for deeper scrubbing
- Air compressor or high-pressure air nozzle to blow out stubborn dust
- Inspection camera or flashlight to see inside ducts
Using these tools can reveal hidden blockages or mold spots you might miss otherwise. Have you thought about how deep dirt might be hiding beyond what your eyes can see?
Safety Gear
Protecting yourself is just as important as cleaning the ducts. Dust and debris can irritate your skin, eyes, and lungs. Always wear personal protective equipment to avoid health risks.
- Respirator mask or N95 mask to filter dust particles
- Safety goggles to protect your eyes
- Gloves to keep your hands clean and safe from sharp edges
- Long sleeves and pants to minimize skin exposure
Safety gear might seem like an extra step, but it makes a big difference. Would you risk breathing in years of accumulated dust without a mask?
Credit: www.urbanmop.com
Preparing For Cleaning
Preparing for cleaning ventilation ducts is key to an effective job. Proper preparation saves time and prevents damage. It also ensures safety during the process.
Turning Off The System
Switch off the HVAC or ventilation system completely. This stops dust and debris from spreading. It also protects the equipment from damage during cleaning. Locate the main power switch or circuit breaker. Make sure no air flows through the ducts while cleaning.
Protecting Surrounding Areas
Cover floors and furniture near vents and ducts. Use plastic sheets or old towels to catch falling dust. Seal off doorways with plastic to limit dust spread. Wear old clothes and gloves for personal protection. Prepare a vacuum or dust collector to clean up easily.
Inspecting The Ducts
Check the ducts for visible dust, mold, or damage. Use a flashlight to look inside vents. Identify areas with heavy buildup or leaks. Note any signs of pests or blockages. This inspection guides the cleaning focus and tools needed.
Cleaning Steps
Cleaning ventilation ducts improves air quality and system efficiency. It requires careful steps to avoid damage and ensure thorough cleaning. This guide explains key tasks to clean ducts safely and effectively.
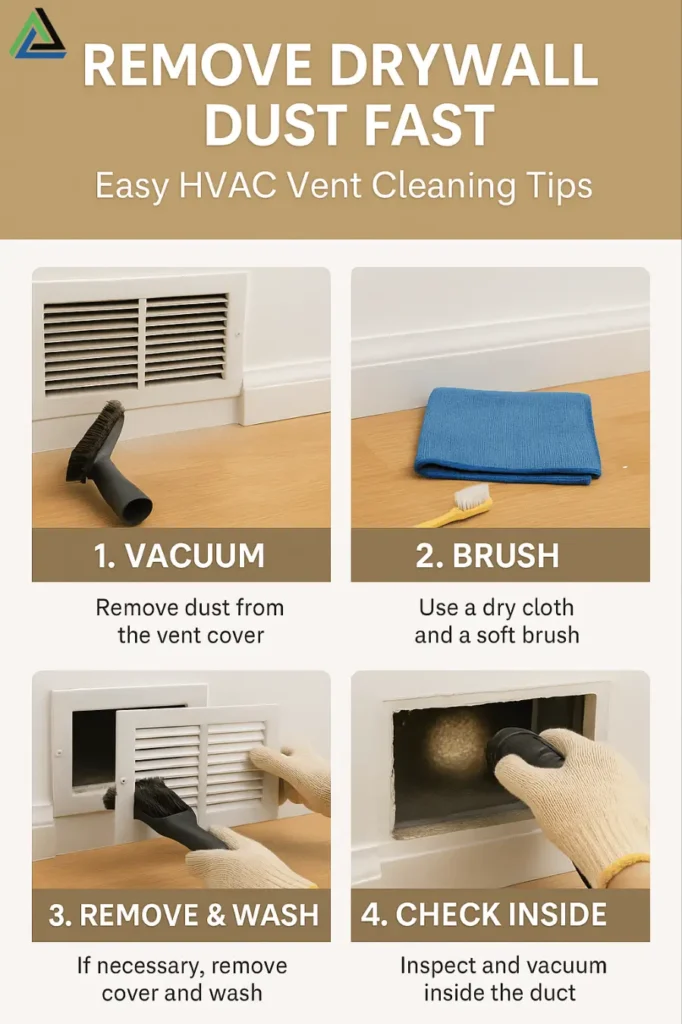
Removing Vent Covers
Start by gently removing vent covers from walls or ceilings. Use a screwdriver if needed. Place covers on a soft surface to avoid scratches. This allows easy access to the duct openings.
Dusting And Vacuuming
Use a soft brush or cloth to dust inside the ducts. Follow with a vacuum cleaner using a long hose attachment. Remove loose dust, dirt, and debris from all reachable areas. This reduces allergens and improves airflow.
Scrubbing And Washing
Prepare a mild soap solution for cleaning vent covers and accessible duct parts. Use a sponge or brush to scrub away grime and buildup. Rinse with clean water and dry completely before reinstallation. Avoid harsh chemicals that may damage surfaces.
Cleaning The Air Handler
Turn off the HVAC system before cleaning the air handler. Remove dust from the blower, coils, and filters with a vacuum or cloth. Replace filters regularly for optimal performance. Keeping the air handler clean helps maintain good air circulation and efficiency.
Handling Tough Debris
Handling tough debris inside ventilation ducts requires patience and the right approach. Such debris can block airflow and reduce air quality. Cleaning these stubborn elements keeps your system efficient and your home healthier.
Dealing With Mold And Mildew
Mold and mildew grow in moist, dark duct areas. Wear gloves and a mask to protect yourself. Use a mixture of water and vinegar or a mold cleaner. Spray the affected area and scrub gently with a brush. Ensure the duct dries completely to prevent regrowth.
Removing Stubborn Dust Buildup
Dust can pack tightly in ductwork over time. Use a vacuum with a long hose attachment to reach deep inside. A stiff-bristled brush helps to loosen dust from duct walls. Wipe down surfaces with a damp cloth to catch leftover particles. Repeat until the duct looks clean.
Addressing Pest Infestations
Signs of pests include droppings, nests, or unusual smells. Remove any debris left by pests carefully. Use traps or call a pest control service for severe infestations. Seal entry points to prevent pests from returning. Clean ducts thoroughly after pest removal to eliminate odors and residue.
Reassembling And Testing
After cleaning the ventilation ducts, reassembling and testing the system is vital. This step ensures everything works properly and safely. It helps maintain good air quality and system efficiency. Take time to put each part back correctly and check the system’s performance.
Replacing Vent Covers
Start by putting the vent covers back in place. Clean covers improve air flow and prevent dust from returning. Align each cover with its opening carefully. Use screws or clips to secure them tightly. Avoid forcing covers to prevent damage.
Restarting The System
Turn the HVAC or ventilation system back on after reassembly. Listen for unusual noises that could mean loose parts. Watch for vibrations or air leaks around vents. If anything seems off, turn off the system and inspect again. A smooth restart means the system is ready to use.
Checking Airflow And Efficiency
Feel the air coming from each vent to check airflow strength. Weak airflow may indicate blockages or incomplete cleaning. Monitor the system’s energy use for any spikes in consumption. Clean ducts should improve efficiency and lower energy bills. Regularly check these factors to keep the system in top shape.

Credit: mcagroup.ca
Maintenance Tips
Regularly dust and vacuum vents to remove dirt and debris. Use a brush or cloth to clean inside ducts gently. Keep filters clean to improve air flow and reduce dust buildup.
Maintaining clean ventilation ducts is essential for a healthy home environment. Dust, debris, and allergens can accumulate over time, compromising air quality and efficiency. Here are some maintenance tips to ensure your ventilation system stays in top shape.Regular Cleaning Schedule
Creating a regular cleaning schedule is the foundation of effective duct maintenance. Aim to inspect and clean your ducts at least once a year. Set reminders to prevent forgetting this crucial task. Regular cleaning prevents the build-up of dust and allergens. It also ensures your HVAC system operates efficiently, saving you money on energy bills.Using Air Filters
Air filters are your first line of defense against dust and pollutants. Make it a habit to check and replace filters every 1-3 months. Choose high-quality filters that suit your system and lifestyle. If you have pets or allergies, you might need to replace them more frequently. Clean filters improve air quality and extend the life of your HVAC system. They trap particles before they reach your ducts, reducing the need for frequent cleaning.When To Call Professionals
Not every duct problem can be solved with a DIY approach. Sometimes, calling in a professional is the best choice. Professionals have the tools and expertise to tackle stubborn issues. If you notice persistent odors, mold, or your energy bills spiking, it’s time to seek expert help. Don’t wait until a minor issue turns into a costly repair. A professional inspection can identify hidden problems and offer peace of mind. Regular maintenance is key to a healthy and efficient home. What steps will you take to ensure clean and fresh air in your living space?
Credit: www.puroclean.com
Frequently Asked Questions
How Often Should Ventilation Ducts Be Cleaned?
Ventilation ducts should be cleaned every 3 to 5 years. More frequent cleaning is needed if you have pets or allergies. Regular cleaning improves air quality and system efficiency. It helps remove dust, mold, and allergens that accumulate over time.
What Tools Are Needed To Clean Ventilation Ducts?
Basic tools include a vacuum with a hose, brushes, and screwdrivers. You may also need a blower or compressed air for deep cleaning. Protective gear like gloves and masks is essential. Proper tools ensure thorough removal of dust and debris.
Can I Clean Ventilation Ducts Myself Safely?
Yes, you can clean ducts yourself if they are easily accessible and lightly soiled. Use a vacuum and brush to remove dust. For extensive buildup or mold, hire professionals. Safety precautions, like turning off HVAC systems, are important.
Why Is Cleaning Ventilation Ducts Important?
Cleaning ventilation ducts improves indoor air quality by removing dust and allergens. It also increases HVAC efficiency and reduces energy costs. Regular cleaning prevents mold growth and unpleasant odors. This promotes a healthier living environment.
Conclusion
Cleaning ventilation ducts keeps air fresh and healthy inside your home. Dust and dirt build up over time and block airflow. Regular cleaning helps your system work better and saves energy. You can do basic cleaning yourself, but sometimes call a professional for deep cleaning.
Clean ducts reduce allergens and improve indoor air quality. Remember, a clean ventilation system supports your comfort and health all year. Take care of your ducts to breathe easier every day.


