
Are you tired of your plain ceiling light and want to add a touch of style to your room? A light to pendant light conversion kit might be exactly what you need.
It’s an easy and affordable way to transform your existing light fixture into a beautiful pendant light that fits your taste. Imagine how a simple change can brighten up your space and make it feel more inviting. You’ll discover how these kits work, why they’re a smart choice, and how you can install one yourself without hassle.
Keep reading to find out how to upgrade your lighting and give your home a fresh new look.

Credit: www.amazon.ca
Why Upgrade To Pendant Lights
Upgrading to pendant lights can transform the look and feel of any room quickly and affordably. These fixtures offer more than just illumination—they add character and style to your space. If you’ve been thinking about refreshing your home lighting, a pendant light conversion kit might be the perfect solution to consider.
Benefits Of Pendant Lighting
Pendant lights give you control over the ambiance by focusing light exactly where you want it. Unlike standard ceiling lights, they can create cozy corners or highlight specific areas like kitchen islands or dining tables.
They also save space. Because pendant lights hang from the ceiling, they free up wall and floor areas, making rooms feel more open. Plus, their adjustable heights mean you can customize the lighting to suit different needs or moods.
Energy efficiency is another advantage. Many pendant lights are compatible with LED bulbs, which use less power and last longer. This means you not only enhance your room’s aesthetics but also reduce electricity costs.
Popular Styles And Designs
There’s a pendant light style for every taste and décor. You can choose sleek, modern designs with clean lines or opt for rustic, industrial looks with exposed bulbs and metal finishes.
Glass pendants add elegance and brighten rooms with their reflective surfaces, while fabric shades soften light for a warm, inviting atmosphere. You might also find multi-light pendants that cluster several bulbs for a dramatic effect.
- Minimalist: Perfect for contemporary spaces.
- Vintage Edison bulbs: Ideal for adding a nostalgic touch.
- Geometric shapes: Great for making a bold statement.
- Natural materials like wood or rattan: Excellent for cozy, earthy vibes.
Think about your room’s style and how pendant lighting can either blend in or stand out as a centerpiece. What feeling do you want your lighting to create in your space?
Choosing The Right Conversion Kit
Choosing the right light to pendant light conversion kit is important for a smooth upgrade. The kit must fit your needs and the current setup. A good match ensures safety and style. This section helps you understand key points to consider before buying.
Types Of Conversion Kits
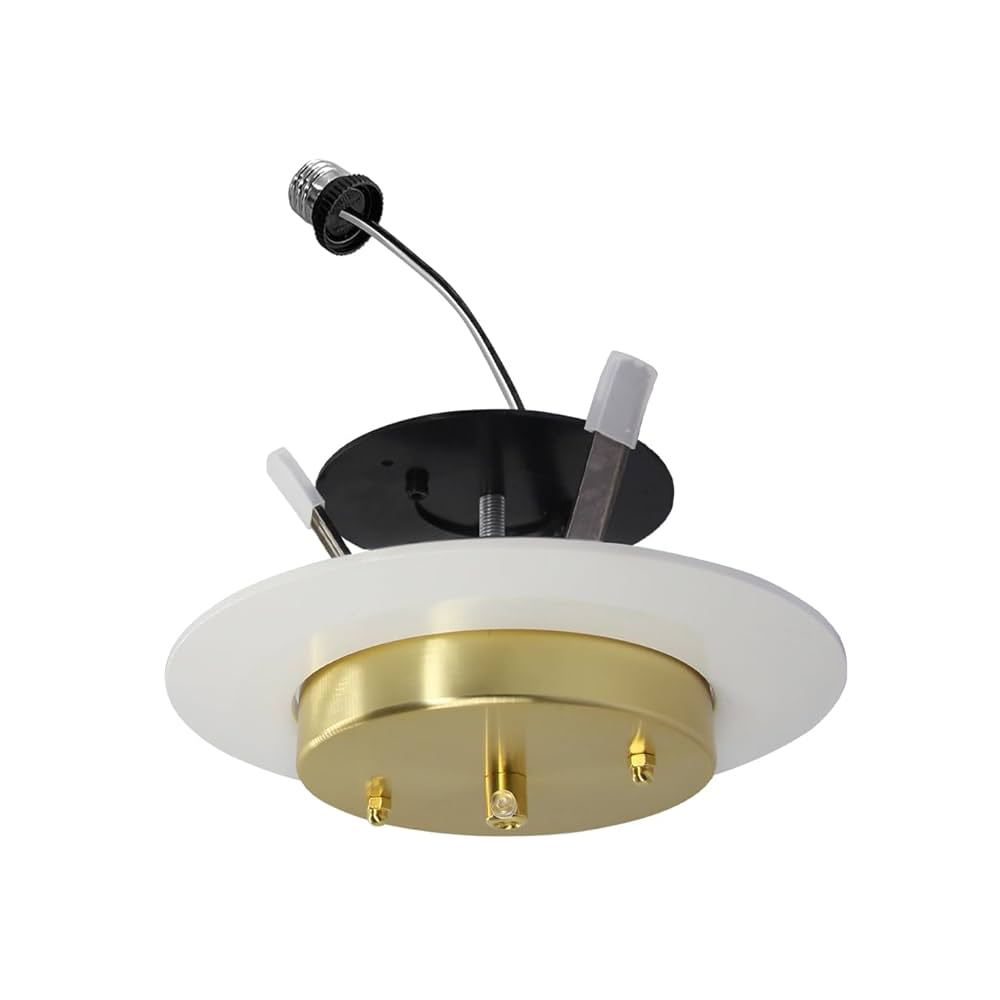
Conversion kits come in different styles. Some kits include a socket adapter that fits over your existing fixture. Others come with a new canopy and chain or rod for hanging the pendant. There are also kits designed for specific bulb types like LED or incandescent.
- Socket adapters: Easy to install and cost-effective
- Canopy kits: Offer a cleaner, finished look
- Chain or rod kits: Provide adjustable hanging length
- Bulb-specific kits: Match LED or traditional bulbs
Choosing the kit type depends on your room’s design and personal style.
Compatibility With Existing Fixtures
Not all conversion kits fit every fixture. Check the base type of your current light. Common bases include E26, E27, or bayonet fittings. The kit must connect securely to avoid electrical issues.
Also, measure the ceiling box size. Some kits only work with standard boxes. The wiring type matters too. Make sure your kit supports your home’s wiring setup.
Consider weight limits. Heavy pendants may need stronger support or special kits. Always read the product details carefully. Choosing a compatible kit saves time and ensures safety.
Tools And Materials Needed
Basic tools like a screwdriver, wire stripper, and electrical tape are essential. Gather the pendant light kit, ceiling hook, and a voltage tester for safety. These items make the conversion simple and secure.
Transforming a dull can light into a stylish pendant light can instantly uplift your room’s aesthetics. To embark on this DIY journey, you’ll need a few specific tools and materials. Having the right equipment not only ensures a smoother process but also enhances safety and efficiency.Essential Tools
To begin, make sure you have a screwdriver set. This will help you remove the existing can light fixture. A voltage tester is crucial to ensure there’s no live current flowing while you work. Wire strippers are necessary to properly connect the new pendant light. These tools help in neatly handling wires, making connections secure and tidy. You might also need a drill if your ceiling requires additional support for the pendant light. It’s a handy tool for making precise adjustments.Safety Gear
Safety should be your top priority. Wear insulated gloves to protect yourself from any accidental shocks. Even when you think the power is off, it’s better to be safe than sorry. Safety goggles are vital to shield your eyes from dust or debris. This is especially important when drilling or working in tight, dusty spaces. Don’t forget a sturdy step ladder. A stable platform ensures you can work comfortably and safely at ceiling height. Have you ever considered how a simple tool can make or break a project? The right gear not only simplifies tasks but also keeps you safe. Ensure you check off each item from this list before you start your conversion project.
Credit: www.amazon.com
Step-by-step Installation Process
Installing a light to pendant light conversion kit can refresh any room. The process is simple and does not require special tools. Follow this clear guide to ensure a safe and effective installation. Each phase prepares you for the next, making the job smooth.
Preparing The Existing Fixture
Turn off the power at the circuit breaker to prevent shocks. Remove the old light fixture carefully. Check the electrical box for damage or loose wires. Clean the area to ensure a neat installation. Gather the conversion kit parts and tools before starting.
Wiring The Pendant Light
Match the wires from the pendant kit to the house wiring. Typically, black connects to black, white to white, and green or copper to ground. Use wire nuts to secure connections tightly. Wrap electrical tape around the wire nuts for extra safety. Tuck the wires neatly into the electrical box.
Securing The Fixture
Attach the mounting bracket from the kit to the electrical box. Hang the pendant light according to the kit instructions. Adjust the chain or cord length to the desired height. Tighten all screws and fasteners to hold the fixture firmly. Double-check stability before proceeding.
Testing The Installation
Restore power at the circuit breaker. Turn on the light switch to check the pendant light. Look for steady light without flickering or buzzing. If issues occur, turn off power and recheck wiring. Confirm that the fixture is secure and working properly.
Common Installation Challenges
Installing a Can Light to Pendant Light Conversion Kit can seem straightforward, but many run into common challenges that slow down the process or cause frustration. Understanding these hurdles before you start helps you prepare better and avoid costly mistakes. Let’s look at some typical issues you might face and how to handle them effectively.
Troubleshooting Wiring Issues
Wiring is often the trickiest part of installing a conversion kit. You might find wires that are old, brittle, or not color-coded, which makes identifying the live, neutral, and ground wires confusing.
Always turn off power before touching any wiring. If the wires don’t match the kit instructions, use a voltage tester to identify live wires safely. Sometimes, wires are tucked deep inside the can light housing, making connections hard to reach.
Don’t rush this step. Taking extra time to label wires and test connections can save you from flickering lights or worse, electrical shorts later. Have you ever had a light flicker after installation? It’s often due to loose or incorrect wiring.
Dealing With Ceiling Types
Ceilings come in many types—drywall, plaster, textured, or even drop ceilings—and each presents unique challenges for installing a pendant light.
For example, a textured or popcorn ceiling can make it difficult to mount the conversion kit flush against the surface. Drop ceilings often lack the structural support needed for heavier pendant lights.
You might need additional anchors or braces to secure your light properly. Have you checked what kind of ceiling you have before buying your kit? Ensuring compatibility will save you from surprises during installation.
Maintenance Tips For Pendant Lights
Maintaining your pendant lights not only keeps them looking great but also ensures they work safely and efficiently. Simple care routines can extend the life of your lights and prevent issues that might require costly repairs. Are you ready to keep your pendant lights shining bright with minimal effort?
Cleaning And Care
Dust and grime can quickly dull the appearance of your pendant light. Use a soft, dry cloth to wipe the surface regularly. For glass or metal fixtures, a slightly damp cloth with mild soap works well.
Be gentle around delicate parts like bulbs and wiring. Avoid harsh chemicals that might damage finishes or cloud glass. If your pendant light has fabric shades, try using a vacuum with a brush attachment to remove dust.
Cleaning your lights often also helps you spot any wear and tear early. Have you noticed a dimmer switch or flickering bulb? These small signs can guide you to take action before bigger problems arise.
Replacing Bulbs Safely
Always turn off the power at the switch or breaker before changing bulbs. This simple step protects you from electrical shocks. Wait for the bulb to cool down completely if it was recently on.
Choose bulbs that match the recommended wattage and type for your fixture. Using incorrect bulbs can lead to overheating or poor performance. When handling bulbs, hold them by the base to avoid oils from your skin shortening their lifespan.
If you’re unsure about your fixture’s specifications, check the manual or the label inside the light socket. Do you have the right tools handy, like a sturdy ladder or a bulb changer? Safety first makes the task easier and faster.
Design Ideas To Enhance Your Space
Transforming a basic light fixture into a pendant light creates a fresh look instantly. Design ideas can help you enhance your space effectively. Thoughtful choices in style and placement elevate the room’s charm. Pendant light conversion kits offer flexibility and style without major renovations.
Small details make a big difference. Combining various fixtures and choosing the right bulbs sets the mood perfectly. These ideas bring warmth, style, and personality to any room.
Mixing Pendant Lights With Other Fixtures
Combine pendant lights with wall sconces or recessed lights. This mix adds layers of light and depth. Use pendant lights as focal points over dining tables or kitchen islands. Surround them with softer lights for balance. Different styles create visual interest. Modern pendants pair well with classic fixtures. Keep the color palette consistent for harmony. Varying heights and sizes add dimension. This approach enhances both function and style.
Choosing Bulb Styles For Ambiance
Select bulbs that match the room’s mood. Warm white bulbs create a cozy atmosphere. Clear bulbs show filament designs and add vintage charm. Frosted bulbs soften light for a calm feel. LED bulbs save energy and last longer. Dimmer-compatible bulbs offer control over brightness. Choose bulbs with the right brightness and color temperature. Proper bulbs turn pendant lights into mood makers.

Credit: www.amazon.com
Frequently Asked Questions
Can I Convert A Light Fixture To A Pendant Light?
Yes, you can convert many light fixtures to pendant lights using a conversion kit. These kits simplify installation and update your lighting style efficiently.
What Tools Do I Need For Pendant Light Conversion?
Basic tools like a screwdriver, wire stripper, and voltage tester are essential. Some kits may also require pliers or electrical tape.
Is A Light To Pendant Conversion Kit Safe To Use?
Yes, if installed correctly and following the kit’s instructions. Always ensure power is off and consult an electrician if unsure.
Will Conversion Kits Fit All Ceiling Types?
Most kits work with standard ceilings, but some may not fit sloped or textured ceilings. Check compatibility before purchasing the kit.
Conclusion
A light to pendant light conversion kit can change your room’s look easily. It lets you add style without big work or costs. These kits fit most light fixtures and come with clear instructions. You can update your space quickly and safely.
Choose a kit that matches your style and needs. Enjoy a fresh, modern light that brightens your home. Simple steps bring great results. Try one to see the difference it makes.


