
Are you wondering if you can adjust the length of your pendant light cord to better fit your space? Whether your light hangs too low or feels too high, getting the perfect height can completely change the look and feel of your room.
The good news is, you often can make these adjustments yourself, saving you time and money. Keep reading to discover simple steps and expert tips that will help you customize your pendant light just the way you want it.
Tools Needed
Adjusting the length of a pendant light cord requires some simple tools. Having the right tools makes the job easier and safer. Most of these tools are common and easy to find. Preparing them before you start saves time and effort.
Wire Cutters
Wire cutters are essential for trimming the cord to the desired length. They provide a clean cut without fraying the wires inside. Choose a pair that fits comfortably in your hand for better control.
Wire Strippers
Wire strippers remove the outer insulation from the electrical wires. This step is important to expose the metal for proper connection. Use a wire stripper with adjustable gauges to avoid damaging the wire.
Screwdriver
A screwdriver helps loosen and tighten screws in the light fixture. Both flathead and Phillips screwdrivers might be needed. Select the right size to avoid stripping the screws.
Electrical Tape
Electrical tape secures and insulates wire connections. It prevents short circuits and protects wires from damage. Use high-quality tape designed for electrical work.
Voltage Tester
A voltage tester confirms that the power is off before you work on the light. It ensures safety by detecting live wires. Always test before handling electrical parts.
Safety Precautions
Adjusting a pendant light cord requires turning off power first to avoid electric shock. Ensure the cord is secure to prevent falling hazards. Use proper tools and follow the manufacturer’s instructions carefully.
Adjusting the length of a pendant light cord might seem like a simple task, but safety should always be your top priority. Working with electrical fixtures requires care to prevent accidents and ensure the longevity of your lighting. Before you dive into the task, it’s crucial to understand the potential risks and how to mitigate them.Turn Off The Power
Always turn off the power at the circuit breaker before you begin. Simply switching off the light at the wall switch isn’t enough. This extra step ensures no electricity is flowing through the wires while you’re working.Use Proper Tools
Invest in insulated tools designed for electrical work. Regular screwdrivers or pliers might conduct electricity, increasing the risk of shock. It’s a small investment for your safety and peace of mind.Check For Loose Connections
Inspect the wiring connections after adjusting the cord. Loose wires can cause flickering lights and even short circuits. Make sure all connections are snug and secure before restoring power.Consider The Environment
Evaluate the room’s conditions where the pendant light is installed. Avoid adjusting cords in damp or wet areas unless the fixture is rated for such conditions. Moisture can increase the risk of electrical shock and damage.Seek Professional Help If Unsure
If you’re not confident in handling electrical tasks, consult a licensed electrician. They can ensure the job is done safely and correctly. Sometimes, hiring a professional can save you from future headaches and costly repairs. Remember, safety isn’t just about avoiding accidents—it’s about creating an environment where you can enjoy your space without worry. Adjusting a pendant light cord doesn’t have to be daunting if you take the right precautions. Are there any safety tips you swear by when handling electrical projects?Identifying Cord Type
Identifying the type of cord on your pendant light is the first step in adjusting its length. Different cords have different structures and flexibility. Knowing the cord type helps you decide if you can shorten or lengthen it safely. It also guides you on the tools needed for adjustment.
Some cords are rigid and fixed, while others are flexible and adjustable. The material, thickness, and design affect how easy it is to modify the cord length. Understanding these features prevents damage to the light fixture or electrical issues.
Fabric-covered Cords
Fabric-covered cords are common in vintage or decorative lights. They have a cloth layer around the wires, giving a stylish look. These cords are usually flexible and can be shortened by cutting and reattaching the ends. Check for strain relief to ensure safe adjustments.
Plastic Or Rubber Cords
Plastic or rubber cords are the most common type in modern pendant lights. They are durable and protect the wires inside. These cords can be shortened but require careful handling to avoid damaging the insulation. Some have built-in adjusters for easy length changes.
Coiled Or Spring Cords
Coiled cords stretch and retract like a spring. They are less common but allow easy length adjustment without cutting. Identifying this type means you can pull or release the cord to change the height of your pendant light. No tools needed.
Chain Or Beaded Cords
Chain or beaded cords combine style with function. The light hangs on a metal or decorative chain, which you can shorten by removing links. This type does not involve electrical wires in the chain itself, making length adjustment simple and safe.

Credit: www.amazon.com
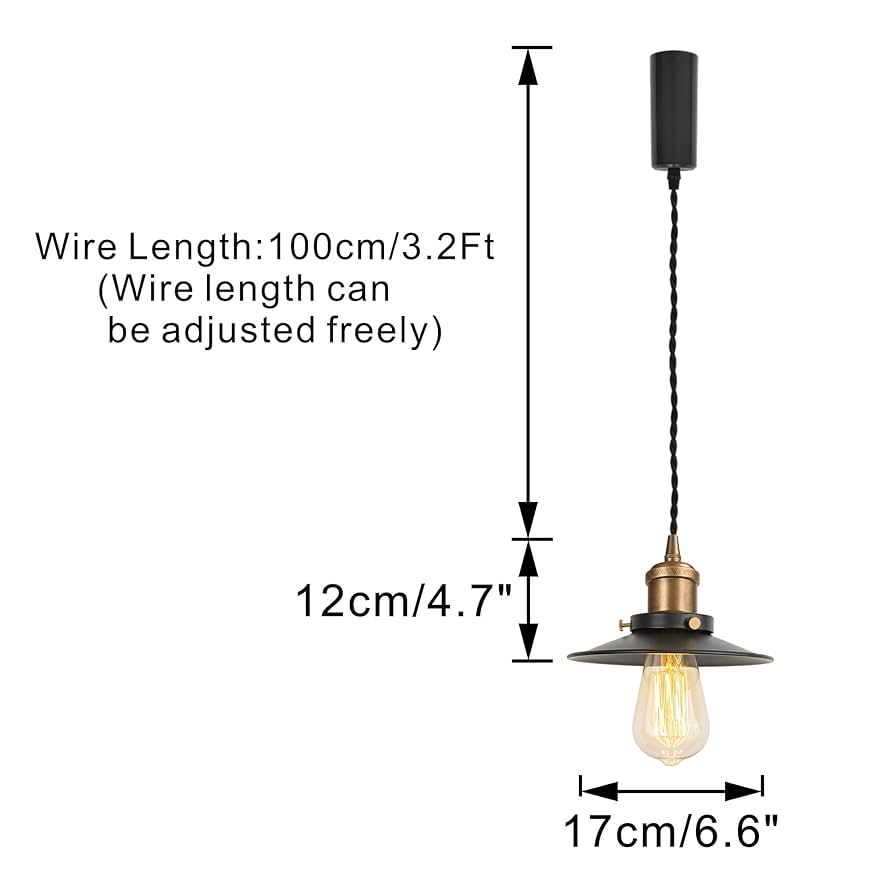
Measuring Desired Length
Measuring the desired length for your pendant light cord is essential before making any adjustments. The right length ensures proper lighting and adds style to your room. It also helps avoid cords hanging too low or sitting too high.
Start by considering the height of the ceiling and the size of the space below the light. Think about the furniture or area the light will hang over. This helps find the perfect drop length.
Determine The Ceiling Height
Measure from the floor up to the ceiling where the pendant will hang. This gives a starting point for deciding how low the light should go. Tall ceilings may need longer cords, while low ceilings require shorter ones.
Consider The Furniture Below
Measure the height of tables, kitchen islands, or counters under the pendant light. The bottom of the light should hang a few inches above these surfaces. This prevents glare and allows clear views across the room.
Use A Tape Measure Or String
Hold a tape measure or a piece of string from the ceiling to the desired height. Mark the length on the cord or note it down. This physical measurement helps avoid guesswork and ensures accuracy.
Account For Adjustments
Leave some extra length when measuring. This allows room for slight changes or repositioning later. It also helps with securing the cord inside the ceiling mount safely.
Turning Off Power
Adjusting the cord length of a pendant light requires safety first. Turning off the power ensures no electric shock risk. Always handle electrical fixtures with the power off.
Before touching the light or cord, cut the power supply. This step protects you and your home. It is simple but crucial for a safe adjustment.
Locate The Circuit Breaker
Find your home’s circuit breaker panel. It is usually in the basement, garage, or utility room. Look for a switch labeled for the light or room.
Switch Off The Correct Breaker
Flip the switch to the off position. This stops electricity to the pendant light. Double-check by turning the light switch on and off.
Use A Voltage Tester
Test the wires with a voltage tester. This confirms no current runs through them. It adds an extra layer of safety before you start work.
Inform Others In The Home
Let family members know the power is off. Prevents others from turning it back on accidentally. Safety is everyone’s responsibility during this task.
Credit: www.amazon.com
Detaching Pendant Light
Detaching a pendant light is often the first step when you want to adjust its cord length. It might seem tricky at first, but with the right approach, it becomes a straightforward task. Removing the fixture safely allows you to access the cord and make precise changes without damaging the light or the ceiling.
Understanding Your Pendant Light’s Mounting System
Most pendant lights are mounted using a canopy that covers the electrical box in the ceiling. This canopy is usually held in place by screws or a locking mechanism.
Before detaching, inspect how your light is attached. Some fixtures have visible screws, while others hide them under decorative covers.
Turning Off Power For Safety
Always switch off the power at the circuit breaker before you touch the light fixture. This step is crucial for your safety and prevents electrical shocks.
Even if you think the light is off, never rely solely on the wall switch. Test with a voltage tester if you have one.
Removing The Canopy And Accessing The Cord
After ensuring power is off, gently unscrew or unlock the canopy. Hold the fixture firmly to avoid it falling as you loosen the canopy.
Once the canopy is removed, you’ll see the wiring and the cord. This is your access point to adjust or detach the cord length.
Disconnecting The Wiring Safely
Take note or a photo of how the wires are connected before you disconnect anything. This will help you reconnect everything correctly later.
Use a screwdriver to loosen wire nuts or terminal screws, and carefully separate the wires without damaging them.
Handling The Cord For Length Adjustment
With the fixture detached and wiring disconnected, you can now shorten or lengthen the cord. Some cords have a locking clip or set screw that holds the cord in place inside the canopy.
Release this lock to pull the cord through or feed more cord in. Make sure to leave extra cord inside the canopy to avoid tension on the wires.
Have you ever found the perfect pendant light, only to realize the cord is just too long or too short? Knowing how to detach the light and adjust the cord can save you from unnecessary frustration—and costly electrician visits.
Adjusting Cord Length
Adjusting the cord length of a pendant light helps you set the perfect height for your space. The right length improves both the look and function of the light. You can make the cord shorter or longer based on your needs.
Shortening The Cord
Shortening the cord is simple and quick. First, turn off the power to stay safe. Then, remove the pendant light from the ceiling mount. Measure how much cord you want to remove. Cut the cord carefully with wire cutters.
After cutting, strip the wire ends to expose the copper. Use wire nuts or connectors to join the wires. Push the wires back into the ceiling box. Finally, reattach the pendant light and turn the power on.
Extending The Cord
Extending the cord can be a bit trickier but still doable. Start by turning off the power. You will need extra cord of the same type and gauge. Connect the new cord to the existing one using wire connectors.
Make sure to join the wires securely and match colors correctly. Cover the connections with electrical tape for safety. Push all wires back into the ceiling box. Rehang the pendant light and restore power.
Securing The Cord
Securing the cord of your pendant light is crucial for both safety and aesthetics. A loose or poorly fastened cord can look messy and even become a hazard. You want your light to hang perfectly, without any awkward slack or tension pulling on the fixture.
Choosing The Right Cord Grip
Using a proper cord grip keeps the cord firmly in place while preventing damage to the wire. These grips come in various sizes and styles, so pick one that fits your cord thickness. If you’ve ever had a lamp where the cord slipped inside the fixture, you know how important this small part is.
Using Ceiling Hooks Or Clips
Ceiling hooks or cord clips can help you guide the cord along the ceiling or wall neatly. This is especially helpful if you want to adjust the length without cutting the cord. You can create a clean, intentional look by securing the cord in a straight line or gentle curve.
Hiding Excess Cord Length
What do you do with extra cord after adjusting the length? Coil it neatly and secure it with a twist tie or Velcro strap. Then tuck the coil into a ceiling canopy or attach it discreetly along the ceiling with clips. This keeps your space tidy and prevents the cord from dangling loosely.
Checking For Safety And Stability
After securing the cord, give it a gentle tug to make sure it won’t slip or pull away. Loose cords can cause your pendant light to tilt or fall. Taking this extra moment to test stability ensures your fixture stays exactly where you want it.
Reinstalling Pendant Light
Reinstalling a pendant light offers a great chance to adjust the cord length for a perfect fit. This process is straightforward if you understand the basics of handling wiring and mounting. It’s more than just hanging the fixture; it’s about making sure the light complements your space and functions safely.
Preparing The Area And Tools
Before you start, turn off the power at the circuit breaker to avoid any accidents. Gather essential tools like a screwdriver, wire strippers, a voltage tester, and pliers. Having everything ready helps you work efficiently and safely.
Removing The Old Pendant Light
Carefully unscrew the canopy—the part attached to the ceiling—and lower the fixture. Use a voltage tester to confirm wires are not live before disconnecting them. Keep track of how the wires connect; taking a picture can help you during reinstallation.
Adjusting The Cord Length
Decide how long you want the pendant to hang. Most cords can be shortened by pulling the excess wire through the canopy and securing it inside. If you need to lengthen the cord, you may require additional wire and connectors—do you have the right materials ready?
Connecting The Wires Safely
Match the wires by color: usually black (hot), white (neutral), and green or copper (ground). Twist the wire ends together and secure them with wire nuts. Double-check the connections are tight and no bare wire is exposed to prevent hazards.
Securing The Fixture And Testing
Push the wires back into the ceiling box carefully and screw the canopy in place. Turn the power back on and test your pendant light. Does the light hang exactly where you want it, and does it illuminate your space as expected?

Credit: www.risenlighting.com
Testing And Final Checks
Test the pendant light by turning it on to ensure the cord length suits your space. Check for any loose connections or uneven hanging before finalizing. Adjust the cord carefully to avoid damage and achieve the desired height.
Adjusting the length of a pendant light cord can transform a room’s ambiance. After making adjustments, thorough testing and checks are crucial. This ensures safety and optimal lighting. Here’s a guide to help you complete these final steps effectively.Check For Secure Fastening
Ensure the cord is tightly secured. Loose cords can pose safety risks. Inspect the fixture for any wobbles. Adjust as needed to ensure stability.Test The Light Functionality
Turn the light on. Check if it illuminates evenly. Flickering could indicate a loose connection. Resolve any issues for consistent lighting.Inspect Cord Length
Ensure the cord is the desired length. Measure if necessary. The pendant should hang at the preferred height. Adjust if it seems off.Evaluate Visual Aesthetics
Stand back and assess the overall look. Does the light enhance the room’s design? Ensure it complements the room’s decor.Ensure Safety Compliance
Verify all electrical components meet safety standards. Check for exposed wires. Consult a professional if unsure. Completing these checks will ensure your pendant light is both functional and stylish.Common Mistakes To Avoid
Adjusting a pendant light cord length can brighten a room perfectly. Avoid mistakes that cause safety issues or poor looks. Knowing common errors helps you fix the cord right the first time.
Ignoring Safety Precautions
Skipping safety checks can lead to electrical hazards. Always turn off power before touching wires. Use tools made for electrical work. Secure connections tightly to avoid sparks or shorts.
Cutting Cord Too Short
Cutting the cord too short limits future changes. Measure twice before cutting once. Leave extra cord length inside the ceiling for adjustments.
Not Securing The Cord Properly
Loose cords can tangle or pull on fixtures. Use clamps or cord grips to hold the cord steady. This prevents strain on wiring and fixture damage.
Failing To Check Weight Limits
Overloading the cord with a heavy fixture causes sagging. Know the weight limit for your cord and ceiling mount. Choose cords and fixtures that match in strength.
Ignoring Style And Room Scale
Setting the light too high or low affects room balance. Adjust cord length to fit ceiling height and furniture size. The right length improves both function and style.
Frequently Asked Questions
Can You Shorten A Pendant Light Cord Easily?
Yes, pendant light cords can be shortened by adjusting the length inside the canopy. Turn off power first. Remove the canopy, pull the cord to the desired length, and secure it. Reattach the canopy and restore power. This helps customize light height effectively.
How Do You Lengthen A Pendant Light Cord?
Lengthening a pendant light cord may require an extension or replacing the cord. Extensions are available for purchase. For safety, ensure compatibility with your fixture. Consider hiring an electrician for complex adjustments to avoid electrical hazards or damage.
Is It Safe To Adjust Pendant Light Cords Yourself?
Adjusting pendant light cords is safe if done carefully. Always turn off power before handling wires. Follow manufacturer instructions. Use proper tools and avoid damaging wires. When unsure, consult a professional electrician to ensure safety and compliance with electrical codes.
What Tools Are Needed To Adjust Pendant Light Cords?
You need a screwdriver, wire cutters, and wire strippers to adjust pendant light cords. Additionally, a voltage tester ensures power is off. These tools help safely shorten or lengthen cords and secure wiring inside the canopy.
Conclusion
Adjusting a pendant light cord length is simple and useful. It helps fit your room’s style and needs. Shortening or lengthening the cord changes the light’s look and feel. You only need basic tools and some care. Always turn off power before starting work.
Small changes can make big differences in lighting. Try adjusting cords to brighten or soften your space. This easy task lets you personalize your home lighting. Feel free to experiment until you find the best length.


