
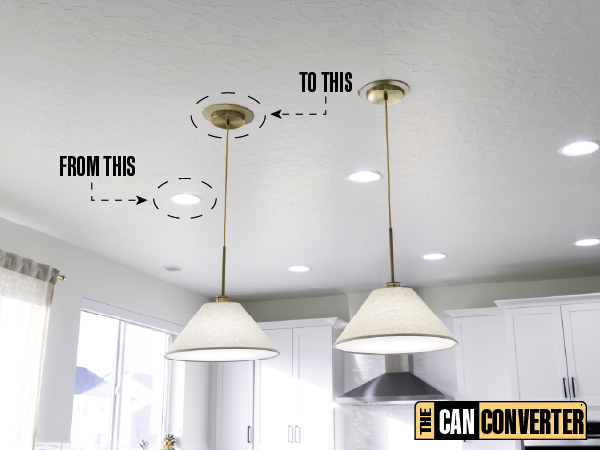
Are you thinking about giving your room a fresh new look by swapping out those plain recessed lights for a stunning chandelier? You’re not alone.
Changing your lighting can completely transform the mood and style of your space. But can you really switch from recessed lighting to a chandelier without a hassle? This guide will walk you through what you need to know, the challenges you might face, and how to make the change smoothly.
Keep reading—you’re closer than you think to adding that wow factor to your room!

Credit: www.amazon.com
Assessing Your Current Setup
Changing recessed lighting to a chandelier requires careful assessment of your current setup. This helps avoid surprises during installation. Understanding the ceiling, wiring, and space ensures the new fixture fits well and works safely.
Checking Ceiling Structure
Start by examining the ceiling where the recessed light is installed. Chandeliers need strong support to hold their weight. Recessed lights usually attach to lightweight housings, not designed for heavy fixtures. Look for joists or beams nearby. You may need to add a brace or support box for the chandelier. Make sure the ceiling material can handle the new fixture without damage.
Evaluating Electrical Wiring
Next, inspect the wiring behind the recessed light. Chandeliers often need a different wiring setup than recessed lights. Check the wire gauge and connections. The wiring must support the chandelier’s electrical load and switch control. Confirm that the power is off before checking wires. If unsure, hire a licensed electrician to verify wiring safety and compatibility.
Measuring Space And Height
Measure the room’s height and the space around the recessed light. Chandeliers hang lower and take up more room. Ensure enough clearance for walking and furniture below. Consider the chandelier’s size and shape to match the room’s scale. Use a tape measure to find ceiling height and distance from the floor. Proper sizing keeps the space balanced and safe.

Credit: www.angi.com
Choosing The Right Chandelier
Choosing the right chandelier is key to transforming your recessed lighting. This choice sets the tone for your room’s style and function. A well-chosen chandelier blends beauty with practicality. It enhances the room’s look and fits the space perfectly.
Matching Style And Size
Select a chandelier that matches your room’s decor. A modern room pairs well with sleek, simple designs. Classic rooms benefit from ornate, detailed fixtures. Size matters. A chandelier too big overwhelms the space. Too small, and it looks lost. Measure your room and ceiling height. Choose a size that balances the area.
Considering Weight And Support
Chandeliers can be heavy. Check the ceiling’s ability to hold the fixture. Recessed lighting spots may need reinforcement. Use a strong mounting bracket for safety. Consult a professional if unsure. Proper support prevents accidents and damage.
Selecting Energy-efficient Options
Energy-efficient chandeliers save money and help the environment. Look for LED bulbs or fixtures rated for low energy use. These last longer and reduce electricity bills. Choose dimmable options for flexible lighting. This adds mood and control to your space.
Gathering Required Tools And Materials
Gather all tools like screwdrivers, wire strippers, and a voltage tester before starting. Choose materials that match your chandelier’s size and weight for safety. Proper preparation helps the installation go smoothly and safely.
Gathering the necessary tools and materials is crucial for a smooth transition from recessed lighting to a chandelier. Proper preparation ensures safety and efficiency. This guide will help you collect everything you need for this project.List Of Basic Tools
Having the right tools makes the task easier. Here’s what you’ll need:- Screwdriver set
- Wire stripper
- Voltage tester
- Drill with bits
- Ladder
- Tape measure
Safety Equipment
Safety should be your top priority. Equip yourself with:- Safety goggles
- Insulated gloves
- Dust mask
- Hard hat
Electrical Components Needed
Gather these electrical components before starting:- Chandelier fixture
- Mounting bracket
- Wire connectors
- Electrical box
- Light bulbs
Removing Recessed Lighting Fixtures
Removing recessed lighting fixtures is a crucial first step if you’re planning to install a chandelier in their place. It involves careful handling to avoid damage to your ceiling or electrical wiring. Taking your time during this process can save you from costly repairs later on.
Turning Off Power Safely
Before touching any electrical components, make sure to turn off the power at the circuit breaker. Don’t rely on just switching off the wall switch; power could still be flowing to the fixture. Use a voltage tester to double-check that the light is completely off.
Have you ever experienced a small shock because you forgot to turn off the power properly? Avoid that by being thorough—it’s not just about safety, but also about peace of mind.
Detaching Fixture Components
Once the power is safely off, remove the trim or cover of the recessed light. This part usually snaps or screws off easily. Then, carefully take out the bulb and the housing, which might be held by clips or screws inside the ceiling.
Keep all screws and parts organized—you’ll need to decide which components to keep or discard based on your new chandelier installation. If the fixture has a socket adapter, gently disconnect it from the wiring.
Inspecting The Junction Box
After removing the fixture, check the junction box hidden in the ceiling. Ensure it’s securely fastened and in good condition to support the weight of your new chandelier. A flimsy or missing junction box can cause serious problems down the line.
If you find the box is plastic or not rated for heavy fixtures, consider upgrading it to a metal box designed for chandeliers. This simple inspection can prevent your new chandelier from becoming a safety hazard.
Installing The Chandelier Mount
Installing the chandelier mount is a crucial part of converting recessed lighting to a chandelier. This step ensures your new fixture is safely and securely supported. It involves preparing the ceiling, attaching the right hardware, and managing the electrical connections properly.
Reinforcing Ceiling Support
Chandeliers are often heavier than recessed lighting, so your ceiling needs extra support. Look for a ceiling joist or add a support brace between joists to hold the weight. Without reinforcement, the fixture could sag or even fall, risking damage and injury.
I once installed a beautiful chandelier but skipped reinforcing the ceiling. Within a week, it started to tilt, which made me realize how important this step is. Would you want to risk your chandelier falling just because of weak support?
Attaching Mounting Bracket
The mounting bracket is what holds your chandelier in place. Attach it securely to the reinforced support using screws designed for heavy fixtures. Make sure the bracket is perfectly level to avoid a crooked chandelier.
- Check the bracket fits your chandelier base.
- Use a level to align the bracket properly.
- Tighten screws firmly but avoid over-tightening.
Running Electrical Wiring
Proper wiring is key for safety and functionality. Turn off the power before handling wires. Connect the chandelier wires to the existing electrical box wires, matching black to black (hot), white to white (neutral), and green or bare copper to ground.
If you’re unsure about wiring, consider hiring an electrician. Incorrect wiring can cause shorts or even fires. Have you ever felt unsure about electrical work but wanted to save money by doing it yourself?
Wiring The Chandelier
Wiring a chandelier in place of recessed lighting requires careful attention to detail and safety. This part of the process ensures your new fixture works correctly and stays securely connected. Handling electrical wires might feel intimidating, but with the right approach, you can make a reliable and safe connection.
Connecting Wires Correctly
Start by matching the wires from your chandelier to the corresponding house wires. Typically, black wires connect to black (hot), white wires to white (neutral), and green or bare copper wires to the ground. Make sure to strip about half an inch of insulation off each wire before twisting them together.
Have you checked if your chandelier has additional wires, like a blue one for a separate light or fan? Always refer to the chandelier’s manual to understand its wiring layout fully. Connecting wires incorrectly can cause short circuits or even damage your fixture.
Securing Wire Nuts
After twisting wires together, cover the connection with a wire nut to keep them secure and insulated. Choose a wire nut size that fits snugly; too small can come loose, and too large won’t hold the wires properly. Twist the wire nut clockwise until it feels tight, then give the wires a gentle tug to ensure they won’t pull apart.
Did you know some electricians add a small strip of electrical tape around the wire nut for extra security? This simple step can prevent loosening over time, especially if your chandelier is heavy or if the connections might be disturbed.
Testing Electrical Connections
Before mounting your chandelier, test the wiring to avoid surprises after installation. Turn the power back on and use a voltage tester to check if the wires are live and correctly connected. If the tester lights up as expected, your connections are good.
Never skip this step — it’s better to find and fix wiring issues now than to deal with flickering lights or worse electrical hazards later. Have you ever turned on a new fixture only to find it doesn’t work? Testing first saves time and stress.
Final Assembly And Adjustment
The final assembly and adjustment stage brings your new chandelier to life. This step ensures the fixture hangs securely and looks perfect. Proper installation creates a stunning focal point in your room.
Hanging The Chandelier
Start by attaching the chandelier to the ceiling bracket. Use a sturdy hook or mounting plate provided with the fixture. Ensure the fixture is well supported to hold its weight safely. Connect the wiring carefully, matching the colors of the wires. Secure all connections with wire nuts and electrical tape. Lift the chandelier slowly and hook it onto the bracket. Check that it hangs straight and feels stable.
Adjusting Height And Position
Adjust the chain or rod to set the chandelier’s height. The ideal height depends on the room size and ceiling height. For dining tables, hang the chandelier about 30 to 36 inches above the surface. In open rooms, leave more space between the fixture and the floor. Make small tweaks to center the chandelier over the desired area. Use a level to ensure it hangs evenly without tilting.
Installing Bulbs And Shades
Choose bulbs that match the chandelier’s specifications and style. LED bulbs save energy and last longer. Screw each bulb into its socket gently but firmly. Attach shades or covers according to the manufacturer’s instructions. Make sure shades fit snugly and align properly. Test the light by turning it on and off. Adjust any bulbs or shades if the light looks uneven or too dim.

Credit: www.amazon.com
Safety Tips And Troubleshooting
Changing recessed lighting to a chandelier can dramatically transform your space, but it’s crucial to prioritize safety throughout the process. Understanding potential issues and knowing how to address them helps keep your home secure and your new fixture shining bright. Let’s dive into key safety tips and troubleshooting advice to guide you.
Common Installation Issues
One frequent problem is the lack of a proper support box. Chandeliers are heavier than recessed lights, so your ceiling must hold the extra weight safely. If you notice the fixture feels loose or wobbles, it’s a sign the support isn’t strong enough.
Another issue is wiring compatibility. Recessed lights often have different wiring setups, so ensure your existing wiring matches the chandelier’s requirements. Mismatched wiring can cause flickering or even electrical hazards.
Finally, watch out for ceiling height and clearance problems. Chandeliers need enough space to hang freely without hitting furniture or heads. Measure carefully before installation to avoid awkward positioning.
When To Call A Professional
Handling electrical work can be risky if you’re not experienced. If you encounter confusing wiring, damaged ceiling joists, or aren’t confident about securing the fixture, it’s time to call an electrician. They have the tools and knowledge to prevent fire hazards and ensure code compliance.
Also, if your home has outdated wiring or if the circuit breaker trips after installation, professional help can diagnose hidden issues. Don’t ignore these warning signs—they could lead to bigger problems down the road.
Maintaining Your New Fixture
Once your chandelier is installed, keeping it clean and well-maintained ensures it stays safe and beautiful. Dust regularly using a soft cloth or feather duster to avoid buildup that can dull the light or cause overheating.
Check the mounting and wiring every few months to catch any loosening screws or frayed wires early. A little attention now can prevent accidents later.
Have you noticed your chandelier flickering or making unusual sounds? Don’t wait—inspect the bulbs and connections immediately. Taking care of these small details keeps your home inviting and hazard-free.
Frequently Asked Questions
Can Recessed Lighting Be Replaced With A Chandelier?
Yes, recessed lighting can be replaced with a chandelier. It requires installing a ceiling box and proper wiring. Ensure the ceiling can support the chandelier’s weight. Hiring a professional electrician is recommended for safety and code compliance.
What Electrical Changes Are Needed For This Upgrade?
You need to add a junction box and possibly new wiring. Recessed lights use different mounts and wiring setups. A chandelier requires a sturdy box and a switch that supports its wattage. Always consult an electrician to handle electrical upgrades safely.
How Much Does Changing Recessed Lighting To A Chandelier Cost?
Costs vary based on chandelier size, wiring complexity, and labor fees. On average, expect $200 to $800 or more. Larger, heavier chandeliers and extensive rewiring increase costs. Getting multiple quotes ensures fair pricing and helps plan your budget efficiently.
Is It Safe To Install A Chandelier Where Recessed Lights Were?
Yes, if the ceiling box is properly installed and secured. The chandelier must be supported by a ceiling joist or a brace. Electrical connections must meet local codes. Professional installation ensures safety and prevents electrical hazards.
Conclusion
Changing recessed lighting to a chandelier is possible with careful planning. You need to check your ceiling type and wiring first. Choosing the right chandelier size helps balance your room’s look. Hiring a professional electrician keeps the work safe and smooth.
This change can brighten your space and add style. Take your time to pick a fixture that fits your taste. The right lighting makes a big difference in any room. Simple steps lead to a beautiful and functional upgrade.


