
Have you ever looked at your favorite table lamp and noticed the cord is frayed or the switch doesn’t work right? Rewiring a table lamp might sound tricky, but it’s something you can do yourself with just a few tools and simple steps.
Imagine saving money, bringing new life to your lamp, and adding a personal touch to your space—all by learning this easy skill. Keep reading, and you’ll discover how to safely and quickly rewire your table lamp, even if you’ve never done it before.
Your lamp—and your wallet—will thank you.
Tools And Materials Needed
Rewiring a table lamp needs specific tools and materials. Having the right items ready makes the job safer and easier. This section lists everything required to complete the task efficiently.
Essential Tools
- Screwdriver – to open lamp parts and tighten screws
- Wire strippers – to remove insulation from wires cleanly
- Needle-nose pliers – to bend and hold wires securely
- Electrical tape – to cover wire connections for safety
- Multimeter – to check electrical continuity and voltage
- Utility knife – to cut wires and insulation carefully
- Wire nuts – to connect wires safely and firmly
Required Replacement Parts
- New lamp cord – usually 2-conductor cord with grounding wire
- Replacement plug – to fit your wall socket type
- Socket switch – if the lamp switch is faulty
- Lamp socket – to hold the light bulb securely
- Harp and finial (optional) – to support and decorate the lampshade
Safety Precautions
Safety is the top priority when rewiring a table lamp. Careless handling of electrical parts can cause shocks or fires. Follow strict safety steps to protect yourself and your home.
Unplugging And Workspace Setup
Always unplug the lamp from the power outlet before starting. Ensure no electricity flows to the lamp during the work. Choose a clean, dry workspace with plenty of light. Keep tools and parts organized to avoid confusion. Avoid working near water or damp areas. Use a flat surface to prevent parts from rolling away.
Handling Electrical Components
Handle wires and metal parts with care. Use insulated tools to prevent electric shocks. Avoid touching wire ends directly with your fingers. Check wires for damage or wear before use. Replace any frayed or broken wires immediately. Secure all connections tightly to prevent loose contacts. Never force parts together; this can cause damage or shorts.
Removing The Old Wiring
Removing the old wiring from your table lamp is a crucial step that sets the foundation for a safe and functional rewiring job. It requires careful handling to avoid damaging the lamp or causing electrical hazards. This part often reveals the lamp’s internal structure, giving you a better understanding of how it all fits together.
Disassembling The Lamp
Start by unplugging the lamp to ensure your safety. Then, remove any lampshade or bulb to clear the workspace. Most lamps have a finial or screw on top of the harp—take this off to free the lampshade frame.
Next, look for screws or nuts holding the socket in place. These are usually accessible through the top or bottom of the lamp. Gently unscrew these parts and carefully lift out the socket assembly without pulling on the wires.
Have you noticed how different lamps have unique designs? This step might vary, so take your time. If something feels stuck, double-check for hidden screws or clips instead of forcing parts apart.
Disconnecting The Wires
Once the socket is free, focus on the wires connecting it to the lamp cord. Usually, these are attached by small screws or push-in connectors. Use a small screwdriver to loosen the screws or gently pull the wires out of connectors.
Mark the wires or take a photo before removal. This will help you remember the correct wiring when installing the new cord. Keep in mind, lamps typically have a hot (live) wire and a neutral wire—knowing which is which matters for safety.
After disconnecting, carefully remove the old cord from the lamp’s base or stem. Sometimes, it’s threaded through a small hole or clamp—loosen or remove these to free the cord completely. Have you ever found old cords that were brittle or cracked? That’s a clear sign it’s time to replace them.
Preparing New Wiring
Preparing new wiring is a crucial part of rewiring a table lamp. It sets the foundation for safe and effective electrical connections. Paying close attention to how you measure and strip the wire can prevent common issues like loose connections or short circuits.
Measuring And Cutting Wire
Start by measuring the length of wire you’ll need to connect the lamp’s socket to the plug. Add a few extra inches to your measurement to allow for flexibility during installation. Cutting the wire too short can cause stress on the connections, which may lead to breakage over time.
Use a sharp wire cutter for a clean cut. Dull tools can crush the wire and make stripping more difficult. Have you ever tried to fix a lamp only to find the wire was too short? Avoid that frustration by measuring carefully before cutting.
Stripping Wire Ends
Stripping the wire ends exposes the copper conductor needed for making connections. Use a wire stripper matched to the wire gauge to avoid damaging the copper. Removing too much insulation can leave exposed wire that causes shorts, while too little insulation removal makes it hard to connect properly.
Strip about half an inch of insulation from each end. Twist the exposed copper strands gently to keep them neat. A neat wire end fits snugly into terminals and ensures a solid electrical connection. What tools do you usually use for stripping wires? Using the right tool can make this task easier and safer.
Connecting The New Wires
Begin by safely removing the old wires from the lamp socket and plug. Connect the new wires by matching the correct colors to the corresponding terminals. Secure all connections tightly to ensure the lamp works properly.
Rewiring a table lamp can breathe new life into your favorite fixture. Once you have replaced the old wires, it’s time to connect the new ones. This process is crucial for the lamp to function correctly and safely. Follow these steps to ensure each connection is secure and efficient.Attaching To The Socket
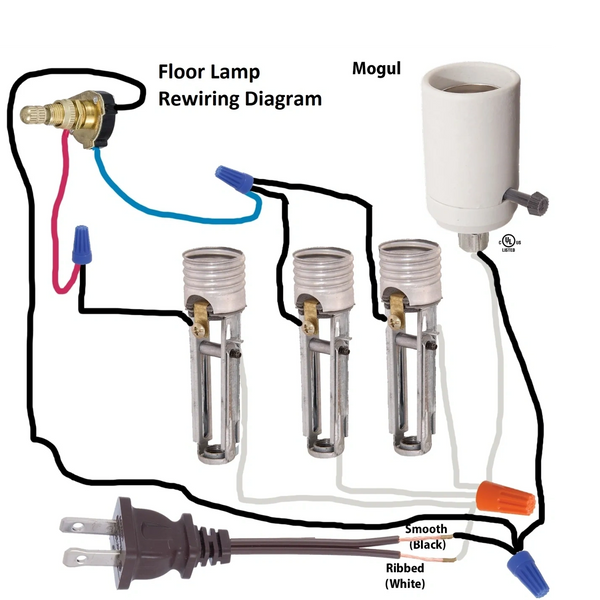
First, identify the socket terminals. They are usually marked with different colors. Attach the neutral wire to the silver terminal. This wire is typically white or ribbed. Connect the hot wire, which is usually black or smooth, to the brass terminal. Ensure each wire is wrapped around the screw in a clockwise direction. This helps secure the wire when you tighten the screw. Tighten the screws firmly to hold the wires in place.Securing Wire Connections
Next, cover each connection with electrical tape. This provides extra insulation. It prevents accidental contact between the wires and the metal parts of the lamp. Ensure no copper wire is exposed. This reduces the risk of short circuits. Finally, tuck the wires neatly into the base of the socket. This ensures they do not interfere with the bulb or the lamp’s outer casing.
Credit: www.amazon.com
Reassembling The Lamp
Reassembling the lamp is where your careful work comes together. After rewiring, putting all the parts back correctly ensures your lamp not only looks good but works safely. This stage demands attention to detail and patience.
Putting The Lamp Back Together
Start by gently placing the socket back into the lamp base. Make sure the wires are neatly tucked inside and nothing is pinched or exposed. Tighten any screws or fittings you removed earlier to secure the socket firmly.
Next, reattach the harp or bulb holder if your lamp has one. This supports the lampshade and keeps the bulb in place. Don’t forget to screw in the bulb carefully—avoid over-tightening to prevent damage.
Now, place the lampshade on top. Check if it sits evenly and adjust if necessary. A well-aligned shade not only looks better but also spreads light effectively.
Testing The Connection
Before plugging the lamp into the wall, double-check all connections. Are the wires tightly connected and insulated? Is the switch properly attached?
Once you are confident everything is secure, plug the lamp in and turn it on. Does the bulb light up immediately? If yes, your rewiring was successful.
If the lamp doesn’t turn on, don’t panic. Unplug it and inspect the wiring again. Sometimes a loose connection or a misplaced wire can be the culprit.
Have you ever faced a tricky wiring issue that seemed impossible to solve? Sometimes, stepping away for a few minutes helps you spot something you missed before.
Troubleshooting Common Issues
Troubleshooting common issues in rewiring a table lamp helps you fix problems quickly. Small mistakes can stop your lamp from working properly. Checking simple things can save time and avoid frustration.
Some issues happen often and are easy to solve. Knowing what to look for helps you get your lamp working again. Focus on the main parts like the bulb, switch, and wiring.
Lamp Not Lighting Up
If the lamp does not light up, start by checking the bulb. Make sure it is screwed in tightly. A burned-out bulb will not work, so try a new one.
Next, check the power source. The outlet might be off or broken. Test the outlet with another device to confirm power.
Look at the lamp switch. Sometimes it gets stuck or breaks. Try turning the switch on and off several times to see if it helps.
Loose Connections
Loose wires can stop the lamp from lighting up. Unplug the lamp before inspecting wires. Look for disconnected or frayed wires inside the base or near the switch.
Use a screwdriver to tighten any loose screws holding the wires. Make sure wire connections are secure and the wires are stripped properly.
Check the socket connections. Loose parts in the socket can cause poor contact with the bulb. Tighten or replace the socket if needed.

Credit: www.walmart.com
Tips For Maintaining Lamp Safety
Maintaining lamp safety is crucial once you’ve rewired your table lamp. Even a perfectly rewired lamp can become a hazard if not cared for properly. Paying attention to simple safety tips can protect you and your home from electrical risks.
Regular Inspections
Check your lamp regularly for any visible damage like frayed cords, loose connections, or cracked sockets. These issues can cause short circuits or sparks if ignored.
Make it a habit to unplug your lamp before inspecting it. Look closely at the plug and cord for any discoloration or unusual smells, which might signal overheating.
Have you ever noticed your lamp flickering or feeling unusually warm? These signs often mean it needs immediate attention. Don’t wait for a problem to get worse—small issues are easier to fix early on.
When To Seek Professional Help
If you find any damaged wiring or if your lamp behaves erratically after rewiring, don’t hesitate to call an electrician. Some problems require expert knowledge and tools to fix safely.
Attempting complex repairs without proper experience can increase risks. A professional can ensure your lamp meets electrical safety standards and prevent future hazards.
Remember, safety isn’t just about fixing problems but also about knowing when a job is beyond your skill level. Would you rather risk a small repair or a costly accident?
Credit: dengarden.com
Frequently Asked Questions
How Do You Safely Rewire A Table Lamp?
First, unplug the lamp and remove the old wiring carefully. Use a new cord with a plug, connect wires to the socket terminals, and secure everything. Always follow safety guidelines and test the lamp before use to ensure proper wiring.
What Tools Are Needed To Rewire A Table Lamp?
You need wire cutters, a screwdriver, pliers, and a new lamp cord with plug. A voltage tester helps ensure safety. Having electrical tape and wire strippers will also make the process easier and safer.
How Long Does It Take To Rewire A Table Lamp?
Rewiring a table lamp usually takes 30 to 60 minutes. The time varies based on your experience and lamp design. Preparing tools and working carefully can speed up the process and ensure safety.
Can I Rewire A Lamp Without Electrical Experience?
Yes, but follow detailed instructions carefully. Basic knowledge of wiring and safety is necessary. If unsure, consult a professional to avoid hazards and ensure the lamp works correctly.
Conclusion
Rewiring a table lamp can save money and extend its life. The process is simple with the right tools and steps. Always stay safe and unplug the lamp before starting. Take your time to connect wires properly and test the lamp after.
A little effort brings a bright, working lamp back to use. Try it yourself and enjoy a fresh, safe light source at home.


