
Are you ready to boost your home’s security and save on energy bills with a motion sensor light? Wiring one might seem tricky, but it’s easier than you think.
Imagine your lights turning on automatically the moment someone steps outside your door—no more fumbling for switches in the dark. In this guide, you’ll discover simple, step-by-step instructions to wire your motion sensor light safely and correctly. Keep reading, and by the end, you’ll have the confidence to install it yourself and enjoy hands-free lighting every night.
Tools And Materials Needed
Wiring a motion sensor light needs the right tools and materials. Having these ready makes the process easier and safer. Each item plays a role in ensuring the light works well and lasts long.
Essential Tools For Wiring
- Screwdriver set – for removing and securing screws
- Wire stripper – to remove insulation from wires
- Voltage tester – to check if wires are live
- Pliers – for twisting and bending wires
- Drill – to make holes for mounting
- Measuring tape – to measure wire length and placement
- Electrical tape – for insulating wire connections
Materials Required
- Motion sensor light fixture – the main device
- Electrical wires – usually black (hot), white (neutral), and green (ground)
- Wire nuts – to connect wires securely
- Mounting screws and brackets – to fix the light in place
- Electrical box – if needed, to house wiring connections
Safety Gear
- Insulated gloves – to protect from electric shocks
- Safety goggles – to shield eyes from debris
- Flashlight – for working in dark areas

Credit: www.youtube.com
Types Of Motion Sensor Lights
Understanding the types of motion sensor lights can make wiring them much easier. Different designs suit different spaces and needs. Knowing the distinctions helps you pick the right one for your home or project.
Indoor Vs Outdoor
Indoor motion sensor lights are usually smaller and less rugged. They work well in hallways, closets, or basements where you want automatic lighting without switches. These lights often connect to your home’s existing wiring and are designed for dry environments.
Outdoor motion sensor lights, on the other hand, are built to withstand weather conditions. They come with waterproof casings and stronger sensors to detect movement over larger areas. You might install these near driveways, porches, or backyards to improve security and convenience.
Have you thought about where exactly you want the sensor light? This choice affects the type you should buy and how you wire it.
Wired Vs Wireless
Wired motion sensor lights connect directly to your home’s electrical system. They offer reliable power and don’t need battery changes, but installation can be more complex. You’ll often need to turn off power at the breaker and may require basic electrical skills or professional help.
Wireless motion sensor lights use batteries and communicate via radio signals or Wi-Fi. These are easy to install because they don’t require wiring, making them perfect for renters or quick setups. However, you should keep an eye on battery life and be ready to replace batteries periodically.
Think about your comfort level with electrical work and whether you prefer a permanent or flexible lighting solution before choosing wired or wireless.
Safety Precautions
Handling electrical wiring can be risky if you overlook safety. Before wiring your motion sensor light, it’s crucial to take precautions to avoid shocks, fires, or damage to your device. Safety isn’t just about protecting yourself—it also ensures your installation works correctly and lasts longer.
Turn Off The Power Supply
Always switch off the circuit breaker or remove the fuse that controls the power to the area where you’ll be working. Double-check by using a voltage tester or a non-contact tester to confirm no electricity is flowing. Have you ever assumed the power was off, only to get a shock? Don’t make that mistake.
Use Proper Tools And Equipment
Use insulated screwdrivers and wire strippers designed for electrical work. Avoid using damaged or cheap tools—they can slip or break, causing injury or faulty connections. Having the right tools makes your job safer and faster.
Wear Protective Gear
Wear rubber-soled shoes and insulated gloves to minimize the risk of electric shock. Safety glasses protect your eyes from sparks or debris when stripping wires or securing fixtures. Simple gear can prevent accidents that interrupt your project.
Follow Wiring Diagrams Carefully
Refer to the manufacturer’s wiring diagram and instructions closely. Incorrect wiring can damage the sensor or cause short circuits. If you’re unsure, ask for help or consult an electrician—your safety depends on correct installation.
Keep Your Work Area Dry And Well-lit
Water and electricity don’t mix. Make sure the installation area is dry to prevent shocks. Good lighting helps you see small wires and connections clearly, reducing mistakes that can lead to hazards.
Test The Setup Before Finalizing
Once wired, turn the power on and test the sensor light before securing it completely. Check if it turns on and off as expected with motion. Catching problems early saves you from taking it apart later, which can be risky if the power is on.
Preparing The Installation Site
Preparing the installation site sets the stage for a smooth wiring process. Proper preparation ensures safety and optimal sensor performance. It involves choosing the right spot and making sure the power is off. This helps avoid accidents and makes installation easier.
Choosing The Right Location
Select a spot with clear visibility for the sensor to detect motion effectively. Avoid areas blocked by trees, walls, or other objects. Choose a location away from direct sunlight or heat sources to prevent false triggers.
Consider the sensor’s range and angle. Place it where it can cover the desired area without blind spots. Mount the sensor at a height between 6 to 10 feet for best results. Ensure the location has easy access to wiring points or power sources.
Turning Off Power
Safety is critical when working with electrical wiring. Turn off the power supply to the circuit where you will install the motion sensor light. Use the main breaker panel to switch off the correct breaker.
Double-check that the power is off by testing the wires with a voltage tester. Never assume the power is off without testing. This step prevents electric shocks and protects your equipment. Keep the power off until all wiring and installation tasks are complete.
Wiring Basics For Motion Sensor Lights
Wiring a motion sensor light might seem complicated at first, but understanding the basics can make the task much easier and safer. Knowing your wires and how they connect is crucial before you start. Let’s break down the essential wiring concepts so you can tackle your project with confidence.
Identifying Wires
Before connecting anything, you need to identify the wires coming from your motion sensor and your power source. Typically, you’ll encounter three main types of wires:
- Black (Hot):Carries the electrical current from the power source.
- White (Neutral):Completes the electrical circuit by carrying current back.
- Green or Bare Copper (Ground):Provides a safety path to prevent electric shock.
Some motion sensor lights may also include a red wire for the load, which connects to your light fixture. Take your time to check the labels or manual—mixing up wires can cause the sensor not to work or create safety hazards.
Understanding Wire Connections
Once you identify the wires, the next step is connecting them properly. Usually, you will connect black wires together, white wires together, and green or bare copper wires together. If there’s a red wire from the sensor, it typically connects to the black wire leading to the light fixture.
Use wire nuts to secure connections tightly and avoid loose wiring. Before you tuck everything back into the box, gently tug each wire to ensure it’s secure. Have you ever had a light flicker because of a loose connection? Avoid that frustration by double-checking your work.

Credit: www.youtube.com
Step-by-step Wiring Process
Wiring a motion sensor light is a straightforward task if you follow the right steps. Understanding the process helps ensure safety and proper functioning. This guide breaks down wiring into clear actions anyone can follow.
Connecting The Power Supply
Start by turning off the main power switch. This prevents any electrical accidents. Locate the electrical box where the motion sensor light will be installed. Identify the black (live), white (neutral), and green or bare copper (ground) wires.
Attach the black wire from the power supply to the black wire on the sensor. Connect the white wire from the power supply to the white wire on the sensor. Join the ground wires together using a wire nut. Make sure all connections are tight and secure.
Wiring The Sensor
Find the wires coming from the motion sensor. Usually, these include a black wire, a red wire, and a white wire. Connect the sensor’s black wire to the power supply’s black wire, if not already done. The red wire connects to the light fixture’s black wire. The white wire from the sensor connects to the white wire from the power supply.
Use wire nuts to secure each connection. Twist wires together and cover with the nut. Check for any exposed wire and cover with electrical tape if needed.
Connecting The Light Fixture
Attach the black wire from the light fixture to the sensor’s red wire. Connect the white wire from the light fixture to the white wire bundle from the power supply and sensor. Connect the ground wire from the light fixture to the ground wires in the electrical box.
Use wire nuts for these connections. Ensure no wires are loose. Tuck the wires neatly into the electrical box to avoid pinching.
Securing And Testing
Fasten the motion sensor light to the mounting bracket. Secure all screws tightly. Restore power by switching the main power back on. Test the sensor by moving in front of it. The light should turn on when motion is detected and turn off after a set time.
Adjust the sensor’s sensitivity and timer settings if needed. Make sure the light works reliably before finishing the installation.
Troubleshooting Common Issues
Wiring a motion sensor light can be straightforward, but sometimes things don’t work as expected. Troubleshooting common issues will save you time and frustration. Let’s look at some typical problems and how you can fix them quickly.
Light Not Turning On
If your motion sensor light doesn’t turn on, the first thing to check is the power source. Make sure the circuit breaker hasn’t tripped or the fuse isn’t blown. Sometimes the switch controlling the light is off, so confirm it’s in the “on” position.
Next, verify your wiring connections. Loose or incorrect wiring can prevent the light from receiving power. Double-check that the live, neutral, and ground wires are connected properly according to the sensor’s instructions.
Also, consider the bulb itself. A burnt-out bulb is an easy fix but often overlooked. Swap in a new bulb to see if that resolves the issue.
Sensor Not Detecting Motion
When the sensor doesn’t detect motion, it might be due to its placement. Sensors have a specific detection range and angle, so positioning it too high, too low, or behind obstacles can block its view.
Try adjusting the sensor’s angle or moving it to a spot with a clear path to the area you want to monitor. Check the sensitivity settings; sometimes they’re set too low, causing the sensor to miss movement.
Environmental factors can interfere as well. Bright sunlight, heat sources, or even moving tree branches can confuse the sensor. Have you noticed your sensor reacting oddly during certain times of day? If so, adjusting the sensor’s range or adding shielding might help.
Flickering Or Intermittent Lighting
Flickering lights often point to a loose connection or incompatible bulbs. Inspect all wire connections to ensure they are tight and secure. Even a slight looseness can cause flickering.
LED bulbs can sometimes cause flickering if they aren’t compatible with your sensor or dimmer. Try replacing the bulb with a recommended type to test this.
Another cause could be voltage fluctuations. If your home’s voltage is unstable, it might affect the sensor’s operation. Using a voltage stabilizer or consulting an electrician can be a practical solution.
Tips For Optimizing Sensor Performance
Enhancing the performance of your motion sensor light maximizes its efficiency. Proper adjustments ensure the light activates only when necessary. Here are some practical tips to optimize sensor performance.
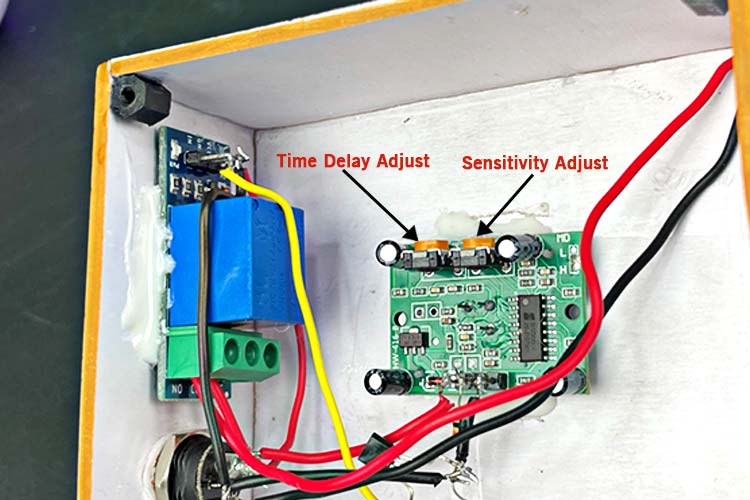
Adjusting Sensitivity
Fine-tune the sensitivity settings on your sensor. This controls how easily the light detects movement. Too high sensitivity might cause unwanted triggers. Too low might miss important movements. Adjust it to balance detection and false alarms.
Setting Timer Duration
Set the timer duration to control how long the light stays on. Short durations save energy. Longer durations provide extended illumination. Consider your needs and location to set an appropriate time.
Avoiding False Triggers
Prevent unwanted activations by positioning the sensor carefully. Avoid areas with frequent movement from pets or swaying branches. Ensure the sensor is not facing busy roads or walkways.

Credit: www.youtube.com
Frequently Asked Questions
How Do You Connect Wires On A Motion Sensor Light?
To connect wires, match the black (hot), white (neutral), and green or copper (ground) wires. Use wire nuts to secure connections. Always turn off power before wiring to ensure safety. Follow the manufacturer’s wiring diagram for precise installation.
Can I Install A Motion Sensor Light Myself Safely?
Yes, you can install a motion sensor light safely if you follow instructions. Always turn off the power at the breaker first. Use a voltage tester to confirm no electricity flows. If unsure, consult a licensed electrician for help.
What Wire Colors Are Used For Motion Sensor Lights?
Typically, black wires are hot, white are neutral, and green or bare copper are ground wires. These color codes help ensure correct and safe wiring during installation. Always verify colors with your sensor’s manual.
Where Should I Place The Motion Sensor Light For Best Detection?
Place the sensor about 6 to 10 feet above the ground, aiming it toward the area you want to monitor. Avoid obstructions like trees or walls that can block motion detection. Proper placement improves sensor accuracy and coverage.
Conclusion
Wiring a motion sensor light can be simple and safe. Follow steps carefully and use the right tools. Double-check connections before turning on power. Test the sensor to make sure it works well. Proper wiring helps save energy and improves home security.
Take time to understand the instructions. This small project adds convenience and safety to your space. Enjoy bright, automatic lighting with confidence.


