
Are you ready to transform your space quickly and easily? Applying vinyl wall art stickers is one of the simplest ways to add personality and style to any room.
But if you’ve never done it before, you might wonder how to get it just right without bubbles or wrinkles. Don’t worry—this guide will walk you through every step, so your walls look flawless and fresh. Keep reading, and you’ll learn the secrets to making your vinyl art stick perfectly, giving your space a stunning new look in no time.
Choosing The Right Vinyl Stickers
Choosing the right vinyl stickers is a crucial first step in transforming your walls with vinyl wall art. The perfect sticker not only fits your space but also matches your style and the room’s atmosphere. Take a moment to consider the type, size, design, and surface compatibility of the sticker before making a purchase.
Types Of Vinyl Wall Art
Vinyl stickers come in various types, each offering a different look and feel. Matte vinyl provides a subtle, non-reflective finish that works well in cozy spaces. Glossy vinyl, on the other hand, catches the light and adds a sleek, modern touch.
There are also textured vinyl options that mimic materials like fabric or wood, adding depth to your wall. Think about what mood you want to create—do you want your art to stand out boldly or blend softly into the background?
Selecting Size And Design
Size matters when choosing vinyl stickers. A large, intricate design can become the focal point of your room, while smaller, simpler stickers can complement existing decor. Measure your wall space carefully and imagine how the sticker will fit.
Design-wise, consider your personal taste and the room’s purpose. Abstract shapes can energize a living room, while calming patterns suit bedrooms. Don’t hesitate to mix and match smaller stickers to create a unique collage if a single large piece feels overwhelming.
Checking Surface Compatibility
Not all walls are created equal, and some vinyl stickers stick better than others depending on the surface. Smooth, clean surfaces like painted drywall, glass, or metal are ideal for vinyl application.
Rough or textured walls, such as brick or heavily textured plaster, may cause the stickers to peel or not adhere properly. Ask yourself: is your wall surface clean and smooth enough for vinyl? Testing a small sticker in an inconspicuous spot can save you frustration later.

Credit: www.ebay.ca
Preparing Your Wall Surface
Preparing your wall surface is a crucial step before applying vinyl wall art stickers. A well-prepared wall ensures the stickers stick properly and last longer without peeling off. Taking a little extra time at this stage can save you from frustration and uneven results later on.
Cleaning The Wall
Start by removing any dust, dirt, or grease from the wall. Use a mild soap solution and a soft cloth to wipe the surface gently. Avoid harsh chemicals that might damage the paint or wallpaper.
Have you noticed how even a small speck of dust can cause bubbles under your sticker? Cleaning thoroughly helps prevent this issue and keeps the surface ready for smooth application.
Smoothing Imperfections
Check your wall for bumps, cracks, or peeling paint. These imperfections can cause the vinyl sticker to lift or wrinkle. Use a fine sandpaper to smooth out rough patches.
If you find any holes or cracks, fill them with spackle and let it dry completely. A perfectly flat surface helps your wall art look crisp and professional.
Ensuring Dryness
Make sure the wall is completely dry before you start applying the vinyl sticker. Moisture can weaken the adhesive and cause the sticker to peel off quickly.
After cleaning or smoothing, give the wall enough time to air dry. You can also use a dry cloth to speed up the process, especially in humid rooms like bathrooms or kitchens.
Gathering Necessary Tools
Gather basic tools like a squeegee, measuring tape, and a clean cloth before starting. Having everything ready helps apply vinyl stickers smoothly and neatly.
Gathering the right tools is key for applying vinyl wall art stickers. Proper preparation ensures a smooth and easy process. You will need some basic tools and optional accessories. These will help achieve precise and professional results.List Of Essential Tools
To start, gather the following essential tools:- Vinyl Wall Art Stickers:Choose your desired design and size.
- Measuring Tape:Ensure accurate placement on the wall.
- Pencil:Mark guidelines without damaging the wall.
- Level:Keep the stickers straight and aligned.
- Squeegee:Smooth out bubbles and wrinkles.
- Scissors:Trim any excess material if necessary.
- Cloth:Clean the wall for better adhesion.
Optional Accessories For Precision
For extra precision, consider these optional accessories:- Painter’s Tape:Temporarily hold the sticker in place.
- Craft Knife:Cut intricate designs with care.
- Hair Dryer:Soften the vinyl for better flexibility.
- Spray Bottle:Lightly mist the surface for repositioning.
Planning Sticker Placement
Planning sticker placement is a crucial step that sets the foundation for a flawless vinyl wall art application. Without careful planning, even the best-quality stickers can end up crooked or uneven. Taking time to measure and use guides ensures your design looks professional and fits perfectly in your chosen space.
Measuring And Marking
Start by measuring the wall area where you want to place the sticker. Use a tape measure to get accurate dimensions of both the wall and the sticker itself.
Mark key points lightly with a pencil or painter’s tape. These marks will help you align the sticker precisely before sticking it down. Keep in mind that even tiny misalignments become obvious once the sticker is applied.
Think about the height and distance from corners or furniture. Are you centering the design or aligning it with a specific feature? Clear measurements prevent guesswork and save you from repositioning later.
Using Templates Or Guides
Templates and guides act like a map for your vinyl stickers. Some stickers come with a paper backing or a plastic guide that shows you exactly where to place them.
If your sticker doesn’t have a built-in guide, create your own by cutting out paper shapes matching the sticker size. Tape these templates on the wall to visualize placement and make adjustments easily.
You can also use a level or laser guide to ensure the sticker stays perfectly straight. This extra step might feel unnecessary, but it often makes the difference between a professional look and a rushed job.
Have you ever rushed to stick something only to realize it’s slightly off? Taking these few extra minutes to plan saves frustration and keeps your wall art looking sharp.
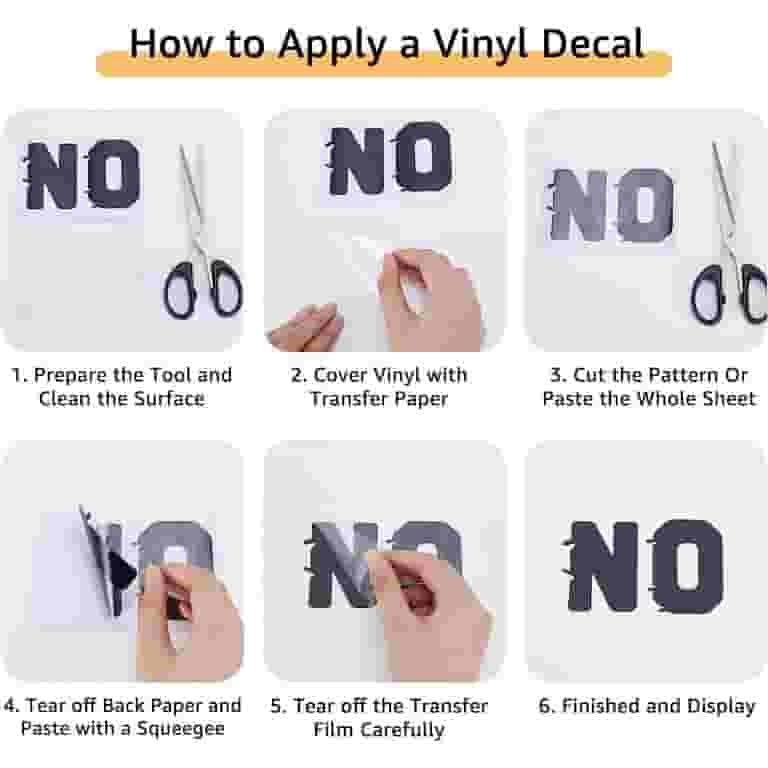
Applying The Vinyl Stickers
Applying vinyl wall art stickers is a simple process that transforms any space quickly. It requires care and patience to avoid wrinkles or bubbles. Follow these steps to ensure a smooth, clean application every time.
Peeling Off Backing
Start by gently lifting a corner of the sticker. Slowly peel the backing paper away from the vinyl. Avoid touching the sticky side to keep it clean and sticky. If the vinyl sticks to the backing, press it back down and try again carefully.
Positioning The Sticker
Hold the sticker by the edges and place it on the wall. Check the alignment using a level or ruler for a straight fit. Adjust the position before pressing it down. Lightly stick the top part first, then smooth the rest down gradually.
Smoothing Out Air Bubbles
Use a flat tool like a credit card to press the sticker firmly. Start from the center and push air bubbles outward toward the edges. Work slowly to avoid tearing the vinyl. Small bubbles will disappear over time as the vinyl settles.
Finishing Touches
Finishing touches make your vinyl wall art look neat and last longer. This final stage ensures the sticker is fully set and looks smooth on the wall. Attention to detail helps avoid peeling or bubbling later.
Removing Transfer Tape
Slowly peel off the transfer tape at a sharp angle. Pull it back gently to avoid lifting the vinyl design. If any part lifts, press it down and smooth again before continuing. Take your time to keep the art intact.
Checking For Loose Edges
Look closely at the edges of the sticker for any parts lifting. Use a clean cloth or your fingers to press down loose areas firmly. Apply extra pressure on corners to secure them well. This step prevents the sticker from peeling over time.
Cleaning Up
Remove any dust or fingerprints using a soft, dry cloth. Avoid using water or cleaners that can damage the vinyl. Clean the surrounding wall gently to keep the area tidy. A clean finish enhances the sticker’s appearance and longevity.
Tips For Long-lasting Adhesion
Ensuring your vinyl wall art stickers stick firmly and last long requires more than just proper application. Paying attention to the environment and how you care for the stickers afterward plays a crucial role in maintaining their fresh look. These tips will help you avoid common pitfalls that cause peeling or fading over time.
Avoiding Moisture And Heat
Moisture is a vinyl sticker’s worst enemy. If the wall is damp or exposed to high humidity, the adhesive can weaken quickly, causing the sticker to peel off. Before applying, make sure the surface is completely dry and avoid placing stickers in bathrooms or kitchens where steam builds up.
Heat can also degrade the adhesive. Placing vinyl art near heaters, direct sunlight, or other heat sources can cause the edges to curl or the colors to fade. If your room gets a lot of sun, think about using UV-resistant vinyl or choosing a spot with indirect light.
Handling And Maintenance Advice
How you treat your vinyl stickers after application affects their lifespan. Try to avoid touching the sticker surface frequently; oils and dirt from your hands can break down the adhesive and dull the colors.
- Use a soft, dry cloth to gently clean the surface if needed.
- Do not use harsh chemicals or abrasive cleaners that can damage the vinyl.
- Be cautious with furniture or items placed close to the wall art to prevent scratches or accidental peeling.
Have you ever noticed a sticker peeling just weeks after putting it up? Often, it’s because the wall wasn’t cleaned properly or the environment was too humid. Taking these small steps can dramatically improve how long your vinyl art stays vibrant and intact.

Credit: www.amazon.ca
Troubleshooting Common Issues
Applying vinyl wall art stickers can sometimes come with small challenges. These issues often include wrinkles, bubbles, or the need to reposition the sticker. Troubleshooting these problems early helps keep your walls looking perfect. Simple fixes can save time and prevent damage to your design.
Fixing Wrinkles And Bubbles
Wrinkles and bubbles often happen when air gets trapped beneath the sticker. Smooth the area gently using a soft cloth or a squeegee. Start from the center and push outward to the edges. Use a pin to prick small bubbles carefully, then press the air out. Warm the sticker slightly with a hairdryer to make it more flexible. This makes smoothing easier and prevents damage.
Reapplying Or Removing Stickers
Sometimes stickers need repositioning or removal. Peel the sticker slowly from one corner to avoid tearing. If adhesive residue remains, use a gentle adhesive remover or warm soapy water. Clean the surface before reapplying the sticker. Reapply by aligning carefully and pressing firmly. Avoid stretching the sticker to keep its shape intact.

Credit: www.ebay.ca
Frequently Asked Questions
How Do I Prepare My Wall For Vinyl Stickers?
Clean the wall with mild soap and water. Ensure it is dry and smooth. Remove any dust or grease for better adhesion.
Can Vinyl Wall Stickers Be Removed Without Damage?
Yes, vinyl stickers peel off easily. Heat them gently with a hairdryer to loosen adhesive. Remove slowly to avoid wall damage.
What Tools Do I Need To Apply Vinyl Wall Art?
You need a squeegee or credit card, a measuring tape, and a level. These help ensure smooth, aligned application.
How Long Does Vinyl Wall Art Last?
Vinyl wall stickers typically last 3 to 5 years indoors. Avoid moisture and direct sunlight to extend their lifespan.
Conclusion
Applying vinyl wall art stickers can refresh any room quickly. Clean the surface well before starting for best results. Peel the backing slowly and stick the design carefully. Use a flat tool to smooth out air bubbles. Take your time and work gently for a neat finish.
Enjoy the new look that vinyl stickers bring to your space. Small steps make a big difference in your decorating. Now, your walls can show your style with ease.


