

Want to transform your walls quickly and easily? Vinyl wall decal stickers are the perfect way to add style and personality to any room without the mess of paint or wallpaper.
But getting them on your wall just right can feel tricky. Don’t worry—you’re about to learn simple, step-by-step tips that will make applying your decals a breeze. Keep reading to discover how you can achieve a flawless look that will impress everyone who sees it.
Your walls are about to get a fresh new vibe!
Choosing The Right Vinyl Decals
Choosing the right vinyl decals sets the stage for a smooth application and a stunning final look. The right choice depends on your wall type, the space’s purpose, and your personal style. Understanding the options helps you avoid common pitfalls, like peeling edges or colors that clash.
Types Of Vinyl Stickers
There are several types of vinyl decals, each with unique features. Matte vinyloffers a non-glossy finish that reduces glare and looks great in natural light. Glossy vinylshines and makes colors pop, perfect for playful or bold designs.
Consider removable vinylif you want to change your decor often without damaging walls. For long-term use, choose permanent vinyl, which sticks firmly and resists peeling. Do you want a textured feel? Some decals come with a fabric-like surface that adds depth.
Size And Design Selection
Size matters more than you might think. Too large, and the decal can overwhelm the room; too small, and it may look lost on the wall. Measure your space carefully and compare it with decal dimensions before buying.
Your design should complement the room’s vibe. If your walls are busy with patterns, pick simple, solid shapes to avoid visual clutter. On plain walls, intricate designs can become a focal point. What mood do you want the space to convey? This question can guide your design choice clearly.
Surface Compatibility
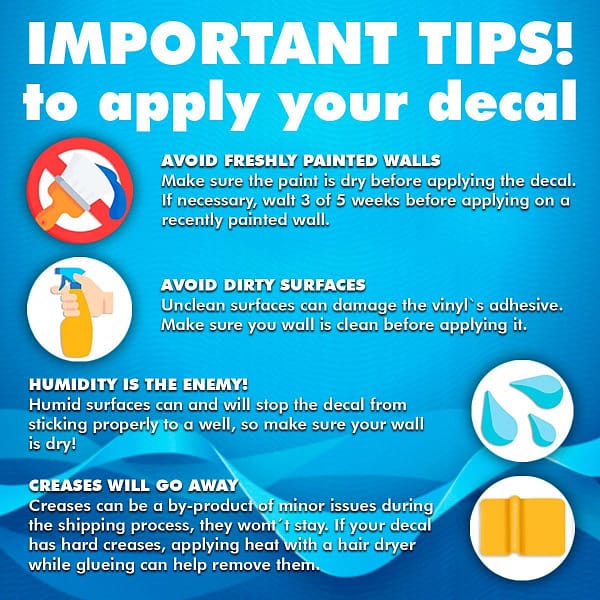
Not all walls are created equal for decals. Smooth, clean surfaces like painted drywall or glass are ideal. Rough or textured surfaces like brick or stucco can cause decals to lift or peel prematurely.
Test a small decal piece on your wall first to see how well it sticks. Avoid decals in humid areas like bathrooms unless they specify water resistance. Have you checked if your wall paint is fresh? Old or flaking paint can ruin decal adhesion.
Preparing Your Wall Surface
Preparing your wall surface is a crucial step before applying vinyl wall decal stickers. The better your wall is prepared, the longer your decal will stick and look flawless. Taking a little extra time here saves you from frustration and peeling later on.
Cleaning The Wall
Start by removing dust, dirt, and grease from your wall. Use a mild soap mixed with water and a soft cloth or sponge. Avoid harsh chemicals that could damage paint or wallpaper.
After cleaning, wipe the wall with a damp cloth to remove any soap residue. Allow the wall to dry completely before moving on. Have you ever tried sticking a decal on a dusty surface? It usually peels off quickly—don’t let that be your experience.
Smoothing Imperfections
Check your wall for bumps, cracks, or peeling paint. Even small imperfections can create bubbles under your decal. Use fine-grit sandpaper to gently smooth rough spots.
If you find any holes or cracks, fill them with spackling paste and let it dry. Sand the area again for a flat finish. A smooth surface helps your decal lie flat and stick better—think of it as laying a tablecloth on a smooth table rather than a bumpy one.
Ensuring Dryness
Make sure your wall is completely dry before applying your decal. Moisture can prevent the adhesive from bonding properly. If you cleaned or patched your wall, give it plenty of time to air dry.
Humidity in the room can also affect drying times. Using a fan or opening windows can speed up the process. Have you ever waited impatiently and applied a decal on a damp wall? Chances are it didn’t stick well or bubbled up quickly.
Gathering Essential Tools
Applying vinyl wall decal stickers can be a fun project. Having the right tools makes the process smooth and stress-free. Before starting, gather everything you need. This ensures a perfect application without interruptions.
What You Need
- Vinyl Wall Decal:Choose the design that fits your style.
- Measuring Tape:Helps in placing the decal accurately.
- Scissors:For trimming any excess material.
- Masking Tape:Temporarily holds the decal in place.
- Squeegee or Credit Card:Smooths out air bubbles during application.
- Cleaning Cloth:Removes dust and dirt from the wall surface.
Optional Accessories
- Level Tool:Ensures your decal is straight on the wall.
- Hairdryer:Loosens adhesive for easier removal or repositioning.
- Pencil:Marks placement points without damaging the wall.
- Step Ladder:Useful for reaching higher wall areas.
Positioning The Decal
Positioning the vinyl wall decal correctly ensures a smooth and attractive finish. Taking time to place the decal carefully prevents mistakes and bubbles. Precise positioning makes the wall art look professional and neat. Follow simple steps to align the decal perfectly on your wall.
Measuring And Marking
Start by measuring the wall space where you want to place the decal. Use a tape measure for accuracy. Mark the center point lightly with a pencil or a small piece of painter’s tape. Check the decal’s size and compare it to the marked space. Mark the top and bottom edges to guide placement. These marks help keep the decal straight and balanced.
Using Masking Tape For Alignment
Cut two long strips of masking tape. Place one strip along the top edge of the marked area. Place the second strip along one side, creating an L shape. This acts as a guide for the decal’s edges. Carefully lift the backing from the decal. Position the decal against the tape lines to keep it straight. Press the decal gently onto the wall to hold it in place before removing the backing fully.
Applying The Vinyl Decal
Applying a vinyl decal is a straightforward process, but it requires attention to detail. Taking your time ensures the decal looks perfect and lasts long. Let’s walk through the key moments of applying your vinyl wall decal with care and precision.
Peeling The Backing
Start by gently lifting a corner of the decal to peel off the backing paper. Avoid rushing this step; peeling too fast can cause the decal to stick to itself or stretch.
Use your fingernail or a plastic card to help lift the edge if needed. If the decal is large, peel back only a small section at a time to maintain control.
Sticking The Decal
Place the exposed adhesive side onto your wall, aligning it carefully. It’s easier to reposition a small part than the entire decal if you don’t get it right the first time.
Press down gently from the center outward, helping the decal stick evenly. Consider using painter’s tape to hold the decal in place as you work.
Smoothing Out Air Bubbles
Air bubbles can be frustrating, but they’re easy to fix. Use a squeegee or a credit card wrapped in a soft cloth to smooth the surface.
Push bubbles toward the edges with firm, even strokes. If a stubborn bubble remains, carefully lift the decal and reapply it while smoothing out the air.

Credit: www.walmart.com
Finishing Touches
Finishing touches are what transform your vinyl wall decal from a simple sticker into a seamless part of your decor. This stage ensures your decal looks clean, smooth, and professionally applied. Skipping these steps can lead to peeling edges or bubbles, which can ruin the effect you worked hard to achieve.
Removing Transfer Tape
Peeling off the transfer tape is a delicate task. Start by lifting one corner slowly and watch how the decal responds. If the decal begins to lift with the tape, press it back down gently and try peeling the tape off at a sharper angle.
Remove the tape steadily, pulling it back over itself rather than straight up. This helps the decal stick firmly to the wall and avoids any accidental tears. Taking your time here pays off in a smooth, bubble-free finish.
Pressing Edges Securely
Once the transfer tape is off, focus on the edges of your decal. Use a clean, dry cloth or a plastic scraper to press down firmly along all the edges. This step prevents corners from curling up later on.
Don’t forget to check for tiny air bubbles near the edges. Gently push them out toward the sides with your finger or a soft tool. Think about how you want your decal to last—are you ready to give it that extra push for durability?
Troubleshooting Common Issues
Applying vinyl wall decal stickers can be simple, but some issues may arise during the process. Small wrinkles, bubbles, or peeling edges might appear. These problems can affect the final look of your decal. This section helps you fix common issues for a smooth, clean finish.
Fixing Wrinkles And Bubbles
Wrinkles and bubbles happen if air gets trapped under the decal. Gently lift the decal near the problem area. Use a flat tool like a credit card to smooth out the air. Push the air toward the edge of the decal. For small bubbles, prick them with a pin and press the air out.
Repositioning Decals
Sometimes decals are not placed correctly the first time. Slowly peel the decal off the wall. Avoid stretching or tearing the vinyl. Reposition the decal carefully, starting from one edge. Smooth the decal with a flat tool as you apply it again.
Dealing With Peeling Edges
Peeling edges occur when the decal does not stick well. Clean the wall surface to remove dust or oil. Press the edges firmly with your fingers or a flat tool. Use a small amount of adhesive if needed. Avoid placing decals on rough or damp surfaces to prevent peeling.
Credit: kraftmatics.com
Maintaining Your Vinyl Decals
Maintaining your vinyl decals is key to keeping them looking fresh and vibrant for a long time. A little care goes a long way in preserving their colors and preventing peeling or damage. You don’t have to be an expert to make your decals last; simple habits can make all the difference.
Cleaning Tips
Keep your decals clean by wiping them gently with a soft, damp cloth. Avoid using abrasive sponges or harsh chemicals, as these can scratch or fade the vinyl surface.
If you notice dust or grime buildup, use mild soap mixed with water for a deeper clean. Always rinse with clean water afterward and dry with a soft towel to prevent streaks or residue.
Have you tried using a microfiber cloth? It’s excellent at picking up dust without damaging delicate surfaces like vinyl.
Avoiding Damage
Protect your decals from direct sunlight exposure for long periods, as UV rays can cause fading. If your decal is in a sunny spot, consider using window treatments or repositioning it to reduce sun damage.
Be careful with sharp objects or rough cleaning tools near your decals; even a small scratch can ruin the design. Also, avoid excessive moisture around the edges to prevent peeling.
Think about how often you touch or rub the decal area. Repeated friction can wear down the vinyl faster than you might expect.

Credit: wallstickers4you.com
Frequently Asked Questions
How Do You Prepare The Wall For Vinyl Decal Application?
Clean the wall surface thoroughly with a mild detergent. Ensure it is dry, smooth, and free from dust or grease. Avoid textured or rough walls for better decal adhesion and longevity.
What Tools Are Needed To Apply Vinyl Wall Decals?
You need a squeegee or credit card, a measuring tape, and a clean cloth. These tools help smooth out air bubbles and position the decal accurately.
Can Vinyl Decals Be Repositioned After Applying?
Yes, you can gently peel and reposition vinyl decals within the first few minutes. Avoid pulling too hard to prevent tearing or stretching the decal.
How Long Does It Take For Vinyl Decals To Set?
Vinyl decals usually set within 24 hours. Avoid washing or scrubbing the decal during this time to ensure strong adhesion.
Conclusion
Applying vinyl wall decal stickers is simple with the right steps. Clean the surface well before placing the decal. Peel carefully and press firmly to avoid bubbles. Smooth out wrinkles using a flat tool or your hand. Take your time for the best look.
These decals add style without damage or mess. Enjoy your new wall art easily and quickly. Try different designs to brighten any room. Practice makes applying decals even easier next time.


