
Are you looking to add style and storage to your space without spending a fortune? Building a shelf wall might be the perfect solution for you.
Imagine having a stunning display for your books, plants, and favorite items, all while keeping your room organized. In this guide, you’ll discover simple, step-by-step instructions that anyone can follow—even if you’ve never built anything before. By the end, you’ll feel proud of the beautiful shelf wall you created with your own hands.
Ready to transform your wall and your home? Let’s get started!

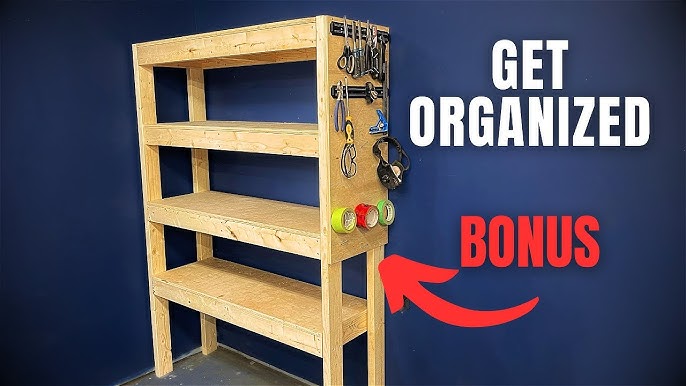
Credit: tailorwoodhaven.com
Planning Your Shelf Wall
Planning your shelf wall carefully sets the foundation for a successful project. It helps you avoid costly mistakes and ensures your shelves are both functional and stylish. Taking time to think through location, measurements, and materials can make all the difference.
Choosing The Right Location
Where you place your shelf wall affects its usefulness and appearance. Look for a wall that is easily accessible and visible but not overcrowded with other furniture. Think about what you want to store or display—books, plants, or decor items—and choose a spot that complements those items.
Have you noticed how a well-placed shelf can transform a dull corner into a focal point? That’s the kind of impact location has. Also, consider lighting; natural light can highlight your shelf contents beautifully.
Measuring Your Space
Accurate measurements prevent surprises during installation. Measure the width, height, and depth of your wall space using a reliable tape measure. Don’t forget to note any obstacles like light switches or vents that could interfere with your shelves.
Write down your measurements clearly. Double-check them to avoid errors that might cost time and money. How many shelves do you want to fit? Knowing this upfront helps decide the spacing between each shelf.
Selecting Shelf Materials
Choosing the right materials is key to durability and style. Wood is classic and sturdy, but metal can offer a modern look and extra strength. MDF or plywood are budget-friendly options but may need edge banding or paint to look their best.
Think about the weight your shelves will hold. Heavy books require thick, solid wood or metal brackets. Lighter items can be placed on thinner, less expensive boards. What look fits your room’s vibe? Rustic pine, sleek metal, or painted white shelves each tell a different story.

Credit: www.youtube.com
Gathering Tools And Supplies
Building a shelf wall starts with gathering the right tools and supplies. Having everything ready saves time and avoids interruptions. Prepare all items before starting the project. This step helps ensure a smooth building process and better results.
Essential Tools
- Measuring tape – for accurate dimensions
- Level – to keep shelves straight
- Power drill – for drilling holes and driving screws
- Screwdriver – to tighten screws manually
- Stud finder – to locate wall studs
- Hammer – for nailing and adjustments
- Saw – to cut wood pieces to size
- Pencil – to mark measurements
- Square – to ensure right angles
Recommended Hardware
- Screws – choose sizes suited for wall and shelves
- Wall anchors – for extra support on drywall
- Brackets – to hold shelves securely
- Wood boards – cut to shelf dimensions
- Sandpaper – to smooth wood edges
- Wood stain or paint – for finishing shelves
- Paintbrush or cloth – for applying finishes
Safety Equipment
- Safety goggles – protect eyes from dust and debris
- Work gloves – protect hands from splinters and sharp tools
- Dust mask – prevents inhaling sawdust
- Ear protection – reduce noise from power tools
Preparing The Wall
Clear the wall surface and remove any nails or hooks. Patch holes and sand rough spots for a smooth finish. Ensure the wall is dry and clean before starting.
Preparing the Wall Creating a shelf wall starts with careful preparation. This step is crucial for stability. A well-prepared wall ensures your shelves stay secure. Let’s dive into the essential steps.Clearing The Area
Start by clearing the area where you’ll build the shelf wall. Remove any furniture or decor. This makes the workspace safer and more accessible. Clean the wall surface thoroughly. Dust and debris can affect shelf installation. Use a damp cloth to wipe the wall. Ensure it’s dry before moving to the next step.Locating Studs
Locate the studs in your wall. Studs provide the necessary support for heavy shelves. Use a stud finder for this task. Move the device slowly along the wall. Mark each stud’s location lightly with a pencil. Spacing between studs is usually 16 or 24 inches. Knowing this helps in planning your shelf layout.Marking Shelf Positions
Decide where each shelf will go. Consider the height and spacing. Use a level to draw horizontal lines. This ensures shelves are straight. Measure the distance between each shelf. Consistent spacing is key for aesthetics and functionality. Mark the spots for brackets or supports. Use a pencil for easy adjustments.Cutting And Assembling Shelves
Cutting and assembling shelves forms the core of building a shelf wall. Precise cuts ensure the shelves fit perfectly. Proper assembly guarantees strength and durability. This section guides through measuring, cutting, sanding, and assembling shelf parts.
Measuring And Cutting Wood
Measure the wall space carefully to decide shelf length and width. Use a tape measure and mark the wood with a pencil. Double-check measurements before cutting to avoid mistakes. Use a saw suitable for the wood type, such as a circular saw or handsaw. Cut slowly and steadily along the marked lines for clean edges.
Sanding And Finishing
Sanding smooths rough edges and prepares wood for finishing. Use medium-grit sandpaper first, then fine-grit for a polished surface. Sand in the direction of the wood grain to avoid scratches. Remove dust with a cloth before applying finish. Choose paint, stain, or varnish based on your style and wood type. Let each coat dry fully before adding another.
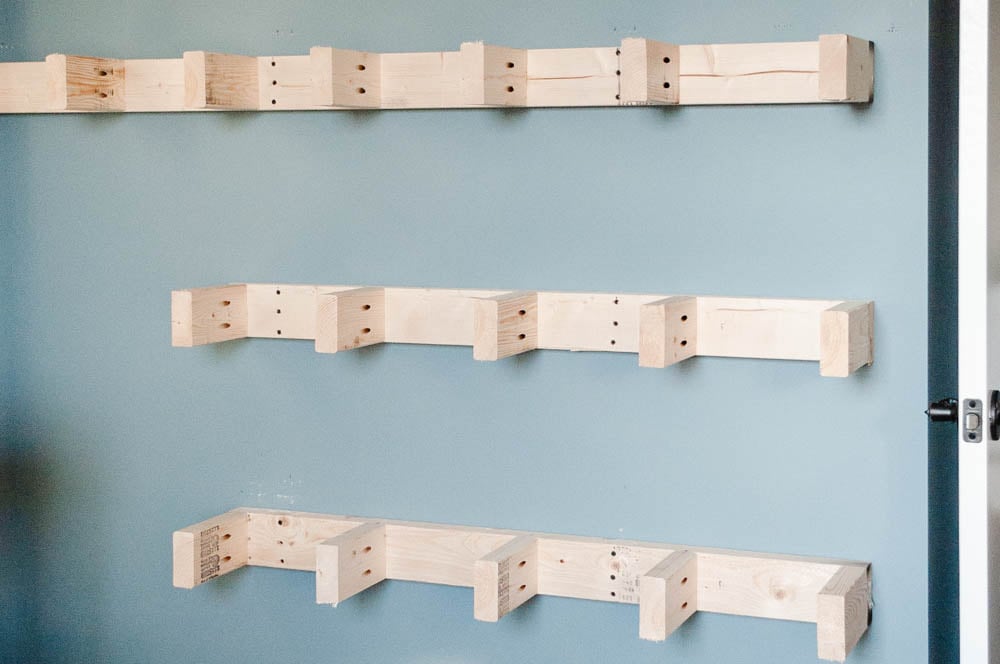
Assembling Brackets Or Supports
Select brackets or supports that match shelf size and weight needs. Hold each bracket in place and mark screw holes on the wall. Drill pilot holes to prevent wood splitting. Use screws that fit the bracket holes securely. Attach brackets to the wall firmly. Place shelves on brackets and check for level using a spirit level.
Installing The Shelf Wall
Installing the shelf wall is where your vision takes shape. This phase requires precision and patience to ensure stability and style. Let’s break down the key steps to get your shelves securely mounted and perfectly aligned.
Attaching Brackets To Wall
Start by locating the studs in your wall using a stud finder. Mark these spots clearly; brackets anchored into studs hold the most weight. If studs aren’t where you need them, use appropriate wall anchors for extra support.
Align each bracket with the marks and hold it firmly against the wall. Drill pilot holes before screwing brackets in place to avoid splitting the wall or bracket. Tighten screws until the bracket feels solid—wobbly brackets can ruin your shelf’s stability.
Securing Shelves
Place your shelves on the attached brackets carefully. Depending on your bracket design, you might need to screw the shelf onto the bracket from underneath or behind. This step prevents the shelf from sliding off, especially under load.
Use screws that fit your shelf thickness and bracket holes perfectly. If you’re working with delicate or thin shelves, consider adding rubber pads between brackets and shelves to reduce pressure points and avoid damage.
Leveling And Adjustments
Once shelves are secured, check their level with a spirit level. Even a slight tilt can cause objects to slide off or create an uneven look. Adjust brackets slightly if needed before final tightening of all screws.
Ask yourself: Is the shelf comfortable to reach and use? Sometimes small tweaks in shelf height or spacing make a big difference in daily usability. Don’t rush this part—perfectly leveled shelves improve both function and appearance.
Styling And Maintenance
Styling and maintaining your shelf wall is just as important as building it. This keeps your space looking fresh and ensures your shelves stay sturdy over time. Paying attention to how you decorate and care for your shelves can make a big difference in your room’s overall vibe and functionality.
Decorating Your Shelves
Think about mixing different items to create visual interest on your shelves. Combine books with small plants, framed photos, or unique collectibles to avoid a cluttered look.
Group items in odd numbers, like three or five, to make displays more natural and appealing. Use varying heights and textures to add depth. Have you tried rotating your decorations seasonally to keep things feeling new?
Cleaning Tips
Dust your shelves regularly with a soft cloth or a microfiber duster to prevent buildup. Avoid using harsh chemicals that can damage the finish or wood.
For wooden shelves, a damp cloth with mild soap works wonders without harming the surface. Remember to dry the shelves completely to prevent moisture damage. How often do you clean your shelves to keep them looking their best?
Regular Checks And Repairs
Inspect your shelves every few months for any loose screws or signs of wear. Tighten brackets and supports as needed to maintain stability.
If you notice any cracks or chips, address them early with wood filler or touch-up paint. Keeping your shelves in good shape prevents bigger problems down the line and keeps your wall looking sharp.
Credit: www.christeneholderhome.com
Frequently Asked Questions
What Materials Do I Need To Build A Shelf Wall?
You need wood boards, wall anchors, screws, brackets, a drill, level, measuring tape, and a stud finder. Choose sturdy wood like pine or oak for durability. Proper tools ensure a safe and strong shelf wall installation.
How Do I Find Wall Studs For Shelf Installation?
Use a stud finder to locate studs behind drywall. Mark stud locations with a pencil. Anchoring shelves into studs provides better support and prevents wall damage. Always double-check markings before drilling.
What Is The Best Wood Type For A Shelf Wall?
Pine, oak, maple, and plywood are popular choices. Pine is affordable and easy to work with. Oak and maple offer strength and a polished look. Choose wood based on budget and style preference.
How Do I Ensure My Shelf Wall Is Level?
Use a spirit level or laser level during installation. Mark horizontal lines on the wall as guides. Check levels after each bracket installation to maintain alignment. A level shelf wall enhances both appearance and functionality.
Conclusion
Building a shelf wall adds style and storage to any room. Start with a clear plan and measure carefully. Choose the right materials for strength and look. Take your time to install shelves straight and secure. Small steps lead to a sturdy, attractive shelf wall.
Enjoy organizing books, plants, or decorations on your new shelves. With patience and care, you can create a space that feels neat and cozy. Give it a try and see how your room changes. Simple projects like this bring big satisfaction.


