
Are you planning to transform your space with stunning 3D wall panels but unsure how to calculate the right amount? Getting this step right can save you time, money, and frustration.
You’ll discover simple, clear steps to measure and calculate exactly how many 3D wall panels you need for your project. Whether you’re a DIY enthusiast or working with professionals, understanding these calculations will help you avoid costly mistakes and achieve the perfect look.
Keep reading to learn how to make your walls stand out without the guesswork.

Credit: swancanada.ca
Types Of 3d Wall Panels
3D wall panels add depth and texture to any space. They bring life to plain walls with unique shapes and patterns. Choosing the right type depends on your style and room needs. Understanding different types helps you pick the best option for your walls.
Materials Used
3D wall panels come in various materials. Each offers different looks and durability.
- PVC:Lightweight, water-resistant, easy to clean.
- MDF:Smooth finish, good for painting, affordable.
- Bamboo:Eco-friendly, natural texture, durable.
- Gypsum:Fire-resistant, smooth surface, good for interiors.
- Wood:Classic look, sturdy, adds warmth.
- Metal:Modern style, strong, adds shine.
Design Variations
Designs vary widely to match all tastes and room styles.
- Geometric Patterns:Sharp shapes like triangles or hexagons.
- Floral Designs:Soft curves, natural themes.
- Wave Patterns:Smooth, flowing lines for a calm feel.
- Abstract Shapes:Unique, artistic forms for a bold look.
- 3D Tiles:Small panels creating a textured mosaic.
Common Sizes
3D wall panels come in standard sizes for easy installation.
| Size (inches) | Area Covered (sq. ft.) | Use |
|---|---|---|
| 24 x 24 | 4 | Large wall areas, feature walls |
| 16 x 16 | 1.78 | Smaller spaces, accent walls |
| 12 x 12 | 1 | Compact designs, intricate patterns |

Credit: www.amazon.co.uk
Tools Needed For Measurement
Accurate measurement is essential when calculating 3D wall panels. Using the right tools makes the job easier and ensures precision. These tools help measure dimensions correctly and avoid costly mistakes during installation.
Each tool plays a specific role in the process. Together, they provide reliable data for your calculations. Below are the key tools needed for measurement.
Measuring Tape
A measuring tape is a simple and essential tool. It helps you measure the length and height of your walls. Choose a tape that is sturdy and easy to read. Flexible tapes work best for curved or uneven surfaces.
Level And Pencil
A level ensures your measurements are straight and even. Mark the points on the wall with a pencil for reference. This tool prevents errors caused by slanted lines. It keeps your panel layout neat and aligned.
Calculator Or App
A calculator or a measurement app speeds up the math part. It helps you add, subtract, and multiply dimensions quickly. Some apps even convert measurements automatically. This tool reduces manual errors and saves time.
Preparing The Wall Surface
Ensure the wall surface is clean, dry, and smooth before measuring. Remove any dirt, dust, or loose paint to get accurate panel calculations.
Preparing the wall surface is a crucial first step in installing 3D wall panels. A well-prepared wall ensures the panels adhere properly and last longer. Let’s explore the steps to get your wall ready for this transformation.Cleaning The Wall
Begin by removing dust and dirt from the wall. Use a soft cloth or sponge with mild detergent. Rinse with clean water to remove soap residue. Let the wall dry completely to prevent moisture issues.Repairing Imperfections
Inspect the wall for cracks or holes. Fill them with putty or spackle. Sand the surface smoothly after the filler dries. This ensures a flat surface for panel installation.Marking Reference Points
Use a level and pencil to draw guide lines. Mark the center of the wall as a starting point. These lines help align the panels evenly.Step-by-step Measurement Process
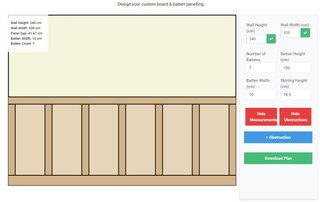
Measuring walls accurately is crucial before installing 3D wall panels. Precise measurements ensure the panels fit perfectly and avoid material waste. Follow this step-by-step process to get the right dimensions for your project.
Measuring Wall Height And Width
Start by measuring the height of the wall from floor to ceiling. Use a tape measure for accuracy. Next, measure the width of the wall from one end to the other. Write down both numbers clearly. Measure each wall separately if your room has multiple walls for paneling.
Calculating Total Area
Multiply the wall height by the width to find the total area. This gives the size in square feet or square meters. For example, a wall 8 feet high and 12 feet wide equals 96 square feet. This number helps estimate how many panels you will need.
Accounting For Doors And Windows
Measure the height and width of doors and windows on the wall. Multiply these to find their total area. Subtract this area from the total wall area. This adjustment prevents ordering too many panels and saves money. List all openings and their sizes to keep track.
Calculating Number Of Panels
Calculating the number of 3D wall panels is a crucial step before starting your project. Accurate calculations help prevent shortages or excess materials. It saves time and money. Knowing the exact number of panels needed ensures a smooth installation process and a clean finish.
Panel Dimensions And Coverage
Start by measuring the height and width of your wall. Multiply these to get the total wall area in square feet or meters. Check the size of each 3D panel. Usually, panel dimensions are given in inches or centimeters.
Convert panel size into square footage by multiplying length by width. Divide the total wall area by the panel area. This gives the number of panels needed to cover the wall surface.
Estimating Waste And Overlap
Some waste is normal during cutting and fitting. Plan for about 10% to 15% extra panels to cover waste. Overlap between panels may be needed for a seamless look. Add extra panels based on the overlap design.
Calculate waste by multiplying total panels by 0.10 or 0.15. Add this number to your total panel count. This ensures you have enough panels for mistakes or alignment adjustments.
Ordering Extra Panels
Always order extra panels beyond your calculated amount. Extra panels help with repairs in the future. They also cover any unexpected damage during installation.
Keep these spare panels in a safe place. Label them with the project date and type for easy identification. This small step avoids delays and extra costs later.
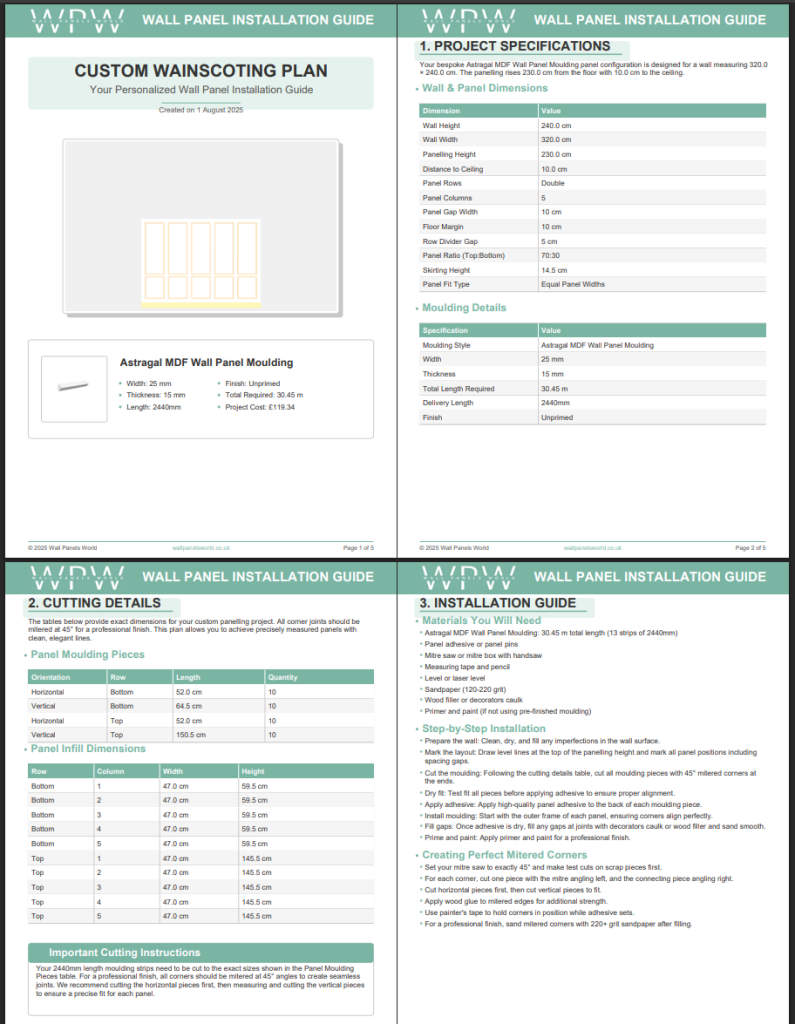
Credit: wallpanelsworld.co.uk
Tips For Accurate Measurement
Getting accurate measurements is key to a successful 3D wall panel installation. Without precise dimensions, you risk ordering too many panels or ending up with gaps that spoil the look. Here are some practical tips to help you measure your walls accurately and avoid costly mistakes.
Double-checking Measurements
Always measure your wall twice before buying panels. Use a tape measure or laser measure to get the height and width, then repeat the process. This simple habit catches errors early and boosts your confidence in the numbers.
If you have time, ask a friend to verify your measurements. A fresh pair of eyes can spot mistakes you might overlook, especially in tricky corners or around doors and windows. Have you ever ordered materials only to find they didn’t fit? Double-checking can save you from that frustration.
Using Digital Tools
Digital tools like laser distance meters can speed up the measuring process and improve accuracy. These devices reduce human error and give you quick, reliable readings. Many models also save measurements, making it easier to track your numbers as you move around the room.
Consider smartphone apps designed for room measurement. They use your phone’s camera and sensors to map out walls in real-time. While not perfect, these apps can complement manual measurements and provide a helpful second opinion.
Considering Wall Irregularities
Walls aren’t always perfectly flat or square, so take note of any bumps, curves, or uneven sections. Measure at multiple points along the height and width to capture these variations. This helps you plan for cutting panels or adjusting placement to fit your wall’s unique shape.
Think about how irregularities might affect the installation. Will you need to trim panels? Can you arrange designs to hide imperfections? Planning for these details upfront saves time and frustration during setup.
Common Mistakes To Avoid
Calculating 3D wall panels accurately can save you time, money, and frustration. Yet, many people fall into common traps that throw off their measurements and estimates. Avoiding these mistakes will help your project go smoothly and ensure your walls look flawless.
Ignoring Surface Obstacles
Walls are rarely perfectly flat or empty. Pipes, light switches, sockets, and uneven surfaces can affect how many panels you need and how you cut them.
Overlooking these obstacles often leads to wasted panels or awkward fitting. Before measuring, walk around your space and note every bump and protrusion. This small step prevents surprises during installation.
Underestimating Panel Quantity
It’s tempting to buy just enough panels to cover the wall, but this can backfire. You might run out mid-project or lack extra panels for mistakes or future repairs.
Always add a buffer of 10-15% to your total panel count. This extra stock is a safety net that keeps your project on track without last-minute trips to the store.
Skipping Measurement Verification
Measuring once and assuming it’s perfect is risky. Even a small error can multiply across your wall, causing gaps or overlaps.
Measure your walls at least twice, and if possible, have someone else check your numbers. Double-checking saves you from costly errors and helps you feel confident about your calculations.
Frequently Asked Questions
What Tools Are Needed To Calculate 3d Wall Panels?
You need a tape measure, calculator, and a notepad. Measure wall dimensions accurately. Use a calculator to compute area and panel quantities. Keep notes for reference during installation.
How Do You Measure Wall Area For 3d Panels?
Measure the height and width of the wall in feet or meters. Multiply height by width to get total wall area. Subtract areas of doors and windows to get net panel area.
How To Estimate The Number Of 3d Panels Required?
Divide the net wall area by the area covered by one panel. Round up to account for cutting and fitting. This ensures you have enough panels for full coverage.
Why Is Panel Thickness Important In Calculations?
Thickness affects the wall’s overall depth and structural support. It also impacts installation methods and material costs. Consider thickness when planning for electrical outlets or molding.
Conclusion
Calculating 3D wall panels is simpler than it seems. Measure the wall height and width carefully. Multiply these numbers to find the total area. Know the size of each panel to count how many you need. Always add extra panels for mistakes or cuts.
This helps avoid running out during installation. Accurate calculation saves time and money. It makes your project smoother and less stressful. Take your time, and double-check your measurements. Clear steps lead to great results in your space.


