
Are you ready to transform your walls into stunning works of art? Casting 3D wall panels might sound tricky, but with the right steps, you can create eye-catching designs that bring depth and style to any room.
Imagine your space instantly looking modern and unique—all because you took control and made your own 3D panels. In this guide, you’ll discover simple, clear instructions to help you cast your panels like a pro. Keep reading, and you’ll learn how to turn a plain wall into a masterpiece you’ll be proud to show off.
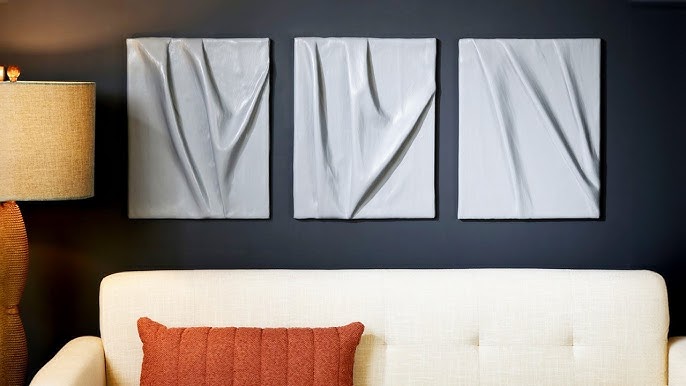
Credit: www.wmboyle.co.uk
Materials And Tools Needed
Getting your materials and tools right is the foundation of casting 3D wall panels successfully. Without the proper supplies, your project can quickly become frustrating or yield poor results. Let’s break down what you need to gather before you start casting.
Choosing The Right 3d Wall Panel Mold
Your mold shapes the entire look of your wall panels, so choosing the right one is crucial. Silicone molds are popular because they are flexible and easy to demold, reducing the chance of damaging your panels. Rigid molds made from plastic or fiberglass offer sharper edges but require more care during removal.
Think about the design you want. Do you prefer geometric patterns or organic shapes? Also, consider the size of the panels and how many you need to produce. A mold with multiple cavities can save time if you want to make several panels at once.
Selecting Suitable Casting Materials
The casting material affects the durability and appearance of your panels. Plaster is affordable and easy to work with but may be less durable in humid areas. Concrete provides strength and a modern look but needs longer curing time and can be heavier to handle.
Resin is another option, offering smooth finishes and vibrant colors but usually at a higher cost. Some people mix materials, like adding fibers to plaster for extra strength. What environment will your panels be in? That question guides your material choice.
Essential Tools For Casting
Having the right tools makes the process smoother and safer. Basic tools include a mixing bucket, measuring cups, and a stir stick for blending your casting material evenly. A spatula or trowel helps you fill the mold without air pockets.
Don’t forget safety gear like gloves and a mask, especially when working with materials like resin or concrete dust. A level surface to place your molds ensures uniform thickness, and a release agent prevents sticking. Are you ready to gather these items and start your project with confidence?
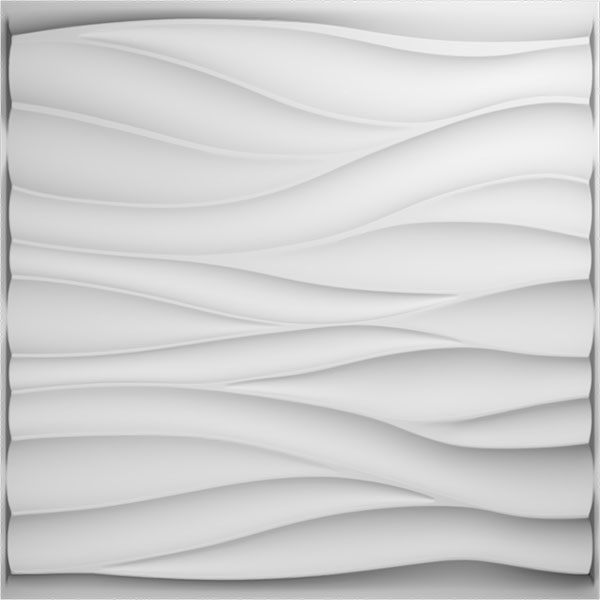
Credit: www.millwork.com
Preparing Your Workspace
Preparing your workspace is crucial before you start casting 3D wall panels. A well-organized and safe environment helps you work efficiently and avoid mistakes. It also protects your health and surroundings from potential hazards.
Setting Up A Clean Casting Area
Choose a flat, sturdy surface to work on. Clear the area of any dust, dirt, or clutter that could stick to your panels or interfere with your materials.
Use a plastic sheet or disposable table cover to keep the surface clean and make cleanup easier. You don’t want unwanted particles ruining your smooth panel finish.
Ensuring Proper Ventilation
Casting materials often release fumes that can be harmful if inhaled. Work near an open window or in a well-ventilated room to keep fresh air flowing.
Consider using a fan to circulate air or a respirator mask if ventilation is limited. Your lungs will thank you, especially during long casting sessions.
Protecting Surfaces And Yourself
Wear gloves and old clothes to avoid skin contact with casting compounds, which can be irritating. Safety goggles are a smart choice if you’re mixing or pouring liquids.
Cover floors and nearby furniture with drop cloths or newspapers. Spills are almost inevitable, but quick cleanup saves you from stubborn stains and damage.
Mixing The Casting Material
Mix the casting material thoroughly until smooth and lump-free. Use the right water-to-powder ratio for best consistency. Work quickly before the mix starts to set.
Mixing the casting material is a crucial step in creating stunning 3D wall panels. It’s where your design starts to come alive. Proper mixing ensures that your panels have a smooth, uniform texture and are durable over time. Let’s dive into how you can master this process with precision and care.Measuring Components Accurately
Accurate measurement is the foundation of successful casting. Use a digital scale to weigh your components. This ensures consistency across all your panels. Keep a detailed record of your measurements. This will help you replicate the perfect mix every time. Always measure your dry and wet ingredients separately. This prevents errors and keeps your workspace organized.Mixing Techniques For Smooth Texture
Mixing for a smooth texture involves a few key techniques. Use a drill with a mixing paddle for thorough blending. This method efficiently eliminates lumps. Gradually add your dry mix to the liquid. This reduces the formation of air bubbles, giving your panels a sleek finish. Ensure you mix at a moderate speed. Too fast, and you risk introducing air; too slow, and you may not achieve a uniform blend.Avoiding Common Mixing Mistakes
Avoid using improper ratios of components, as this can compromise the quality of your panels. Stick to the recipe for best results. Don’t mix for too long. Over-mixing can lead to the material setting prematurely or becoming too thick to work with. Be cautious of environmental factors like temperature and humidity. They can affect the curing process, so adjust your technique accordingly. Have you ever tried a new recipe and it didn’t turn out as expected? The same care applies here. Practice and patience are key to mastering the art of mixing casting materials.Pouring And Casting Process
The pouring and casting process is key to creating sharp, durable 3D wall panels. It requires careful preparation and attention to detail. This ensures your panels come out smooth and strong.
Following each step correctly helps avoid defects and saves time. The process includes preparing the mold, pouring the material, and removing air bubbles. Each stage affects the final look and durability of your panels.
Applying Mold Release Agents
Start by applying a mold release agent. This prevents the casting material from sticking to the mold. Use a brush or spray to cover all mold surfaces evenly. Let the agent dry before pouring the material. This step makes removing the panel easier and keeps the mold intact for future use.
Pouring Material Into The Mold
Pour the casting material slowly into the mold. Use a steady, controlled flow to avoid splashing. Fill the mold completely, reaching all corners and edges. Pouring too fast can cause bubbles or overflow. Ensure the material spreads evenly for a clean shape.
Removing Air Bubbles For A Flawless Finish
Air bubbles create holes and weak spots in the panels. Remove bubbles by gently tapping or vibrating the mold. You can also use a toothpick to pop bubbles on the surface. Work carefully to keep the design crisp and smooth. Proper bubble removal ensures a flawless, professional finish.
Curing And Demolding
Curing and demolding are crucial stages in casting 3D wall panels. They determine the final strength and appearance of your panels. If you rush these steps, you risk damaging the delicate details or weakening the structure.
Optimal Curing Times And Conditions
Every material has a specific curing time, often noted on the packaging. Typically, concrete or resin panels need at least 24 to 48 hours to cure properly. However, temperature and humidity play a big role—cool, damp environments slow down curing, while warmth speeds it up.
Try to keep your molds in a dry, stable place with moderate temperature—around 70°F (21°C) is ideal. Avoid direct sunlight or drafts, which can cause uneven curing. Have you noticed how panels cured too fast sometimes crack or warp? That’s why patience here pays off.
Careful Mold Removal Tips
Removing your panels from the mold requires a gentle touch. Start by loosening the edges carefully with a soft tool like a plastic spatula. Avoid metal tools that can scratch or chip the surface.
Sometimes tapping lightly on the mold’s sides helps release the panel without force. If you feel resistance, wait longer—forcing it out can cause cracks. Remember, the mold is your best friend for multiple casts, so treat it with care.
Handling Panels Post-demolding
Once out of the mold, your panels are still vulnerable. Handle them with clean, dry hands or wear gloves to prevent stains. Lay them flat on a soft surface to avoid bending or warping.
Stacking them too soon can cause pressure marks or breakage. Allow panels to cure fully off the mold before moving or installing. What’s your plan to store panels safely while finishing touches dry?
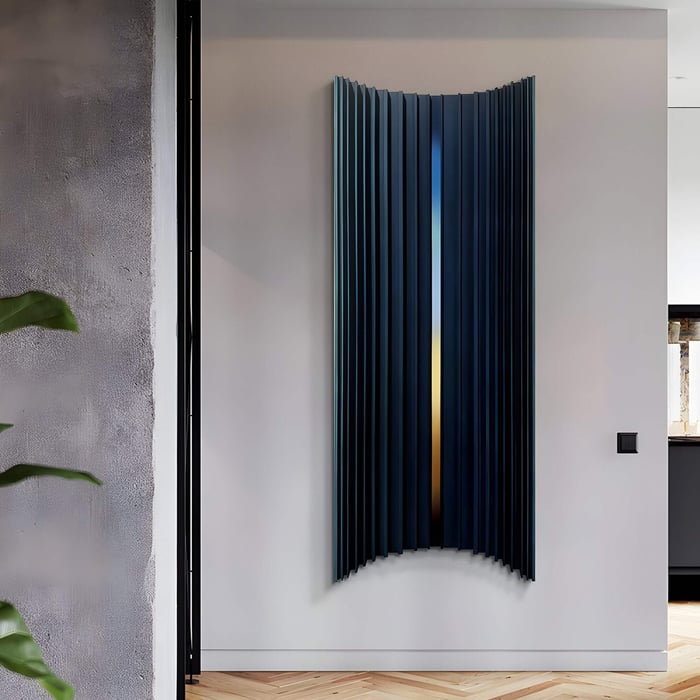
Credit: giant-sculptures.com
Finishing And Installing Panels
Finishing and installing your 3D wall panels correctly is crucial to achieving a polished and durable look. This stage transforms raw cast panels into striking wall features that stand the test of time. Paying close attention to detail here can save you from common issues like uneven surfaces, peeling paint, or panels that don’t stay put.
Sanding And Surface Preparation
Start by inspecting each panel for any rough spots or imperfections. Use fine-grit sandpaper to smooth edges and surfaces gently without damaging the design.
Dust off the panels thoroughly after sanding to ensure paint or sealant adheres properly. Have you checked your workspace for dust or debris that might stick to the panels during this step? A clean environment helps avoid unwanted texture on your finished surface.
Painting And Sealing Options
Choose paint types suitable for your panel material—acrylic or latex paints work well on most cast panels. Applying a primer first can enhance paint adhesion and color vibrancy.
Seal the panels with a clear coat to protect against moisture and wear. You might prefer a matte finish for subtlety or a glossy one to highlight textures. What effect do you want your panels to create in the space?
Attaching Panels To Walls Securely
Use construction adhesive designed for wall panels to attach your 3D panels firmly. Apply the adhesive in a zigzag pattern for even coverage and press the panel into place for several seconds.
For added security, especially on heavier panels, consider using nails or screws at the edges. Always check that your wall surface is clean and dry before installation to prevent adhesion problems.
Will you be mixing panel designs or colors? Planning your layout ahead ensures a seamless, professional look once installed.
Maintenance And Care Tips
Taking care of your 3D wall panels ensures they stay vibrant and intact for years. Proper maintenance not only preserves their aesthetic appeal but also extends their lifespan. Let’s look at practical ways you can keep your panels looking fresh and flawless.
Cleaning Methods For 3d Panels
Dust and dirt can settle into the grooves of 3D panels, dulling their texture. Use a soft brush or a microfiber cloth to gently remove surface dust regularly. Avoid abrasive tools that might scratch the panels’ surface.
For deeper cleaning, dampen a cloth with mild soapy water and wipe the panels carefully. Test the solution on a small hidden area first to make sure it doesn’t damage the material. Never soak the panels or use harsh chemicals, as they can weaken or discolor the finish.
Repairing Minor Damages
Small chips or cracks can happen, especially in high-traffic areas. You can fix these by applying a matching filler or putty designed for the panel’s material. Smooth it out with a spatula and let it dry completely before sanding lightly for a seamless look.
If paint or color fades, touch it up with a matching paint. Keep extra paint from your original installation for this purpose. How often do you think about checking your walls for tiny damages that could worsen over time?
Long-term Preservation Advice
Keep your panels away from direct sunlight to prevent fading and warping. Consistent exposure to moisture or extreme temperatures can also cause damage, so control your room’s humidity with a dehumidifier if needed.
Consider applying a clear protective sealant every few years to add a durable layer against stains and scratches. Regularly inspect your panels for any signs of wear, and address issues immediately to avoid expensive repairs later.
Frequently Asked Questions
What Materials Are Needed To Cast 3d Wall Panels?
To cast 3D wall panels, you need silicone molds, casting resin or concrete, release agents, mixing tools, and protective gear. These materials ensure clean, detailed panels suitable for interior or exterior walls, offering durability and aesthetic appeal.
How Long Does It Take To Cast 3d Wall Panels?
Casting 3D wall panels typically takes 24 to 48 hours for the material to fully cure. Drying time depends on the type of resin or concrete used and environmental conditions like temperature and humidity.
Can I Customize Designs For 3d Wall Panels?
Yes, you can customize 3D wall panel designs using personalized silicone molds or by creating unique patterns. This allows tailored textures and shapes to fit your décor style or project requirements.
What Surface Preparation Is Needed Before Installing Panels?
Surfaces must be clean, dry, and smooth before installing 3D wall panels. Remove dust, grease, and loose materials to ensure strong adhesion and long-lasting installation.
Conclusion
Casting 3D wall panels can be simple with the right steps. Start by preparing your materials carefully. Pour the mixture slowly to avoid air bubbles. Let the panels dry completely before handling. Clean your tools right after use to save time.
Practice makes the process smoother and more fun. These panels add style and texture to any space. Try casting your own panels and see the difference. Enjoy your creative project and the fresh look it brings.


