
Are your string lights suddenly not working? Before you toss them out or buy new ones, there’s a simple fix you can try yourself—changing the fuse.
It might sound tricky, but with the right steps, you can bring your favorite lights back to life quickly and safely. In this guide, you’ll learn exactly how to change the fuse in your string lights, so you can save money and keep your space glowing bright.
Keep reading—you’re just a few easy steps away from fixing your lights.
Credit: www.homedepot.com
Tools Needed
Changing a fuse in string lights requires a few simple tools. Having the right tools makes the job safe and quick. These tools help you open the fuse compartment and replace the fuse without damage.
Gathering these items before starting saves time and prevents frustration.
Flathead Screwdriver
A flathead screwdriver helps to open the fuse cover. It fits into small slots and gently pries open plastic compartments.
Choose a small size to avoid breaking the fuse box.
Replacement Fuses
Keep the correct type of replacement fuses ready. Check the string light’s manual or the old fuse for size and rating.
Using the wrong fuse can cause electrical issues or damage.
Needle-nose Pliers
Needle-nose pliers help to pull out the old fuse. They offer a better grip in tight spaces.
These pliers also make it easier to place the new fuse securely.
Multimeter (optional)
A multimeter checks if the fuse is blown. It measures electrical continuity.
This tool is useful to confirm the fuse needs replacement before starting work.
Safety Precautions
Handling string lights may seem straightforward, but safety should always be your top priority. Ignoring precautions can lead to electric shocks or damage to your lights, turning a simple task into a dangerous one. Taking a moment to prepare properly can save you from accidents and ensure your lights shine safely.
Turn Off Power Before You Start
Always unplug your string lights or switch off the circuit breaker before touching the fuse or wiring. Even if the lights appear off, electricity can still be running through the wires. I once skipped this step and got a small shock—it was a sharp reminder to never underestimate electrical power.
Use The Correct Replacement Fuse
Check the fuse rating printed on your string lights or in the manual. Using a fuse with the wrong amperage can cause the lights to malfunction or even start a fire. Don’t guess—if your fuse says 3 amps, replace it with exactly that.
Inspect The Lights For Damage
Before changing the fuse, look for frayed wires, cracked bulbs, or loose connections. Damaged parts can cause shorts or overloads that blow new fuses repeatedly. Have you ever replaced a fuse only to see it blow again? The root cause is often hidden damage you overlooked.
Handle The Fuse Holder Carefully
Fuse holders can be delicate. Don’t force them open or closed, as this can break the contacts inside. Use a small flathead screwdriver or your fingernail gently to avoid damaging the holder or the wires attached.
Keep Your Hands Dry And Work In A Dry Area
Water and electricity never mix well. Make sure your hands are dry and the work area is free from moisture. This simple step cuts the risk of shocks and keeps your job safer and easier.
Locate The Fuse Compartment
The fuse compartment is usually located near the plug or on the string light’s power cord. Open the small cover to access the fuse inside. This area holds the fuse that protects your lights from power issues.
Changing the fuse in string lights is a simple task. It ensures your lights work safely and efficiently. The first step is to locate the fuse compartment. This small but vital component often hides in plain sight. Knowing where to look is key. Below are some helpful tips.Check The Plug
The fuse compartment is usually in the plug. It’s a small, sliding door on the side or bottom. You may need a small tool to open it.Look For A Small Door
Some plugs have a tiny door. This door often has a label or icon. It indicates the fuse compartment location.Inspect The Plug’s Side
The fuse compartment might be on the plug’s side. Check for a small, flat panel. This panel slides or snaps open.Examine The Plug’s Bottom
Sometimes, the compartment is at the bottom. Look for a small, rectangular cover. It may have a tiny hinge or lock.Read The Manufacturer’s Instructions
The manufacturer’s instructions provide guidance. They often include diagrams showing the fuse location. These are helpful if you’re unsure where to look.Remove The Old Fuse
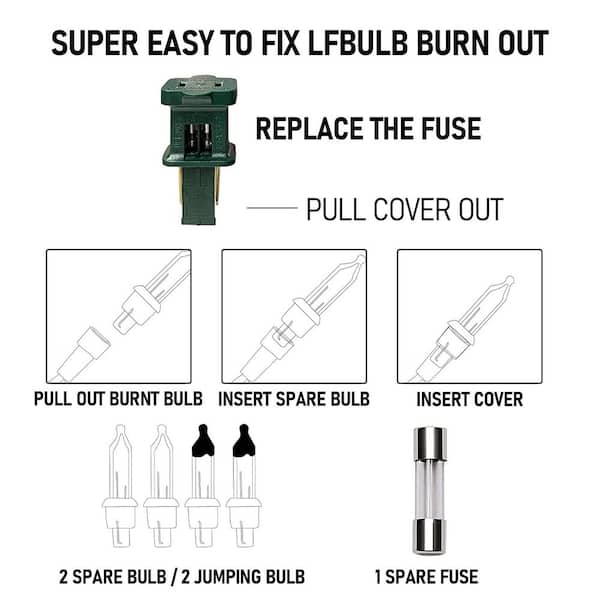
Removing the old fuse is a key step in fixing string lights. The fuse protects your lights from electrical damage. Over time, fuses can blow out and stop the lights from working. This section explains how to take out the old fuse safely and easily.
Locate The Fuse Holder
First, find the fuse holder on the string lights. It is usually near the plug. The holder looks like a small, plastic box. Sometimes it has a sliding cover or a screw cap. Check carefully to avoid damaging the wires.
Open The Fuse Holder
Open the fuse holder by sliding or unscrewing the cover. Do this gently to prevent breaking the holder. Inside, you will see the fuse. It is a small glass or plastic tube with metal caps on each end.
Carefully take out the old fuse. You can use your fingers or a small tool like tweezers. Avoid pulling on the wires. The fuse should come out easily if the holder is open.
Check The Fuse Condition
Look closely at the fuse. A blown fuse often has a broken wire inside or a dark, burnt mark. If the fuse looks intact, the problem might be elsewhere. Always replace with the correct fuse type and rating.
Identify The Correct Replacement Fuse
Identifying the correct replacement fuse is essential for fixing string lights safely and effectively. Using the wrong fuse can cause damage or pose a fire risk. Always choose a fuse that matches the original specifications.
Check the string light’s packaging or user manual for fuse details. If these are missing, inspect the fuse holder carefully for markings. Most fuses have their rating printed on the glass or metal cap.
Fuses are rated by amperage and voltage. The amperage tells how much current the fuse can handle before breaking. Voltage rating shows the maximum voltage the fuse can safely carry.
Choosing a fuse with a higher amperage than required can let excess current flow. This may damage the lights or wiring. A fuse with lower amperage will blow too often, interrupting use.
Locate The Fuse Holder On Your String Lights
The fuse holder is usually near the plug or on the power cord. It may be a small compartment with a sliding or snap-on cover. Sometimes, it looks like a tiny tube or cylinder.
Read The Fuse Specifications Carefully
Look for numbers like 3A, 5A, or 250V on the fuse. The letter “A” stands for amperes, which measure electrical current. Voltage is often shown with a “V.” Match these numbers exactly.
Buy The Exact Fuse Type
String lights often need glass tube fuses or blade fuses. Using the wrong type may cause poor contact or damage. Purchase fuses from a store or online that match size and ratings.
Keep Spare Fuses Handy
Having extra fuses at home saves time when a fuse blows. Store them in a dry place and label them for easy identification. This helps maintain your string lights without hassle.

Credit: www.youtube.com
Install The New Fuse
Installing a new fuse in string lights is a simple task that restores their function safely. The fuse protects the lights from electrical damage by breaking the circuit if too much current flows through.
Before installing the new fuse, make sure to choose the correct type and rating. Using the wrong fuse can cause damage or a fire hazard.
Locate The Fuse Holder
Find the fuse holder on the plug of the string lights. It usually looks like a small sliding or hinged compartment.
Open the fuse holder carefully using your fingers or a small tool.
Take out the blown fuse gently from the holder. Dispose of it properly to avoid confusion later.
Insert The New Fuse
Place the new fuse into the holder in the same position as the old one. Make sure it fits snugly without forcing it.
Check the fuse’s metal ends touch the contacts inside the holder firmly.
Close The Fuse Holder
Slide or snap the fuse holder cover back into place. Confirm it is fully closed to keep the fuse secure.
Test the string lights by plugging them in. They should light up normally if the fuse is installed correctly.
Test The String Lights
Testing your string lights before and after changing the fuse is a crucial step to ensure everything works safely and efficiently. It helps you identify if the fuse replacement was successful or if there might be other issues causing the lights to fail.
Skipping this step can lead to frustration or even damage to the lights, so take the time to test carefully. You might be surprised how often a simple test can save hours of troubleshooting later on.
Visual Inspection Of The Lights
Start by looking closely at the bulbs and wiring for any obvious signs of damage. Check for broken bulbs, frayed wires, or loose connections that might prevent the lights from working.
Even a single broken bulb can stop the entire string from lighting up. Don’t overlook these small details—they are often the root of the problem.
Plugging In And Observing
After replacing the fuse, plug the string lights into a power outlet and watch carefully. Look for any bulbs that don’t light or flicker, and listen for any unusual buzzing sounds.
If the lights come on steadily, that’s a good sign your fuse replacement worked. If not, there may be a deeper electrical issue that needs attention.
Using A Multimeter For Accurate Testing
If you want to be thorough, use a multimeter to check continuity in the string lights. This tool helps you see if electricity is flowing properly through the circuit.
- Set the multimeter to continuity mode.
- Touch the probes to the string light’s wiring or fuse terminals.
- A continuous beep or reading indicates good flow; silence or no reading means a break.
This step often catches problems that aren’t visible to the naked eye, saving you time and guesswork.
What To Do If The Lights Still Don’t Work
If testing shows the lights are still off, double-check your fuse installation first. Make sure the fuse is the correct type and properly seated in its holder.
If the fuse is correct and the problem persists, inspect the wiring or bulbs again. Sometimes, multiple issues can exist, and replacing the fuse alone won’t fix the entire string.

Credit: www.youtube.com
Tips For Preventing Fuse Blowing
Preventing fuse blowing in string lights helps keep them working longer. Simple steps reduce the risk of electrical problems. These tips help maintain safe and reliable lights for any occasion.
Use The Correct Fuse Type And Rating
Always check the fuse type recommended by the manufacturer. Using the wrong fuse can cause frequent blowing or damage. Match the voltage and amperage ratings exactly to avoid issues.
Avoid Overloading Electrical Circuits
Do not plug too many string lights into one outlet. Overloading circuits causes fuses to blow to protect wiring. Spread lights across multiple outlets or use a power strip with a built-in circuit breaker.
Inspect Lights For Damage Before Use
Look for broken wires or cracked bulbs before plugging in lights. Damaged parts increase the risk of short circuits and fuse failure. Replace any faulty components immediately.
Keep Lights Away From Moisture
Water can cause electrical shorts and blow fuses. Use lights designed for outdoor or wet areas if needed. Store indoor lights in dry places to prevent moisture damage.
Turn Off Lights When Not In Use
Switch off string lights when you do not need them. This reduces wear and prevents overheating. Less heat means a lower chance of fuse problems.
Frequently Asked Questions
How Do I Know If The Fuse In String Lights Is Blown?
Check the fuse by opening the fuse compartment. If the filament inside is broken or darkened, the fuse is blown. You can also test it with a multimeter for continuity to confirm. Replace it with the correct fuse type and rating.
What Tools Do I Need To Change A Fuse In String Lights?
You only need a small screwdriver or your fingers to open the fuse compartment. Also, have a replacement fuse with the same rating ready. A multimeter is optional to test the fuse before replacing it.
Can I Use Any Fuse To Replace The Blown One In String Lights?
No, always use a fuse with the same voltage and amperage rating. Using a different fuse can cause damage or fire risk. Check the string light’s manual or the old fuse for the correct specifications.
How Often Should I Check The Fuse In My String Lights?
Check the fuse whenever the lights stop working suddenly. Regular checks aren’t necessary unless you notice flickering or partial outages. Proper handling and storage reduce fuse damage.
Conclusion
Changing a fuse in string lights keeps them working safely. Always unplug the lights before starting. Find the fuse holder and open it carefully. Replace the old fuse with the correct type. Close the holder firmly to avoid loose connections.
Test the lights to ensure they shine bright again. Regular checks help avoid future problems. Simple steps can save your favorite string lights. Stay safe and enjoy your glowing decorations.


