
Are you tired of plain can lights that don’t add any style to your room? Switching from a basic can light to a trendy pendant light can instantly transform the look and feel of your space.
But you might be wondering, “Is it difficult? Will it cost a lot? Can I do it myself? ” The good news is, converting a can light to a pendant is easier than you think—and it’s a smart way to upgrade your lighting without a full remodel.
You’ll discover simple steps and insider tips that make this switch smooth and affordable. Ready to give your room a fresh, modern vibe? Let’s dive in and make your lighting work for you.
Tools And Materials Needed
Converting a can light to a pendant involves more than just swapping fixtures. Having the right tools and materials ready will make your project smoother and safer. Knowing what you need ahead of time saves frustration and helps you avoid last-minute trips to the hardware store.
Essential Tools
You’ll need a few basic tools to handle wiring and mounting. A wire stripper and a voltage tester are must-haves for working safely with electrical components. A screwdriver set, both flathead and Phillips, will help with removing the existing can light and installing the pendant.
Don’t forget pliers for twisting wires and a ladder to reach ceiling fixtures comfortably. If you want a clean finish, a drywall saw or utility knife might be needed to adjust the ceiling hole size.
Selecting The Right Pendant Light
Choosing a pendant that fits your space and style is crucial. Consider the size of the pendant relative to the room and ceiling height. A large pendant in a small room can feel overwhelming, while a tiny one might look out of place in a spacious area.
Check the weight of the pendant too—heavy fixtures may require additional support. Also, ensure the pendant’s mounting hardware matches the electrical box in your ceiling for a secure fit.
Safety Equipment
Your safety is the top priority. Use insulated gloves to protect against electrical shocks when handling wires. Safety glasses can guard your eyes from dust or debris if you need to cut into the ceiling.
Turn off the power at the circuit breaker before starting any work. Have a flashlight or headlamp ready in case you lose light during the process.

Credit: www.amazon.com
Preparing The Can Light
Preparing the can light is a crucial step before installing a pendant fixture. It ensures safety and creates a clean base for the new light. Take your time to follow each part carefully. This preparation helps avoid electrical problems later.
Turning Off Power
Start by turning off the power to the light at the circuit breaker. This stops electricity from flowing and keeps you safe. Double-check by flipping the light switch to confirm the power is off. Use a voltage tester to be sure no current is present.
Removing The Can Light Trim
Next, remove the trim around the can light. The trim is the decorative ring that holds the bulb and cover. Gently pull or twist it away from the ceiling. Some trims have clips or springs; press them carefully to release the trim without damage.
Disconnecting The Wiring
Now, access the wiring inside the can light housing. Unscrew the junction box cover to expose the wires. Carefully disconnect the wires by untwisting the wire nuts. Keep track of which wires connect together for the new fixture. Use electrical tape on exposed wires to prevent shorts.
Installing The Pendant Fixture
Begin by turning off the power to the can light for safety. Remove the existing fixture, then install the pendant mounting bracket. Connect the wires carefully, secure the pendant, and adjust its height as desired.
Installing a pendant fixture can transform any room’s ambiance. This simple upgrade adds elegance and style. Follow these steps to ensure a successful installation.Mounting The Pendant Bracket
Begin by turning off the power at the breaker. Remove the existing can light trim and bulb. Locate the mounting bracket included with your pendant kit. Align it with the existing can light housing. Secure it using the screws provided. Ensure the bracket is flush with the ceiling.Connecting The Wiring
Carefully pull out the existing wires from the ceiling. Match the pendant’s wires with the ceiling wires by color. Usually, black to black, white to white, and green or bare to the ground. Twist the wire connectors to secure them. Double-check all connections for safety.Securing The Pendant Light
Attach the pendant light to the mounted bracket. Use the screws provided in the pendant kit. Ensure the fixture is stable and aligned. Adjust the pendant height as needed before tightening. Turn the power back on and test the light switch. Enjoy the new look your pendant brings to your space.
Credit: www.xhlux.com
Adjusting Pendant Height
Adjusting the pendant height is essential for both style and function. The right height ensures the light provides enough brightness and fits well with your room’s design. You can control the ambiance by simply changing how low or high the pendant hangs.
Measuring Drop Length
Start by measuring the distance from the ceiling to the spot where the light should hang. Use a tape measure for accuracy. Consider the room’s height and what the pendant will hang over, like a table or countertop. The drop length often ranges from 12 to 36 inches, depending on the space.
Adjusting Cord Or Chain
Most pendant lights come with adjustable cords or chains. To shorten the length, pull the cord through the canopy and secure it inside. For chains, remove extra links with pliers. Make sure the cord or chain is tight and won’t slip after adjustment. Keep the wires inside neat and avoid twisting.
Ensuring Level Installation
Once the height is set, check if the pendant hangs straight. Use a level tool or a smartphone app to confirm. Adjust the canopy or the hanging mechanism if the light tilts. A level pendant looks clean and prevents uneven light spread.
Testing And Final Touches
After installing your new pendant light, it’s essential to carefully move through the final stages. Testing and adding finishing touches ensures your work is both safe and visually appealing. These steps help you confirm everything operates smoothly and looks just right in your space.
Restoring Power
Before restoring power, double-check all your wiring connections. Loose or incorrect wiring can cause shorts or damage your fixture. Make sure the circuit breaker is off while you inspect everything closely.
Once you feel confident, turn the breaker back on. This step reactivates the electricity to your new pendant light. Stay ready to switch it off quickly if you notice any sparks or unusual sounds.
Testing The Light
Now, test your pendant light by flipping the wall switch. Does it illuminate immediately? If not, check the bulb and wiring again.
Observe how the light casts shadows and fills the room. Is the brightness suitable for the area? Sometimes adjusting the bulb wattage or shade position makes a big difference in ambiance.
Have you noticed a flicker or humming? These signs often point to loose connections or incompatible dimmers. Address these issues before moving on.
Adding Decorative Elements
With your light working perfectly, focus on aesthetics. Adding a decorative canopy or cover can hide the wiring and mounting hardware for a cleaner look.
Consider matching the pendant’s finish with your room’s style. Bronze, chrome, or matte black can drastically change the vibe. Adding complementary bulbs, like vintage Edison-style, can enhance the charm.
What small touches could personalize your pendant? Try experimenting with chain lengths or mixing materials to reflect your taste. These details turn a simple fixture into a statement piece.
Common Issues And Solutions
Converting a can light to a pendant can refresh a room’s look, but it doesn’t always go smoothly. You might run into a few common issues that can stall your progress or even create safety hazards. Identifying these problems early and knowing how to fix them will save you time and frustration.
Loose Connections
Loose wiring connections are a frequent problem when swapping out lighting fixtures. If wires aren’t tightly secured, your pendant may flicker or fail to turn on. Always double-check that all wire nuts are twisted tightly and that no bare copper is exposed.
Don’t forget to turn off the power before touching any wires. If you notice any damaged wire insulation, replace or repair it before proceeding. Have you ever felt a light switch that was warm to the touch? That’s often a sign of loose or faulty wiring, which can be dangerous.
Pendant Swinging
A pendant light that swings excessively can be annoying and potentially hazardous. This usually happens if the fixture isn’t properly secured to the ceiling box or if the pendant cord is too long. To fix this, shorten the cord to an appropriate length and ensure the mounting bracket is firmly attached.
Adding a ceiling hook to anchor the cord can also reduce movement. Have you noticed your pendant swinging every time a door closes or a fan runs? That’s a clear sign it needs better stabilization.
Incompatible Fixtures
Not every pendant fixture will work with your existing can light setup. Differences in voltage, size, or mounting hardware can cause installation problems. Before purchasing, verify the fixture’s specifications match your electrical box and power supply.
Some pendants require additional support or adapters to fit properly. If your new pendant feels heavy or unstable, check if you need a special mounting plate or reinforcement. Have you ever bought a fixture that just wouldn’t fit? Spending extra time on compatibility checks upfront can prevent costly returns and headaches.
Tips For A Professional Finish
Getting a professional finish when converting a can light to a pendant can transform your space and elevate its overall look. Attention to small details makes a big difference. Here are key tips to help you achieve a sleek, polished result that you’ll be proud of.
Choosing The Right Bulb
Your choice of bulb affects both the look and functionality of the pendant light. Opt for LED bulbs as they offer energy efficiency and a longer lifespan. Consider the bulb’s shape and size; for example, a globe bulb complements modern pendants, while an Edison bulb adds vintage charm.
Think about the light color temperature too. Warm white bulbs (2700K-3000K) create a cozy atmosphere, while cool white (4000K) provides brighter, more task-oriented lighting. Matching the bulb type to your room’s purpose enhances both comfort and style.
Matching Room Style
Does your pendant light fit the room’s overall design? A sleek metal pendant works well in minimalist or industrial spaces, while a glass or fabric shade suits traditional or boho interiors. The fixture should harmonize with your existing décor, not clash with it.
Consider the pendant’s size and height. Too large or too low can overwhelm the room or become a hazard. Aim for balance so the pendant becomes a natural focal point without stealing attention from other design elements.
Maintaining Safety Standards
Safety can’t be overlooked during your conversion project. Always turn off the power before starting any electrical work. Use a voltage tester to ensure no live wires are exposed.
Securely fasten the pendant’s mounting bracket to support its weight. Avoid overloading the circuit by checking the fixture’s wattage against your home’s electrical limits. If you feel unsure, consulting a licensed electrician guarantees your installation is both safe and compliant.

Credit: hellofromliz.com
Frequently Asked Questions
How Do I Convert A Can Light To A Pendant Light?
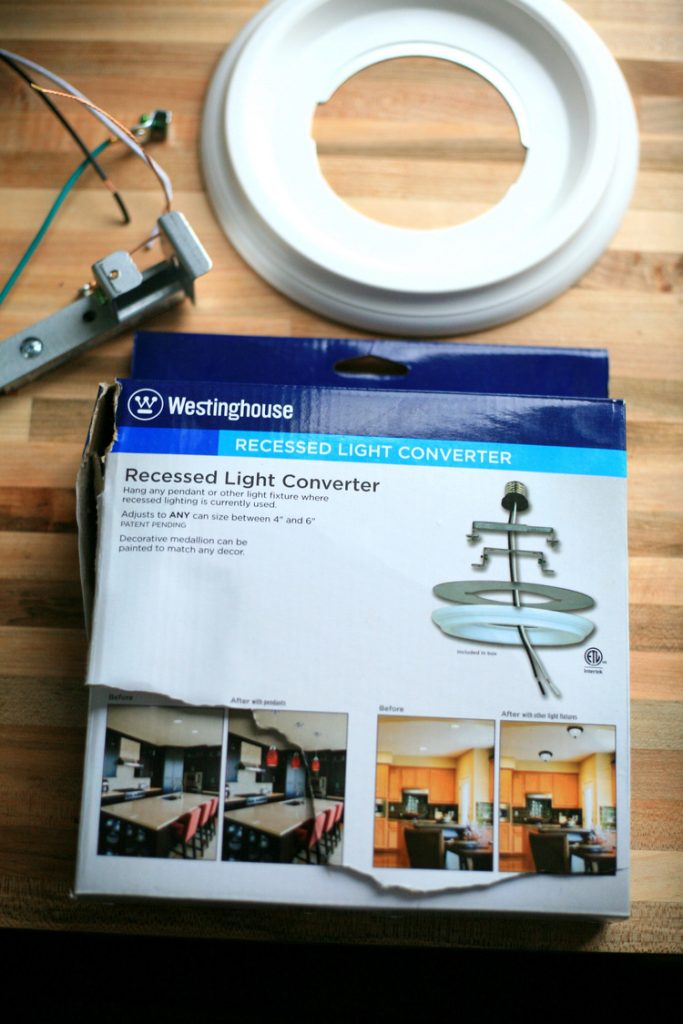
To convert a can light to a pendant, first turn off power. Remove the can light trim and bulb. Install a compatible pendant adapter kit. Connect wires securely and mount the pendant fixture. Restore power and test the new pendant light.
What Tools Are Needed For Can Light To Pendant Conversion?
You need a screwdriver, wire stripper, voltage tester, and pendant adapter kit. A ladder and electrical tape also help. These tools ensure a safe and smooth light fixture conversion process.
Can I Use Any Pendant Light With A Can Light Fixture?
No, use pendant lights compatible with recessed can light adapters. Check the adapter specifications and weight limits before purchase. This ensures safe installation and proper fit for your ceiling.
Is It Safe To Convert Can Lights To Pendant Lights Myself?
Yes, if you follow safety guidelines and turn off power first. Use a voltage tester to confirm no electricity. If unsure, consult a licensed electrician for a safe and code-compliant installation.
Conclusion
Converting a can light to a pendant light can change a room’s look. It adds style and improves lighting. The process is simple with the right tools and steps. Take your time and follow safety tips. Enjoy the new light and fresh feel in your space.
Bright ideas start with small changes. Try this project to update your home easily.


