
Are you looking for a stylish and cozy way to add comfort to your living space? Learning how to crochet a large floor pouf is easier than you think—and it’s a project you’ll love showing off.
Imagine sinking your feet into a soft, handmade pouf after a long day. This guide will walk you step-by-step through creating your own beautiful, oversized floor pouf that fits perfectly in your home. Ready to transform your space with a unique, comfy piece you made yourself?
Let’s get started!
Materials Needed
Gathering the right materials is key to crochet a large floor pouf successfully. The right supplies help you create a sturdy, beautiful pouf that lasts. Focus on yarn, hook, and other essential tools. Choosing these carefully makes your project easier and more enjoyable.
Yarn Selection
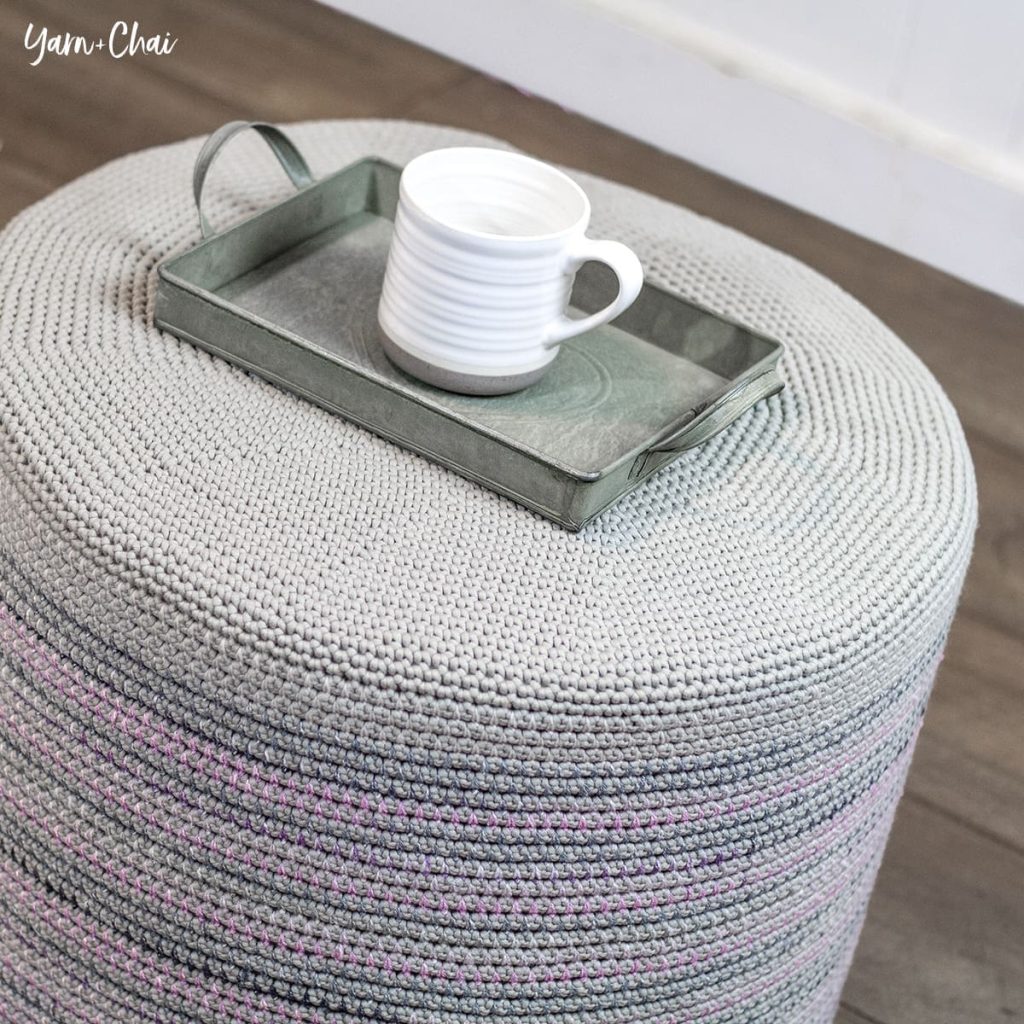
Choose thick, durable yarn for a large floor pouf. Bulky or super bulky yarn works best. It holds shape and feels comfortable to sit on. Cotton or acrylic yarns are good choices. Cotton is strong and breathable. Acrylic is soft and easy to clean. Pick a color that matches your room decor.
Choosing The Right Hook
Use a crochet hook size that fits your yarn thickness. A larger hook helps create loose, flexible stitches. Typically, a 10 mm to 15 mm hook works well. Check the yarn label for recommended hook size. Using the right hook keeps your pouf sturdy but soft.
Additional Supplies
- Scissors for cutting yarn cleanly
- Stitch markers to keep track of rounds
- Tapestry needle to weave in ends
- Measuring tape to check pouf size
- Stuffing material like polyester fiberfill or old pillows
Having these tools ready saves time and effort. They help finish your pouf neatly and with good shape.

Credit: yarnandchai.com
Preparing The Base
Preparing the base of your large floor pouf sets the foundation for a sturdy and attractive piece. It’s important to start strong, as this part determines the shape and durability of the entire pouf. Paying close attention to the base ensures that your final product will hold its form and be comfortable to use.
Creating A Magic Ring
The magic ring is the perfect way to begin crocheting a circular base. It allows you to pull the starting loop tight, eliminating any gaps in the center. This creates a neat and secure starting point, which is essential for a pouf that will be filled and used regularly.
To create the magic ring, wrap your yarn around your fingers to form a loop. Insert your hook into the loop, yarn over, and pull through to start your first stitch. From there, you can crochet the first round of stitches into this adjustable loop, tightening it as you go.
Have you noticed how a loose center can make your project look unfinished? The magic ring solves that issue entirely, making it a favorite among crocheters for projects like poufs.
Crocheting The Pouf Bottom
After the magic ring, the next step is to crochet the pouf’s bottom in rounds. This part shapes the base’s diameter and thickness, so take your time and keep your tension even. Using a chunky yarn can help the base feel more solid and durable.
Increase stitches gradually in each round to keep the circle flat. If you notice your base curling or warping, adjust the number of increases or your stitch tension. Consistency here is key to ensuring your pouf sits evenly on the floor.
Think about how the size of the base affects the overall pouf size. Do you want a wider, squat pouf or a taller, narrower one? Adjust your rounds accordingly before moving on to the sides.
Building The Sides
Building the sides of your large floor pouf is a crucial part of the crochet process. This step shapes the pouf and determines how sturdy and comfortable it will be. Paying close attention to stitch increases and shape maintenance ensures your pouf looks polished and holds up well over time.
Increasing Stitches Evenly
Even stitch increases keep your pouf’s sides smooth and round. If you add stitches unevenly, the sides can become lumpy or misshapen. Count your stitches regularly and space increases out evenly across each round.
A good way to remember where to add stitches is to mark your starting point and divide the round into equal sections. For example, if you need to add 8 stitches in a round of 40, try to place an increase every 5 stitches. This keeps the growth balanced.
Have you ever tried increasing randomly? You’ll notice the side flares or dents, making your pouf look uneven. Taking the time to increase evenly pays off with a neat, professional finish.
Maintaining Shape
Keeping the shape consistent as you build the sides means avoiding too many or too few increases in one area. Check your work frequently by laying it flat or holding it up to see if it bulges or caves in.
If you spot any irregularities, adjust your stitch count in the next few rounds to correct the shape. Sometimes, adding a few decreases or skipping an increase can fix minor issues. Remember, your hands can feel if the tension is too tight or loose, so listen to that feedback.
Think about the final look you want. Should the sides be straight or slightly tapered? Adjust your stitches accordingly to match your vision. This control over shape is what makes your handmade pouf stand out.

Credit: yarnandchai.com
Adding Height
Adding height to your large floor pouf creates a comfortable and stylish seat. It changes the pouf from a flat cushion to a functional piece of furniture. The key lies in building the body with careful crochet work. Each round of stitches adds volume and shape.
Crocheting The Body
Start by making a sturdy base with a tight stitch. Use thick yarn and a large hook for a solid foundation. Work in continuous rounds to keep the shape even. Increase stitches gradually to widen the pouf’s diameter.
After reaching the desired width, stop increasing stitches. Keep crocheting the same number of stitches per round to build height. This step forms the sides of the pouf. The height depends on how many rounds you add.
Consistent Stitch Patterns
Maintain the same stitch pattern throughout the body. Consistency ensures the pouf looks neat and balanced. Use simple stitches like single or half-double crochet for uniform texture.
Count stitches each round to avoid accidental increases or decreases. This prevents the pouf from becoming uneven or lopsided. Consistent tension also helps keep the height steady and smooth.
Closing The Pouf
Closing the pouf is a key part of the crochet process. It shapes the pouf and keeps the stuffing inside. This step requires care to ensure a neat and secure finish. Two main tasks help in closing your large floor pouf: decreasing stitches and the final stitch closure.
Decreasing Stitches
To close the pouf, start by decreasing stitches gradually. This reduces the circumference and helps the pouf take its round shape. Use simple crochet decreases like single crochet two together (sc2tog).
- Insert the hook into the next stitch.
- Yarn over and pull through.
- Insert the hook into the following stitch.
- Yarn over and pull through.
- Yarn over and pull through all loops on the hook.
Repeat this pattern around the pouf’s edge. Each round will have fewer stitches. This draws the sides closer together without puckering.
Final Stitch Closure
Once the stitch count is very low, stop crocheting. Leave a long tail of yarn. Use a yarn needle to thread this tail through the remaining stitches.
- Insert the needle through each stitch around the edge.
- Pull the yarn tight to close the opening.
- Secure with a knot to keep it from loosening.
- Weave in the yarn tail inside the pouf for a clean look.
This final closure seals the pouf firmly. It keeps the stuffing safe inside. Your large floor pouf now looks smooth and complete.

Credit: yarnandchai.com
Stuffing And Finishing
Fill the pouf firmly with soft stuffing to keep its shape and comfort. Close the opening neatly, sewing the edges tightly for a smooth finish.
Stuffing and finishing your large floor pouf is an exciting step that brings your crochet project to life. It’s where your creation transforms from a flat piece of work to a plush, inviting feature in your home. This phase is all about finding the right materials, getting the stuffing just right, and ensuring your pouf is securely closed for long-lasting enjoyment.Choosing Filling Materials
Selecting the right filling material is crucial for your pouf’s comfort and durability. You want something that will provide support but also allow the pouf to keep its shape. Common options include polyester fiberfill, old blankets, or even fabric scraps. You might be tempted to use bean bag filling, but these can flatten over time. Consider the weight and feel you desire. For a firmer pouf, use tightly packed materials like foam pieces.Inserting The Stuffing
Start by opening up the pouf enough to insert your hand. Gradually add small amounts of stuffing to ensure even distribution. Use your hand to push the filling into every corner. Adjust as you go to maintain the shape. It’s like creating a pillow—too little stuffing and it will sag, too much and it might burst at the seams.Securing The Pouf
Once filled to your satisfaction, it’s time to secure the opening. Use a yarn needle and matching yarn to stitch the opening closed. Make sure your stitches are tight to prevent any stuffing from escaping. A double knot at the end provides extra security. How will you personalize your pouf’s closure? A decorative stitch could add a unique touch that reflects your personal style.Care Tips
Taking care of your large floor pouf keeps it looking fresh and comfy for years. Simple habits can protect your handiwork and maintain its charm. Let’s dive into practical tips that make cleaning and shape maintenance easy and effective.
Cleaning The Pouf
Regularly dust your pouf with a soft brush or vacuum using a gentle upholstery attachment. This prevents dirt from settling deep into the yarn.
If your pouf gets a stain, act fast. Blot the spot with a clean cloth and mild soap mixed with water. Avoid rubbing hard, as this can damage the crochet fibers.
For a deeper clean, hand wash the cover if it’s removable, using cold water and gentle detergent. Air dry flat to keep the shape intact.
Maintaining Shape
Your pouf’s shape depends on the stuffing you choose and how you handle it daily. Fluff it regularly to redistribute the filling evenly.
If your pouf feels flat, add more stuffing to restore its firmness. Don’t overfill; this can stretch the crochet stitches.
Think about rotating your pouf’s position often. This reduces wear on one side and helps it last longer.
Frequently Asked Questions
What Materials Are Needed To Crochet A Large Floor Pouf?
You need bulky yarn, a large crochet hook, stuffing, and a yarn needle. Choose soft, durable yarn for comfort and durability.
How Long Does It Take To Crochet A Large Floor Pouf?
Crocheting a large floor pouf usually takes 6 to 10 hours. Time varies by skill level and crochet speed.
What Stitch Is Best For A Sturdy Floor Pouf?
Single crochet stitch is ideal for a sturdy pouf. It creates a tight, durable fabric that holds shape well.
Can I Customize The Size Of My Crochet Pouf?
Yes, adjust the number of stitches and rounds to change size. Larger poufs need more yarn and stuffing.
Conclusion
Crocheting a large floor pouf is a fun and useful project. You can create a cozy seat or footrest with simple steps. Using the right yarn and tools makes the process easier. Take your time and enjoy each stitch you make.
This pouf adds comfort and style to any room. Give yourself pride in making something with your own hands. Soon, you will have a unique piece that fits your space perfectly. Keep practicing, and your skills will grow with every project.
Happy crocheting!


