
Are you ready to transform your walls with stunning 3D panels but worried about cutting them perfectly? Cutting 3D wall panels can seem tricky, but with the right tips and tools, you can do it yourself easily and confidently.
Imagine creating seamless designs that fit your space exactly the way you want. In this guide, you’ll discover simple steps to cut your panels without damage or frustration. Keep reading, and you’ll learn how to achieve professional-looking results that make your walls stand out.
Choosing The Right Tools
Choosing the right tools makes cutting 3D wall panels easier and neater. The tools depend on the size and detail of the cuts. Small, simple cuts need different tools than large, precise ones. Safety gear is also crucial to protect yourself during the cutting process.
Hand Tools For Small Cuts
Hand tools work well for small or simple cuts on 3D wall panels. A utility knife can score and snap thinner panels cleanly. A fine-toothed saw helps cut thicker panels carefully. These tools give control for detailed trimming and shaping.
- Utility knife for scoring and snapping
- Fine-toothed saw for thicker panels
- Measuring tape for accurate marking
- Straight edge for guiding cuts
Power Tools For Precision
Power tools speed up the cutting process and improve accuracy. A jigsaw with a fine blade cuts curves and angles smoothly. A circular saw gives straight, fast cuts on large panels. Use clamps to hold panels steady while cutting. Choose blades designed for foam or plastic materials.
- Jigsaw with fine blade for curves
- Circular saw for straight cuts
- Clamps to secure panels
- Blades suited for foam or plastic
Safety Equipment Essentials
Safety gear protects from dust, debris, and sharp tools. Wear safety goggles to shield your eyes. Use a dust mask to avoid breathing fine particles. Gloves protect your hands from cuts and scrapes. Work in a well-ventilated area to reduce dust buildup.
- Safety goggles for eye protection
- Dust mask to prevent inhaling particles
- Gloves for hand safety
- Ventilated workspace to reduce dust
Credit: www.homedepot.com
Preparing The Panels
Preparing 3D wall panels before cutting is a crucial step that sets the tone for a smooth installation. Taking your time here prevents mistakes and saves you from wasting valuable materials. Let’s talk about how you can get your panels ready to cut with precision and confidence.
Measuring And Marking
Accurate measurement is your best friend. Use a reliable tape measure to record the exact dimensions where your panel needs trimming.
Mark the cut lines clearly with a pencil or chalk. Sharp, visible lines help you stay on track, especially with complex 3D designs.
- Double-check measurements before marking to avoid errors.
- Consider marking both the front and back sides if your panel is thick.
Have you noticed how a small miscalculation can throw off the entire pattern? Taking a moment to measure twice can save you frustration later.
Securing Panels For Cutting
Keeping your panel steady is key to a clean cut. Place it on a flat surface like a workbench or sawhorses.
Use clamps to hold the panel firmly in place. This prevents shifting that can ruin your cut or damage the panel’s texture.
- Soft padding between clamps and panel protects the 3D surface.
- If clamps aren’t available, heavy objects can work temporarily, but ensure the panel won’t slip.
Imagine trying to cut a sliding puzzle—it’s frustrating and risky. Securing your panel means you’re in control, and your cuts will look professional every time.
Cutting Techniques
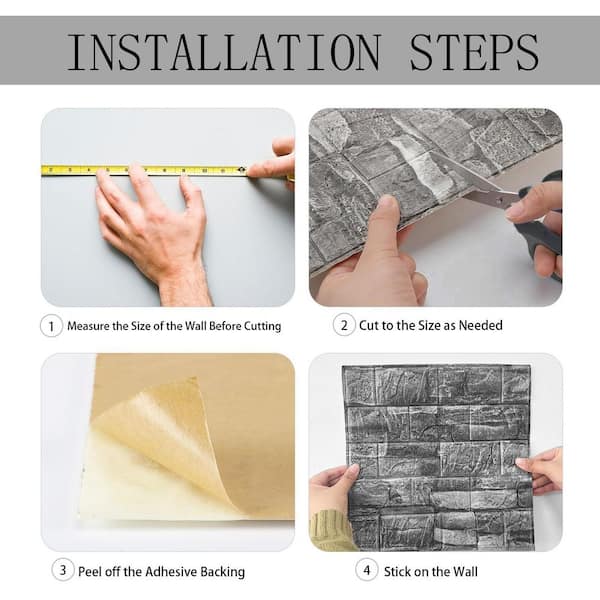
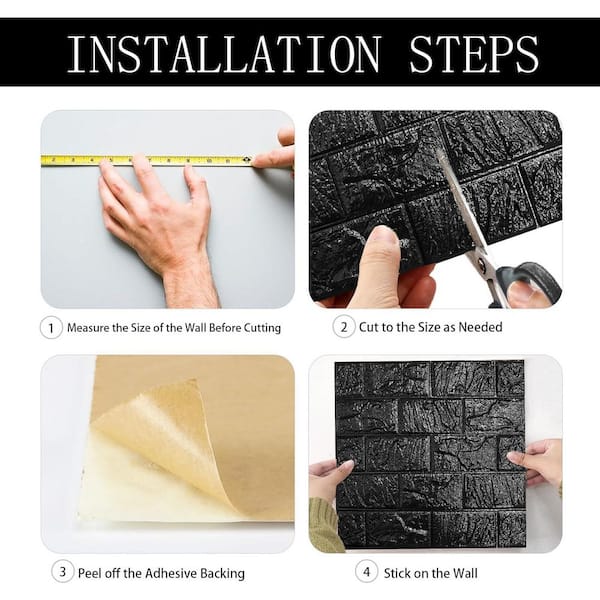
Cut 3D wall panels using a sharp utility knife or saw for clean edges. Measure and mark carefully before cutting to avoid mistakes. Smooth rough edges with sandpaper to ensure a neat finish.
Cutting 3D wall panels can be a rewarding DIY project, but it requires the right techniques to ensure precision and a professional finish. Whether you’re updating your living space or tackling a commercial project, understanding the best cutting techniques is crucial. With the right approach, you can transform ordinary walls into stunning visual displays.Straight Cuts
Achieving a clean straight cut is fundamental. Use a sharp utility knife and a metal ruler for accuracy. Always score the panel gently before applying more pressure to cut through. For thicker panels, a table saw or circular saw with a fine-tooth blade works wonders. Ensure the panel is securely clamped to prevent movement. This ensures a clean edge and reduces material waste. Patience is key. Rushing can lead to uneven edges and a less professional look. Take your time to measure twice and cut once.Curved And Intricate Cuts
For curved or intricate designs, a jigsaw with a fine blade offers precision. Start with a template or stencil to outline your design on the panel. This step is crucial for maintaining symmetry and consistency. A rotary tool can be handy for small, detailed areas. It allows for greater control and can handle tight curves with ease. Test on a scrap piece first to get a feel for the tool and avoid costly mistakes. Remember, practice makes perfect. The more you work with your tools, the more confident you’ll become in achieving those complex shapes.Handling Different Materials
Different materials require different approaches. Wood panels may need a saw, while PVC or foam panels can often be cut with a utility knife. When working with MDF, consider using a circular saw for straight cuts and a jigsaw for curves. MDF dust can be harmful, so always wear a mask and goggles for safety. Composite materials may pose a challenge due to their density. A carbide-tipped blade can help ensure a smooth cut. Always check the manufacturer’s guidelines for cutting recommendations. Have you encountered a challenging material? Adjust your tools and techniques accordingly to ensure a seamless finish.Smoothing And Finishing Edges
Smoothing and finishing edges after cutting 3D wall panels is essential for a clean, professional look. Rough edges can spoil the design and cause damage to the surface or walls. Proper finishing makes the panels safe to handle and improves their durability. It also helps the paint or sealant adhere better, ensuring long-lasting results.
Sanding Tips
Use fine-grit sandpaper to smooth the cut edges gently. Avoid heavy sanding that might damage the panel’s surface. Sand in a circular motion for an even finish. Check edges frequently to avoid over-sanding. A sanding block can help maintain a flat, consistent edge. Clean dust off the edges with a soft brush or cloth before moving to the next step.
Sealing And Painting Edges
Apply a primer or sealant to the sanded edges to protect them. Choose a sealant compatible with the panel material for best results. Let the sealant dry fully before painting. Use paint that matches the panel color or design for a seamless look. Thin coats of paint work better and reduce drips. Allow each coat to dry before applying the next one.
Common Mistakes To Avoid
Cutting 3D wall panels requires care and attention. Many beginners make simple mistakes that cause poor results or waste materials. Avoiding these errors saves time and money. Understand common pitfalls to achieve clean, precise cuts.
Cutting Without Proper Measurements
Skipping accurate measurements leads to uneven panels and gaps. Measure twice before cutting once. Use a reliable tape measure and mark cut lines clearly. Check measurements against the wall space to ensure a perfect fit. Avoid guessing or rushing through this step.
Ignoring Safety Precautions
3D wall panels often require power tools for cutting. Not wearing safety gear increases injury risk. Always use goggles to protect your eyes from dust and debris. Wear gloves to avoid cuts and a mask to prevent inhaling particles. Keep your workspace clean and well-lit for better control.
Credit: woodywalls.com
Maintaining Your Tools
Maintaining your tools is essential for achieving clean, precise cuts on 3D wall panels. Dull or dirty tools can cause uneven edges and even damage the panels. Taking time to care for your equipment ensures better results and extends the life of your tools.
Cleaning After Use
After cutting your 3D wall panels, always clean your tools immediately. Dust and residue can build up quickly, making blades less effective and causing rough cuts next time.
Use a soft brush or cloth to remove sawdust and debris. For stubborn residue, a mild solvent can help, but avoid harsh chemicals that might damage the tool.
Have you noticed how a clean tool feels smoother and easier to handle? Keeping your workspace tidy also reduces the risk of accidents and improves your overall efficiency.
Sharpening Blades
Dull blades are the enemy of precision. Sharpen your cutting blades regularly to keep them razor-sharp and ready for any project.
You can use a sharpening stone or a specialized blade sharpener, depending on the type of tool you have. Sharpen only as much as needed—over-sharpening can wear the blade down faster.
Think about the last time you struggled with a dull blade—was the frustration worth it? Investing a few minutes in sharpening saves you hours of fixing uneven cuts later.

Credit: woodywalls.com
Frequently Asked Questions
How Do You Measure 3d Wall Panels For Cutting?
Measure the wall space carefully before cutting. Use a tape measure and mark the panel with a pencil. Accurate measurements ensure a perfect fit and reduce material waste.
What Tools Are Best For Cutting 3d Wall Panels?
A utility knife or a fine-toothed saw works well. For thicker panels, use an electric jigsaw. These tools provide clean, precise cuts and reduce panel damage.
Can I Cut 3d Wall Panels Without Damaging Designs?
Yes, use gentle, steady cutting motions. Avoid rushing or applying too much pressure. This preserves the panel’s texture and overall appearance.
How Do I Cut Curved Or Irregular Shapes On 3d Panels?
Use a flexible ruler to mark curves. Cut slowly with a jigsaw or utility knife. Precision and patience help maintain panel integrity and design flow.
Conclusion
Cutting 3D wall panels is easier than it seems. Use the right tools and measure carefully. Take your time to make clean cuts. Smooth edges help the panels fit perfectly. Always wear safety gear to protect yourself. Practice on a scrap piece before cutting the final panel.
This way, you avoid mistakes and save material. With patience and care, your wall will look great. Enjoy your new 3D wall panels and the fresh style they bring.


