
Are you ready to transform your walls with stunning cling plastic stickers but unsure how to cut them perfectly? Cutting these stickers the right way can make all the difference between a messy look and a flawless finish.
In this guide, you’ll discover simple, step-by-step techniques that anyone can follow to get clean, precise cuts every time. Imagine how easy it will be to create eye-catching wall art that fits your space exactly how you want. Keep reading, and you’ll learn tips that save you time, avoid frustration, and bring your walls to life like never before.
Tools Needed
Cutting cling plastic stickers for wall art needs the right tools. Using proper tools ensures clean cuts and smooth edges. It also saves time and avoids damage to the stickers. Prepare your workspace with these tools to get the best results.
Choosing The Right Cutter
A sharp cutter is essential for cutting cling plastic stickers. A craft knife or a precision blade works best. These cutters offer control and accuracy on detailed designs. Avoid scissors as they can tear the plastic or create uneven edges. Choose a cutter with a comfortable handle to reduce hand fatigue.
Additional Supplies
- Cutting mat: Protects your surface and keeps the blade sharp.
- Ruler: Helps make straight, precise cuts.
- Tape: Holds the sticker in place while cutting.
- Soft cloth: Cleans the sticker and removes dust.
Having these supplies ready will make your cutting process easier and cleaner. Each tool plays a role in achieving professional-looking wall art.
Preparing The Workspace
Preparing the workspace is a key step before cutting cling plastic stickers for wall art. A well-organized area helps you work safely and precisely. It also reduces mistakes and saves time. Setting up the right environment makes the cutting process smooth and enjoyable.
Clean And Flat Surface
Choose a surface that is flat and sturdy. A table or desk works best. Wipe it clean to remove dust and dirt. Dust can stick to the plastic and ruin the design. A clean space keeps the stickers smooth and easy to cut.
Make sure the surface is large enough for your materials. This gives you room to spread out and work comfortably. Avoid clutter to prevent accidents or damage to your stickers.
Good Lighting
Bright light helps you see the sticker details clearly. Natural daylight is ideal. If not available, use a bright lamp. Position the light so it does not cast shadows on your work.
Good lighting reduces eye strain and helps you cut with accuracy. Check that the light covers the entire workspace evenly. This makes every cut precise and clean.
Measuring And Marking
Measure the sticker carefully to fit your wall space perfectly. Mark cutting lines clearly with a pencil or marker for precise edges. Accurate measuring and marking ensure a clean, neat finish for your wall art.
Measuring and marking are crucial steps in cutting cling plastic stickers for wall art. Precise measurements ensure your stickers fit perfectly on your walls. Accurate marking guides your cuts, preventing mistakes. Both processes demand attention to detail and patience.Taking Accurate Measurements
Use a measuring tape to determine your wall space. Measure both height and width. Ensure your measurements are correct to avoid errors. Write down the dimensions on a piece of paper. Double-check your figures for accuracy.Marking Cut Lines
Lay the cling plastic stickers on a flat surface. Use a pencil to mark the cut lines. Follow your measurements closely. A ruler or straight edge can help keep lines straight. Make sure marks are clear and easy to see.
Credit: www.stickeryou.com
Cutting Techniques
Cutting cling plastic stickers for wall art requires precision and the right techniques. The way you cut determines how clean and professional your final design looks. Let’s break down the best approaches to handle both simple and complex shapes.
Straight Cuts
Straight cuts are the easiest to master and essential for creating neat edges. Use a sharp craft knife or a pair of fine scissors to get crisp lines. Always cut on a flat, stable surface to avoid jagged edges or mistakes.
To keep your lines perfectly straight, try using a ruler as a guide. This helps you maintain control and prevents slipping. Have you noticed how much smoother your cuts become when you slow down and focus on accuracy instead of speed?
Curved And Intricate Cuts
Curved and detailed shapes can feel intimidating, but the right tools make a huge difference. Small, sharp scissors or a precision craft knife work best here. Take your time and make small, controlled snips instead of trying to cut the entire curve in one go.
It helps to practice on scrap material first. This builds your confidence and improves your hand steadiness. Are you surprised how much easier intricate cuts get once you break them down into tiny sections?
Remember, patience is key. Rushing intricate cuts often leads to tearing or uneven edges. Keep your workspace well-lit and take breaks if your hand starts to shake.
Handling Mistakes
Mistakes happen, especially when working with cling plastic stickers wall art. Handling these errors calmly can save your project and prevent wasted materials. Knowing how to fix small issues or recognize when a fresh cut is necessary keeps your work looking sharp and professional.
Fixing Minor Errors
Sometimes, a sticker might have a tiny tear or an uneven edge after cutting. You can carefully trim small mistakes with a sharp craft knife or fine scissors to clean up the edges without ruining the design.
If a bubble or wrinkle appears during application, gently lift the sticker and smooth it out with a soft cloth or a plastic squeegee. This simple step often restores the sticker’s smooth finish.
Have you ever noticed a small misalignment in your design? You can reposition the sticker if it hasn’t fully adhered yet. Work slowly and patiently to avoid stretching or tearing the material.
When To Recut
Not all errors are fixable. If the cut lines are off or the design is distorted, recutting might be the best choice. It’s better to start fresh than to settle for a flawed piece that will affect the overall look.
Keep an eye on the quality of your blade and the settings on your cutting machine. Dull blades or incorrect pressure settings often cause imperfect cuts, so replacing the blade or adjusting settings before recutting can prevent repeated mistakes.
Ask yourself: Does the sticker still fit the wall space as intended? If the size or shape is wrong beyond minor adjustments, recutting ensures your artwork matches your vision perfectly.

Credit: www.vistaprint.ca
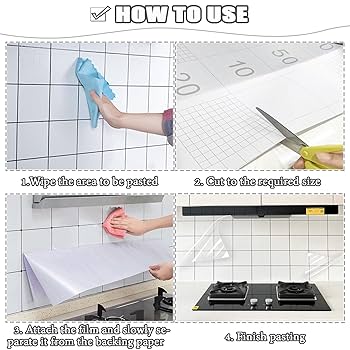
Applying The Cut Stickers
Applying cut cling plastic stickers to your wall requires care and attention. Proper application ensures the stickers look smooth and last longer. Follow simple steps to prepare and attach the stickers correctly. This process helps avoid bubbles and peeling.
Cleaning The Wall Surface
Start by cleaning the wall where you will apply the sticker. Use a mild soap and water solution. Wipe the area with a clean cloth to remove dust and grease. Let the wall dry completely before proceeding. A clean surface helps the sticker stick firmly.
Positioning And Sticking
Hold the sticker up to the wall without removing the backing. Check the placement and alignment carefully. Use painter’s tape to secure the sticker in place temporarily. Peel off the backing slowly, starting from one edge. Press the sticker onto the wall gently, smoothing out air bubbles.
- Use a soft cloth or squeegee to press firmly.
- Work from the center outward to avoid wrinkles.
- Remove any tape after the sticker is fully attached.
Maintenance Tips
Keeping your cling plastic stickers wall art looking fresh and intact requires some care. Simple maintenance can extend the life of your wall art and keep it vibrant. Let’s look at how you can clean and remove these stickers without causing damage.
Cleaning Wall Art
Dust and dirt can dull the appearance of your cling stickers. Use a soft, dry microfiber cloth to gently wipe the surface. Avoid harsh chemicals or abrasive materials that might scratch or degrade the plastic.
If you notice stubborn spots, dampen the cloth slightly with water and wipe carefully. Test a small, hidden area first to ensure no discoloration occurs. Frequent gentle cleaning prevents buildup and keeps your wall art looking new.
Removing Without Damage
Removing cling stickers requires patience to avoid peeling paint or leaving sticky residue. Start by lifting a corner slowly with your fingernail or a plastic card. Pull the sticker off gently at a low angle rather than tugging straight out.
If the sticker resists, warm it slightly with a hairdryer on low heat to loosen the adhesive bond. Avoid metal tools that can scratch your wall. After removal, clean any leftover adhesive with a mild soapy solution or adhesive remover safe for painted surfaces.
Have you ever removed a sticker only to find paint peeling off? Taking a slow, careful approach can save your wall from damage and make redecorating easier.

Credit: www.amazon.ca
Frequently Asked Questions
How Do I Prepare Cling Plastic Stickers For Cutting?
Clean the sticker surface and ensure it’s dry. Use a sharp craft knife or scissors for precise cuts. Secure the sticker on a flat surface to avoid slipping.
What Tools Work Best To Cut Cling Plastic Stickers?
Sharp craft knives, precision scissors, or cutting machines like Cricut offer clean cuts. Avoid dull blades to prevent jagged edges and tearing.
Can I Cut Cling Plastic Stickers Into Custom Shapes?
Yes, you can cut stickers into any shape. Trace your design lightly, then carefully cut along the lines for custom wall art.
How Do I Avoid Damaging Wall Art While Cutting Stickers?
Use a cutting mat underneath to protect surfaces. Cut slowly and steadily to maintain clean edges and avoid tearing the sticker material.
Conclusion
Cutting cling plastic stickers for wall art is simple with the right steps. Use sharp scissors or a craft knife for clean edges. Take your time to measure and cut carefully. Clean the wall surface before applying stickers for better hold.
Peel and stick gently to avoid wrinkles or bubbles. Small mistakes can be fixed easily with patience. Enjoy decorating your space with your personalized wall art. This project brings creativity and fun to any room. Keep practicing to improve your cutting skills each time.


