
Are your Christmas lights not shining as bright as they should? It’s frustrating when a string of lights goes out just as you’re getting ready to decorate.
But before you toss them aside and buy new ones, there’s good news: you can fix them yourself. Imagine saving money, avoiding waste, and bringing back that warm holiday glow with just a few simple steps. In this guide, you’ll discover easy tricks to troubleshoot and repair your Christmas light string quickly.
Ready to bring your decorations back to life? Let’s get started!

Credit: blog.1000bulbs.com
Common Issues With Christmas Lights
Christmas lights bring joy but often face common issues. These problems stop the lights from glowing as they should. Fixing these problems helps keep the holiday spirit bright. Understanding each issue saves time and effort during decoration.
Burned Out Bulbs
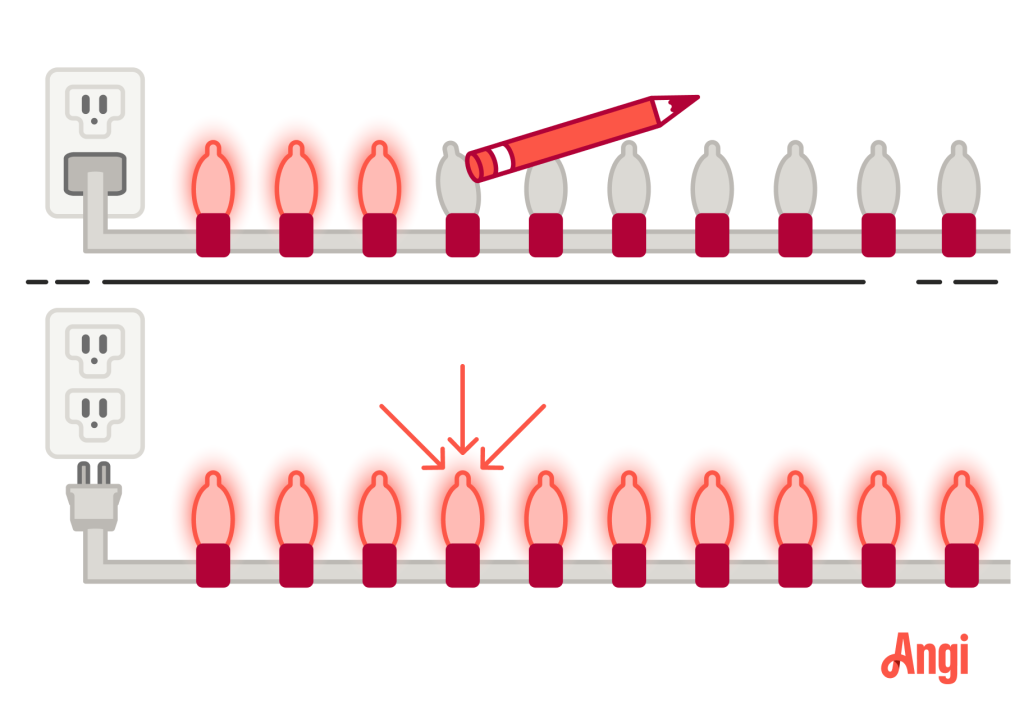
A single burned out bulb can cause the whole string to fail. Bulbs can burn out from use or old age. Check each bulb carefully to spot the dark or broken ones. Replace burned out bulbs with the correct size and type. Using the wrong bulb may cause more problems.
Broken Wires
Wires can break from bending or pulling too hard. Broken wires stop electricity from reaching bulbs. Look for cuts, cracks, or exposed wire on the string. Use electrical tape or wire connectors to fix small breaks. Replace the string if the damage is large or unsafe.
Loose Connections
Loose connections happen where bulbs fit into sockets or plugs join. These loose spots create flickering or no light. Press bulbs firmly into sockets and check plug connections. Clean dirty contacts to improve connection. Tighten or replace parts to ensure steady power flow.
Tools Needed For Repair
Fixing a Christmas light string requires some simple tools. Having the right tools helps find and fix problems fast. These tools protect the lights and the person repairing them.
Below are the basic tools and safety gear you need for repairing Christmas lights.
Basic Tools
- Multimeter – Checks electrical flow and finds broken bulbs.
- Wire cutters – Cuts damaged wires cleanly.
- Wire strippers – Removes insulation without damaging wires.
- Electrical tape – Insulates repaired wire connections.
- Replacement bulbs – Matches the original size and voltage.
- Screwdriver – Opens light sockets or covers.
- Needle-nose pliers – Helps hold small parts and wires.
Safety Gear
- Insulated gloves – Protect from electric shocks.
- Safety glasses – Shield eyes from wire ends or debris.
- Non-conductive footwear – Reduces risk of electric shock.
- Work in a dry area – Avoids accidents with electricity and water.
Identifying The Problem
Identifying the problem in a string of Christmas lights can save you time and hassle. Knowing which part needs attention is crucial for a quick fix. Let’s explore how to pinpoint the issue effectively.
Testing The Light String
First, plug the light string into a power source. Observe whether the whole string remains dark or only some sections light up. This will help you determine if the issue is with the entire string or specific areas.
If the string doesn’t light up, try a different outlet. Sometimes the problem lies with the power source. Use a voltage tester to ensure the outlet is working properly.
Spotting Faulty Bulbs
Examine each bulb carefully. Look for dark or burnt filaments. These bulbs are likely the culprits causing the string to malfunction.
Replace any suspect bulbs with new ones. Ensure the replacement bulbs match the voltage and wattage of the original bulbs.
Checking The Fuse
Locate the plug of the light string. Open the small compartment that houses the fuse.
Remove the fuse gently and inspect it for damage. A blown fuse will have a broken filament or appear dark.
Replace any faulty fuses with new ones of the same type and rating. Securely close the fuse compartment and test the light string again.

Credit: www.diychatroom.com
Step-by-step Repair Process
Repairing a Christmas light string can bring your holiday decorations back to life. The process requires care and simple tools. Follow clear steps to find and fix common issues. This guide helps with bulbs, wires, and connections.
Replacing Burned Out Bulbs
Burned out bulbs often cause the whole string to fail. Start by unplugging the lights for safety. Check each bulb carefully. Look for dark spots or broken filaments inside the bulb.
Remove the faulty bulb by gently twisting or pulling it out. Insert a new bulb of the same type and size. Make sure the replacement fits snugly. Plug in the lights to test if the string works.
Fixing Broken Wires
Broken wires stop electricity flow and cause dark spots. Find the damaged section by inspecting the string closely. Look for cuts, frays, or exposed copper wire.
Use wire strippers to remove a small section of insulation on both sides of the break. Twist the exposed wires together tightly. Cover the repair with electrical tape or heat shrink tubing. Avoid leaving wire exposed. Test the string again to ensure power flows.
Securing Loose Connections
Loose connections can cause flickering or partial outages. Check all bulb sockets and plugs for snug fits. Press bulbs firmly into their sockets. If a socket looks damaged, replace it or adjust the wiring.
Inspect the plug and outlet connections. Unplug and replug to improve contact. Clean any dirt or corrosion. Secure connections prevent interruptions and keep lights shining bright.
Preventing Future Issues
Preventing future issues with your Christmas light strings starts with good habits that protect the bulbs and wiring. Small actions can save you the frustration of untangling knots or dealing with broken bulbs next holiday season. Let’s look at how you can keep your lights in top shape year-round.
Proper Storage Tips
Where and how you store your Christmas lights matters more than you might think. Avoid stuffing the entire string into a box or drawer, which can cause tangles and damage the wires.
Instead, try these storage ideas:
- Wrap the lightsaround a sturdy piece of cardboard or a plastic spool to keep them neat.
- Use zip ties or twist tiesto secure sections and prevent loose loops.
- Store in a cool, dry placeaway from direct sunlight and moisture to prevent corrosion.
I once tossed my lights in a bin without care, only to spend hours untangling them the next year. Since switching to wrapping them on a spool, setup has become much quicker.
Regular Maintenance
Checking your lights throughout the year helps catch problems early before they become bigger headaches. You don’t have to wait until December to spot a broken bulb or frayed wire.
Try these quick maintenance tips:
- Test each stringbefore storing it away to ensure every bulb works.
- Replace burnt-out or damaged bulbsimmediately to keep the circuit intact.
- Inspect wires for cracks or wearand avoid using strings with exposed wiring.
Ask yourself—how much time could you save next year if you caught these issues early? Spending a few minutes now can make your holiday decorating much smoother.

Credit: www.cbc.ca
Frequently Asked Questions
How Do I Identify A Broken Bulb In Christmas Lights?
To find a broken bulb, carefully inspect each light for cracks or dark spots. Replace any damaged bulbs to restore the string’s function.
Why Are Some Christmas Lights Not Lighting Up?
Lights may not light due to a loose bulb, blown fuse, or damaged wire. Check each component and replace faulty parts.
How Can I Safely Test A Christmas Light String?
Plug the string into a power source and look for dark bulbs or flickering. Use a light tester for accurate diagnosis.
What Tools Do I Need To Fix Christmas Light Strings?
You’ll need replacement bulbs, fuses, a light tester, and electrical tape. These tools help identify and repair common issues efficiently.
Conclusion
Fixing a Christmas light string can save time and money. Start by checking bulbs and wires carefully. Replace any broken bulbs to restore the glow. Use a tester to find hidden faults. Keep safety in mind while working with electricity.
With patience and these simple steps, your lights will shine bright again. Enjoy a festive and well-lit holiday season without hassle. Remember, small repairs make a big difference in your decorations.


