
Are your holiday decorations looking dim because a string of lights won’t work? It’s frustrating when a single bulb or wire causes the whole set to go dark.
But don’t worry—you can fix it yourself, even if you’re not an expert. In this guide, you’ll discover simple, step-by-step ways to bring your lights back to life quickly and safely. Keep reading, and you’ll have your space shining bright in no time.

Credit: blog.1000bulbs.com
Common Issues With String Lights
String lights add charm to any space but often stop working. Knowing common issues helps fix them fast. Most problems come from bulbs, wires, or fuses. Troubleshooting these parts saves time and money. Understanding each issue makes repairs simple and safe.
Burned Out Bulbs
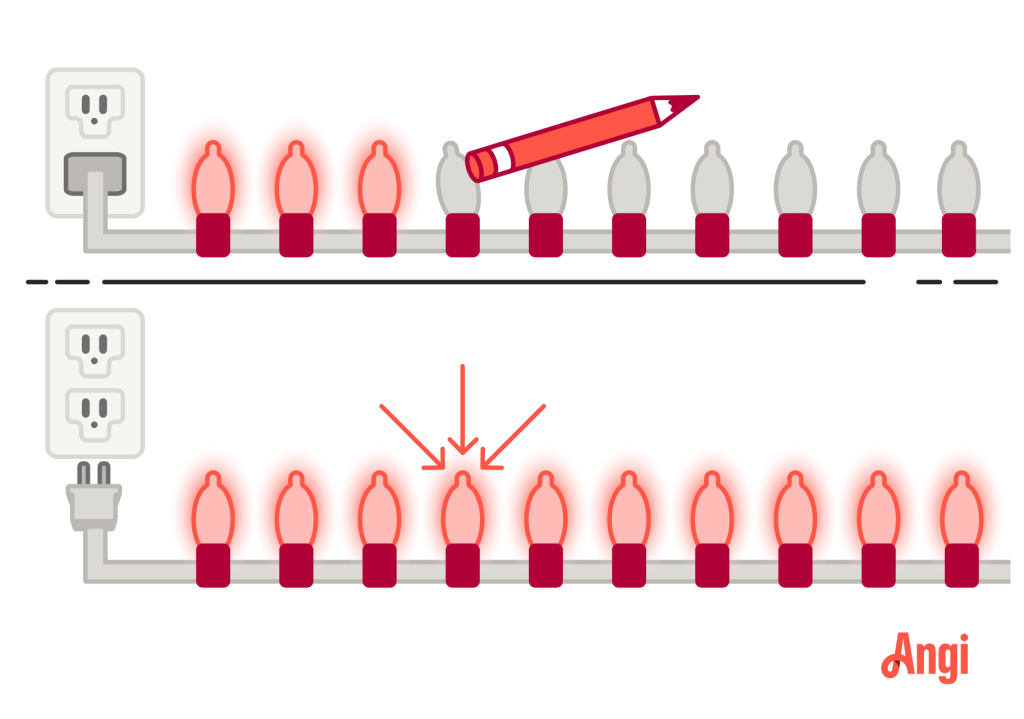
Burned out bulbs cause sections of lights to go dark. Bulbs can burn out from age or power surges. Replace bulbs with the exact size and type. Check bulbs carefully for blackened or broken filaments. Test each bulb by swapping with a working one.
Broken Wires
Broken wires stop electricity flow and cause outages. Look for cuts, frays, or exposed wires along the string. Damaged wires can be fixed with electrical tape or wire connectors. Always unplug lights before repairing wires to avoid shocks. Keep wires dry to prevent corrosion and breaks.
Faulty Fuses
Faulty fuses block electricity and prevent lights from working. Fuses are inside the plug or control box. Remove the fuse carefully and check if the wire inside is broken. Replace blown fuses with ones matching the correct amperage. Using the wrong fuse can cause damage or fire risks.
Tools You’ll Need
Fixing a string of lights requires the right tools. Having these tools ready saves time and reduces frustration. It also helps you work safely and effectively. Gather your tools before starting the repair to keep everything organized.
Basic Repair Kit
- Wire cutters and strippers for trimming and exposing wires
- Electrical tape to insulate repaired sections
- Replacement bulbs matching your light string
- Multimeter to check for electrical continuity and faults
- Small screwdriver for opening bulb sockets or connectors
- Spare fuses designed for your light set
Safety Gear
- Insulated gloves to protect from electric shocks
- Safety glasses to shield eyes from debris
- Non-conductive ladder if you need height access
- Work in a dry area to avoid electric hazards
Preparing For Repairs
Gather necessary tools like a multimeter and replacement bulbs before starting. Unplug the lights to ensure safety during repair. Check the entire string carefully to find broken or loose parts.
Preparing for Repairs Before jumping into the nitty-gritty of fixing a string of lights, it’s crucial to set the stage for a successful repair. Begin by gathering all necessary tools, such as replacement bulbs, a voltage tester, and a screwdriver. Having everything ready will save you time and reduce frustration during the process.Unplugging And Inspecting
Safety first! Always unplug your string of lights before starting any repairs. This simple step prevents electrical shock and protects your lights from further damage. Once unplugged, lay the string out flat on a table or the floor. Carefully inspect the wires for any visible signs of wear, such as frayed wires or broken bulbs. This initial inspection can often reveal glaring issues that need immediate attention.Identifying The Problem Area
After your initial inspection, it’s time to pinpoint the problem area. Look for sections where the lights are dim or not lighting up at all. These are your primary suspects. Use a voltage tester to check the flow of electricity through the string. Start from the plug and work your way down the line. This will help you identify the exact spot where the current stops, guiding you to the root of the problem. Is there a specific section that seems problematic? Often, just a single faulty bulb can disrupt the entire string. Replacing that one bulb can sometimes be all it takes to restore the glow. Remember, a methodical approach saves time and effort.Fixing Burned Out Bulbs
Fixing burned out bulbs in a string of lights can restore its glow quickly. A single faulty bulb often causes the entire string to dim or go out. Locating and replacing that bulb brings the lights back to life. The process is simple and requires only basic tools and care.
Finding The Faulty Bulb
Start by unplugging the lights for safety. Check the bulbs for any that look blackened or broken. A bulb with a dark or cloudy appearance often means it is burned out. Gently press each bulb to see if it is loose. Loose bulbs can cause the string to stop working.
Use a bulb tester or replace bulbs one by one if you can’t see damage. Test each bulb by removing it and inserting a new one. The lights will turn on when the faulty bulb is replaced. This process narrows down the problem quickly.
Replacing Bulbs Safely
Always unplug the light string before replacing bulbs. Use gloves or a cloth to avoid skin oils on bulbs. Oils can cause bulbs to burn out faster. Insert the new bulb firmly but gently into the socket.
- Match the new bulb with the correct size and voltage.
- Do not force bulbs into sockets to avoid damage.
- Check for any damage to wires or sockets before plugging back in.
Once all replacements are done, plug the lights in and test. Proper handling ensures the lights last longer and work safely.
Repairing Broken Wires
Repairing broken wires in a string of lights can feel tricky, but it’s often simpler than you think. Identifying the exact spot where the wire is damaged is the first key step. Once found, using the right materials to fix the break will restore your lights safely and effectively.
Locating Wire Damage
Start by carefully inspecting the entire length of the string. Look for visible signs like cuts, frays, or exposed wire. Sometimes, the damage is hidden under the insulation, so gently flex the wire to feel for weak spots or breaks.
If your lights have a section that won’t light up, that’s often where the problem lies. You can also test the string by plugging it in and carefully moving the wires to see if the lights flicker or come on. This simple test can pinpoint the break without needing special tools.
Using Electrical Tape And Connectors
Once you find the damaged wire, carefully strip about half an inch of insulation from both ends of the break. Twist the exposed wires together tightly to ensure a good connection.
Next, wrap the repair area with electrical tape to insulate it thoroughly. Alternatively, using wire connectors or crimp connectors adds extra security and durability to the fix.
- Make sure no bare wire is exposed after wrapping or connecting.
- Choose connectors rated for outdoor use if your lights are outside.
- Double-check your repair by plugging the string back in before finalizing the tape or connector seal.
Have you ever thought about how many small breaks go unnoticed until a whole section stops working? Taking the time to carefully check and repair wires can save you money and keep your lights shining bright longer.

Credit: www.familyhandyman.com
Replacing Fuses
Replacing fuses is a common fix for a string of lights that suddenly stops working. Fuses protect the lights from electrical surges. When a fuse blows, it breaks the circuit and turns off the lights. Finding and replacing the right fuse can bring your lights back to life quickly and safely.
Checking Fuse Type
Locate the fuse compartment on the plug of your light string. It usually has a small door or cover. Inside, you will find one or two small glass or plastic fuses. Check the label or the fuse itself for numbers and letters. These indicate the fuse type and rating.
Common types include:
- AGC or AGW fuses
- 3 Amp or 5 Amp ratings
- 250 Volt maximum
Use the exact same type and rating when buying a replacement fuse. Using the wrong fuse can cause damage or safety hazards.
Safe Fuse Replacement
Unplug the lights before opening the fuse compartment. Handle the fuse carefully to avoid breaking it. Use a small screwdriver or your fingernail to open the fuse holder door. Remove the blown fuse and check for a broken filament inside.
Insert the new fuse firmly into the holder. Make sure it fits snugly and the holder closes properly. Plug the lights back in and test them. If the new fuse blows immediately, a deeper electrical problem may exist.
Always keep spare fuses on hand for quick fixes. Store them in a dry, safe place for future use.
Testing The Lights After Repair
Testing the lights after repair is a crucial step. It confirms the fix worked and ensures safety. Carefully checking the string helps avoid future problems. The process is simple and quick. Follow these guidelines for best results.
Plugging In And Monitoring
Plug the string of lights into a power outlet. Watch the lights closely as they turn on. Look for any bulbs that stay dark or flicker. Check if all sections light up evenly. Listen for unusual sounds like buzzing or popping. Keep the lights on for several minutes. This helps spot hidden issues. If the lights work well, the repair is likely successful.
Troubleshooting Remaining Issues
If some bulbs do not light, inspect those bulbs first. Make sure each bulb is seated properly in its socket. Replace any bulbs that seem damaged or burnt out. Check the fuse in the plug and replace it if blown. Examine the wiring for loose connections or breaks. Use a multimeter to test electrical continuity if needed. Sometimes, swapping bulbs between sockets helps find the problem. Repeat the testing until all lights function correctly.
Preventive Tips For Long-lasting Lights
Keeping your string of lights in great shape doesn’t just happen by chance. You need to take some simple, regular steps to make sure they last through many seasons. Small efforts like how you store them or check them can save you time and frustration when you want to light up your space.
Proper Storage
How you put away your lights is just as important as how you use them. Avoid tangles and broken wires by wrapping them carefully around a sturdy object or using a storage reel. Loose knots and sharp bends can cause damage, so keep your string of lights straight and secure.
Store them in a dry, cool place away from direct sunlight or extreme temperatures. Moisture can cause corrosion and shorten the life of your bulbs. Have you ever found a set ruined because they were left in a damp box? That’s exactly what proper storage prevents.
Regular Maintenance
Don’t wait until a bulb goes out to check your lights. Look over your string regularly for signs of wear like frayed wires, loose bulbs, or corrosion at the sockets. Fixing a small issue early can keep your entire set working longer.
Cleaning your lights gently with a soft cloth removes dust and grime that can reduce brightness and cause overheating. Unplug before maintenance to stay safe. Do you give your lights a quick once-over before each use? This habit can save you from unexpected outages.

Credit: www.youtube.com
Frequently Asked Questions
How Do I Test A String Of Lights For Faults?
Use a multimeter to check continuity on each bulb and wire. Replace any broken bulbs or repair damaged wires.
What Causes A String Of Lights To Stop Working?
Common causes include blown bulbs, loose connections, or damaged wiring. Inspect each part carefully for visible issues.
Can I Fix Broken Bulbs On Holiday Lights?
Yes, replace broken bulbs with exact matches. Using incorrect bulbs can cause further damage or safety risks.
How Do I Safely Repair Frayed Or Damaged Light Cords?
Unplug the lights first. Use electrical tape or wire connectors to cover exposed wires securely and prevent shocks.
Conclusion
Fixing a string of lights is easier than it seems. Check bulbs one by one to find the problem. Replace any broken or loose bulbs carefully. Test the lights after each fix to see if they work. Always unplug the string before starting repairs.
With patience and simple steps, you can bring your lights back to life. Enjoy bright, glowing decorations again without stress or extra cost. Keep these tips handy for future light troubles. Brighten your space safely and easily!


