
Looking to add a stylish touch to your space with a pendant light? Hanging the cord correctly can make all the difference between a professional look and a messy tangle.
You might think it’s complicated, but it’s easier than you expect. In this guide, you’ll discover simple, step-by-step tips to hang your pendant light cord safely and neatly. By the end, you’ll have the confidence to transform your room and create a cozy, modern vibe.
Ready to get started? Let’s dive in.
Choosing The Right Pendant Light
Choosing the right pendant light is key to creating the perfect ambiance in your space. It’s not just about picking a fixture that looks good; you need to consider how it fits the room’s size, style, and function. Getting this right will make hanging the pendant light cord much easier and ensure your lighting looks intentional and polished.
Types Of Pendant Lights
Pendant lights come in a variety of styles to suit different needs. You can find single bulb pendants, multi-light clusters, and even adjustable fixtures that allow you to change the height and direction of the light.
Think about the purpose of your pendant light. Are you lighting a dining table, a kitchen island, or adding a decorative touch to a hallway? For task lighting, choose a focused, downward-facing pendant. For ambient lighting, consider globes or drum-shaped pendants that diffuse light evenly.
Selecting The Cord Length
The cord length is more important than most people realize. Too long, and the light hangs awkwardly low, too short, and it may not provide enough illumination or look cramped.
Measure the distance from the ceiling to where you want the light to hang before buying your pendant. A good rule of thumb is to leave about 28-34 inches above a table or countertop. But don’t be afraid to adjust based on your ceiling height and room layout.
Matching Style With Room Decor
Your pendant light should complement your room’s style, not clash with it. If your decor is modern and minimalist, sleek metals and simple shapes work best. For rustic or farmhouse styles, look for lights with warm finishes and vintage bulbs.
Think about the color, material, and shape of your pendant light. Does it echo other elements in the room like furniture or fixtures? Matching these details will make your pendant light feel like a natural part of your design, not an afterthought.
Credit: glarefusion.com
Tools And Materials Needed
Before you start hanging your pendant light cord, gathering the right tools and materials is crucial. Having everything on hand saves time and prevents frustration mid-project. It also ensures your installation is safe and looks professional.
Essential Tools
- Drill:You’ll need this to make holes for mounting brackets or anchors.
- Screwdriver:A flathead or Phillips screwdriver helps secure screws tightly.
- Wire Strippers:These are important for safely exposing the wires without damaging them.
- Measuring Tape:Accurate measurements keep your pendant light hanging at the perfect height.
- Level:Use this to ensure your light hangs straight and not crooked.
Have you ever tried to fix something without the right tool and ended up making it harder? Avoid that by investing a little time upfront to prepare.
Safety Equipment
- Safety Glasses:Protect your eyes from dust and debris when drilling or cutting wires.
- Gloves:Insulated gloves help prevent electrical shocks and protect your hands.
- Voltage Tester:This tool is a must-have to check if the power is off before touching any wiring.
Safety isn’t optional when working with electrical fixtures. Have you checked your safety gear before starting a project? It can save you from serious accidents.
Additional Supplies
- Mounting Brackets or Hooks:These hold your pendant light securely in place.
- Wire Nuts:Use these to safely connect wires without risk of short circuits.
- Electrical Tape:This adds an extra layer of insulation and security to your wire connections.
- Anchor Bolts:If you’re attaching the light to drywall or plaster, anchors provide the needed support.
Sometimes, the smallest extra supply can make a big difference in the stability and durability of your pendant light setup. Have you ever skipped one and regretted it later?
Preparing The Installation Area
Preparing the installation area is a crucial part of hanging a pendant light cord safely and effectively. Taking the time to get this step right can save you from common pitfalls and ensure your new light hangs perfectly. Let’s walk through the key tasks you need to focus on before you start the actual installation.
Turning Off Power
Safety should be your top priority. Before touching any wires or fixtures, switch off the power at the circuit breaker to prevent electrical shocks.
Double-check that the light you’re working on is completely off by flipping the wall switch and testing with a non-contact voltage tester if you have one. This small extra step can protect you from unexpected accidents.
Checking Ceiling Support
Not all ceilings are built the same, and your pendant light needs a strong anchor point. Look for a solid ceiling joist or a sturdy mounting bracket that can support the light’s weight.
If your ceiling is drywall without a joist nearby, consider installing a ceiling hook with a toggle bolt or a mounting plate designed for pendant lights. This ensures your light won’t sag or fall after installation.
Marking The Hanging Spot
Decide exactly where you want your pendant light to hang. Use a pencil to mark the spot on the ceiling where the fixture will be installed.
Think about how the light will fit in the room’s layout. Is it centered over a dining table or positioned to illuminate a workspace? Marking carefully helps you avoid moving the fixture later, which can cause extra work and damage.
Installing The Ceiling Hook Or Mount
Installing the Ceiling Hook or Mount Begin by choosing a sturdy spot on the ceiling. Ensure the hook or mount can support the pendant light’s weight. Drill a hole, insert the anchor, and screw in the hook securely. Confirm it’s stable before attaching the pendant light cord.
Installing the ceiling hook or mount for a pendant light is crucial. It ensures your light hangs securely and looks aesthetically pleasing. This process involves careful selection and installation to avoid any mishaps. Let’s dive into the details.Choosing The Right Hook
Selecting the right hook is essential for safety. Consider the weight of your pendant light. Light fixtures vary, so choose a hook that supports your specific weight. Look for hooks made from sturdy materials like stainless steel or brass. These materials are durable and can handle heavier loads. Ensure the hook’s size fits your ceiling type. A hook too small might not hold securely. If uncertain, consult a hardware expert.Securing The Hook Properly
Proper installation is key to a secure hold. Begin by marking the spot where the hook will be installed. Use a pencil for accuracy. Drill a pilot hole if necessary. This helps the hook screw in easily and prevents ceiling damage. Insert the hook into the hole and tighten it securely. Ensure it doesn’t wobble or tilt. If using a toggle bolt, follow the instructions carefully. Double-check the hook’s stability before hanging the light. Safety first!Hanging The Pendant Light Cord
Hanging the pendant light cord correctly is key to achieving both style and function in your space. It affects the overall look and ensures safety. Taking your time with this part will give you a polished finish and prevent future issues.
Adjusting Cord Length
Start by deciding how low you want your pendant light to hang. A good rule is to keep it about 30 to 36 inches above a table or countertop. If the cord is too long, you can shorten it by pulling the excess through the canopy and trimming it carefully.
Remember, it’s easier to cut more off later than to add back length. So, leave a little extra at first. Have you ever hung a light that felt too low? Adjusting length before securing saves frustration.
Threading The Cord Through Hook
Next, thread the pendant cord through the ceiling hook or mounting bracket. This step lets the cord hang neatly and supports the weight of the fixture. If your hook has a loop, simply feed the cord through and pull it until the light sits at your desired height.
Make sure the cord isn’t twisted or tangled during this process. A smooth, straight line not only looks better but also reduces strain on the wiring. Have you noticed how a twisted cord can make the whole setup look messy?
Securing The Cord
Once the length is set and the cord is threaded, it’s time to secure it. Use a cord grip or strain relief device to keep the cord firmly in place inside the canopy. This prevents movement that could wear out the wiring over time.
Double-check that the cord is tight but not pinched. Too much pressure can damage the wires inside. Securing the cord properly makes your pendant light safe and reliable, so don’t rush this part.
Wiring The Pendant Light
Wiring a pendant light correctly is crucial for safety and functionality. It might seem tricky at first, but with careful attention and the right tools, you can handle it confidently. Let’s break down the process to make sure your pendant light not only looks great but works perfectly too.
Connecting Wires Safely
Before you start, always turn off the power at the breaker box to avoid any accidents. Identify the wires: typically, black or red is the live wire, white is neutral, and green or bare copper is ground. Match the wires from your pendant light to the corresponding wires in the ceiling.
Hold the ends of matching wires side by side and twist them together clockwise. Don’t rush this step—secure connections prevent flickering and hazards. If you ever felt a loose light socket, it’s usually because the wires weren’t connected tightly enough.
Using Wire Nuts And Connectors
Wire nuts are your best friends for a secure and tidy connection. After twisting the wires, screw on a wire nut firmly until it’s tight and no bare wire shows outside. You can give a gentle tug to check if the wires stay firmly inside.
In some cases, especially with thicker wires or multiple connections, push-in wire connectors offer a clean, reliable alternative. They save time and reduce the chance of loose wires. Whatever you use, make sure it’s rated for your wire size and type.
Testing The Connection
Once everything is connected, restore power and test your pendant light. Does it turn on immediately without flickering? If yes, you’ve done it right! If not, turn off the power again and double-check your wire connections.
Consider using a voltage tester before turning the power back on. It can confirm whether the wires are live or not, giving you peace of mind. Have you ever had a light fixture that just wouldn’t work? Sometimes, a simple retwist or tightening of wire nuts solves the problem instantly.
Final Adjustments And Styling
After securing your pendant light, the final adjustments and styling really make a difference in how it looks and feels in your space. Small tweaks can turn a simple fixture into a stunning focal point. These finishing touches help your light fit perfectly with the room’s vibe and your personal taste.
Leveling The Light Fixture
Check if your pendant light hangs straight and even. A fixture that tilts or leans can distract from the overall aesthetic and may even affect lighting quality. Use a small level tool or simply step back and eyeball the alignment to spot any unevenness.
If it’s off, gently adjust the cord or chain length on each side until the fixture sits perfectly flat. This step is easier when someone helps by holding the light while you make changes. Have you noticed how a slight tilt can change the entire look of a room? That’s why this small fix matters.
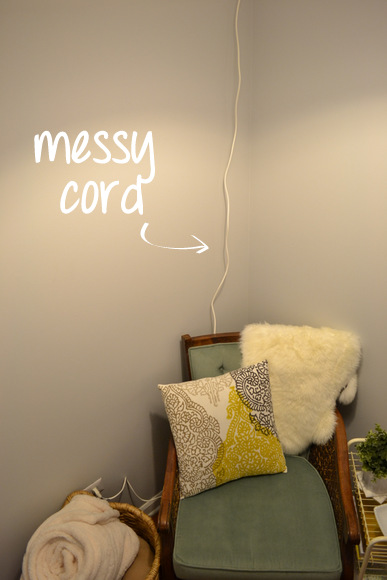
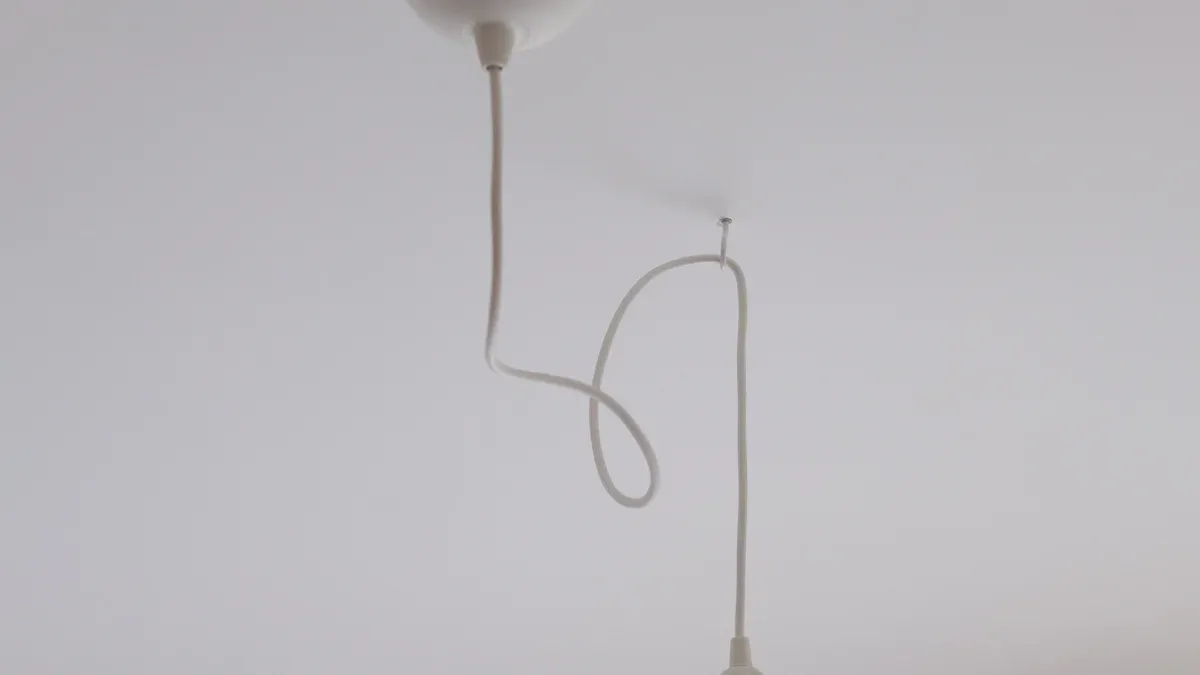
Tidying Excess Cord
Excess cord can look messy and take away from the clean style you want. Coil any extra length neatly above the ceiling canopy or use cord clips along the ceiling to keep things tidy. This also prevents cords from dangling unsafely or getting tangled.
Think about your ceiling height and furniture placement—sometimes a bit of extra cord is helpful for future adjustments. But if you don’t need the slack, trimming it carefully is a good idea. You don’t want your pendant light to look like it’s fighting gravity with loose cables.
Adding Decorative Elements
Adding small decorative touches can personalize your pendant light and make it pop. Consider swapping out the bulb for a vintage Edison style or a colored globe to add character. You can also add a decorative cord cover or wrap the cord in fabric for a softer, more stylish look.
Don’t forget the ceiling canopy—it’s an opportunity to add color or texture that complements the fixture. What little changes could you make that reflect your style but still keep your light functional? Sometimes, the details you add last turn a simple light into a conversation starter.

Credit: 100things2do.ca
Troubleshooting Common Issues
Hanging a pendant light cord might seem straightforward, but unexpected issues can pop up that test your patience. Troubleshooting these common problems quickly can save you time and frustration. Let’s look at practical ways to fix the usual hiccups you may face.
Light Flickering
Flickering lights often mean there’s a loose connection somewhere. Start by checking the bulb—sometimes a simple twist tightens it enough to stop flickering.
If the bulb is secure, inspect the socket and wire connections for any looseness. A poor connection can cause inconsistent power flow, leading to flickering.
Have you ever experienced flickering that was fixed by swapping the bulb? That’s a quick way to rule out a faulty bulb versus wiring issues.
Cord Slipping
If your pendant light cord keeps slipping through the ceiling mount, it’s probably because the cord grip isn’t tight enough. Most fixtures have a small screw or clamp designed to hold the cord firmly.
Double-check that this clamp is adjusted to the thickness of your cord. If it’s too loose, the cord will slide down, ruining your setup.
Try adding a small rubber washer or piece of tape inside the clamp for extra grip if the clamp alone isn’t enough. This trick helped me keep the cord steady when the clamp felt weak.
Uneven Hanging
Uneven pendant lights can throw off a room’s balance and look sloppy. First, measure the length of the cord on each side carefully to spot any differences.
Sometimes, the ceiling hook or mounting bracket isn’t level, which causes the light to hang crooked. Use a level to confirm, and adjust the mounting hardware as needed.
Have you checked whether the light’s weight is evenly distributed? Sometimes the bulb socket or shade can be off-center, making the whole fixture lean.
Maintenance Tips For Pendant Lights
Proper maintenance keeps pendant lights bright and safe. Regular care extends the life of your fixture. It also keeps your space looking fresh and stylish.
Cleaning The Fixture
Turn off the light and let it cool before cleaning. Use a soft cloth or microfiber duster to remove dust. For stubborn dirt, dampen the cloth slightly with water. Avoid harsh chemicals that may damage the finish. Clean glass or acrylic shades with mild soap and water, then dry well.
Checking Wiring Regularly
Inspect the cord and connections for any wear or damage. Look for frayed wires or loose parts. Ensure the fixture is secure and not wobbling. If you spot any problems, switch off power and fix them promptly. Regular checks help prevent electrical hazards and keep your pendant light safe.
Replacing Bulbs Safely
Always turn off the power before changing bulbs. Let the old bulb cool down to avoid burns. Use the correct bulb type and wattage recommended for your fixture. Handle bulbs gently to prevent breakage. Secure the new bulb firmly but do not overtighten. Safe bulb replacement keeps your light working well.

Credit: 100things2do.ca
Frequently Asked Questions
How Do I Measure Pendant Light Cord Length?
Measure from the ceiling to the desired hanging height. Add extra length for adjustments. This ensures the pendant light hangs perfectly.
What Tools Are Needed To Hang A Pendant Light Cord?
You need a drill, screwdriver, wire stripper, tape measure, and ladder. These tools help you install the pendant light safely and accurately.
Can I Adjust Pendant Light Cord Length Later?
Yes, most pendant lights allow cord length adjustment. Simply shorten or lengthen the cord to fit your space and style preferences.
How Do I Secure A Pendant Light Cord Safely?
Use ceiling hooks, cord grips, or clips to hold the cord. Ensure the cord is taut and avoid sagging for safety.
Conclusion
Hanging a pendant light cord can brighten any room quickly. Following simple steps makes the job easier and safer. Measure the cord length before you start hanging it. Secure the cord properly to avoid accidents. Choose the right tools for a smooth setup.
Check the light’s position and adjust as needed. Enjoy the new look and warm glow in your space. Small changes can make a big difference in your home’s feel. Try it yourself and see how easy it can be.


