
Are you ready to transform your space with a stylish pendant light but unsure how to hang it with a cord? You’re in the right place.
Hanging a pendant light might seem tricky, but with the right steps, you can do it yourself quickly and safely. Imagine the warm glow and modern touch your new light will add—right where you want it. Keep reading, and you’ll discover simple tips that make the whole process clear and easy.
By the end, you’ll have the confidence to brighten your room exactly how you envisioned. Let’s get started!
Choosing The Right Pendant Light
Choosing the right pendant light is key to enhancing any room’s atmosphere. The perfect fixture blends style, function, and size. Consider the room’s purpose and design before selecting a pendant light.
Types Of Pendant Lights
Pendant lights come in many forms. Some popular types include:
- Single pendants – simple and focused lighting
- Multi-light pendants – several bulbs on one fixture
- Globe pendants – round, modern shapes
- Cage pendants – open design for an industrial look
- Drum pendants – fabric shades for soft light
Each type offers a unique look and lighting effect. Choose one that fits the room’s function and mood.
Matching Style And Space
The pendant should match the room’s style and size. Small pendants suit cozy spaces. Large fixtures fit open areas with high ceilings.
Consider the room’s décor. Modern styles need sleek, simple designs. Rustic spaces work well with warm, textured fixtures.
Balance is important. Avoid pendants that overpower or get lost in the room.
Selecting The Cord Length
Cord length affects both look and function. Measure the ceiling height first. The pendant should hang low enough to light the space well.
For dining tables, keep the light 28 to 34 inches above the surface. In open rooms, allow more space below the light.
Adjustable cords offer flexibility. They let you change the height as needed.

Credit: www.amazon.ca
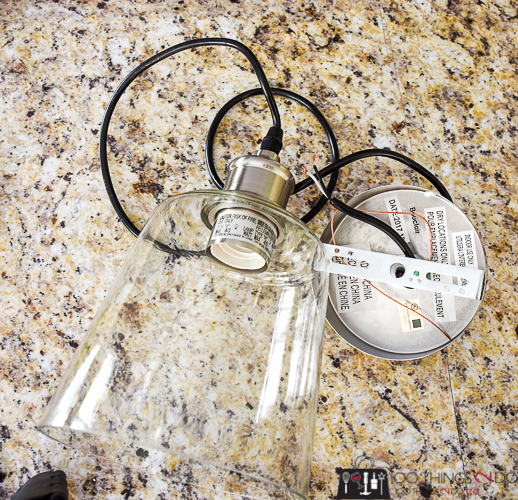
Gathering Necessary Tools And Materials
Before you start hanging your pendant light with a cord, gathering the right tools and materials sets the foundation for a smooth installation. Having everything ready helps you avoid unnecessary trips and interruptions. It also ensures you work safely and efficiently, making the whole process more enjoyable.
Essential Tools
- Screwdriver:A Phillips and flathead screwdriver will help you secure the mounting bracket and tighten screws.
- Wire Stripper:Stripping the wire ends properly is crucial for a safe electrical connection.
- Drill:Use a drill with appropriate drill bits to make holes in the ceiling if needed.
- Voltage Tester:This tool confirms the power is off before you handle any wiring.
- Measuring Tape:Accurate measurements ensure your pendant hangs at the perfect height.
When I first installed my pendant light, I underestimated the need for a voltage tester. Luckily, I bought one just in time, which saved me from potential electric shock. This experience taught me that skipping essential tools isn’t worth the risk.
Safety Equipment
- Insulated Gloves:Protect your hands from electrical shocks while working with wires.
- Safety Glasses:Shield your eyes from dust or debris during drilling.
- Stable Ladder or Step Stool:Ensures you reach the ceiling safely without stretching or losing balance.
Using proper safety equipment is not optional. It’s about protecting yourself. Think about it: would you rather rush and risk injury or take a moment to gear up properly?
Additional Supplies
- Wire Nuts:Secure wire connections safely and neatly.
- Electrical Tape:Adds an extra layer of insulation around wire nuts.
- Mounting Bracket:Usually included with your pendant light but double-check before starting.
- Light Bulbs:Choose bulbs that match your fixture’s specifications and desired ambiance.
- Ceiling Anchors:Necessary if your ceiling material requires extra support for the pendant.
Have you ever started a project only to realize you forgot a small but critical item? That’s why laying out every supply beforehand saves time and frustration. You’ll thank yourself when everything is within arm’s reach.
Preparing The Installation Area
Preparing the installation area ensures safety and efficiency. Clear the space and gather necessary tools. Ensure the ceiling can support the pendant light’s weight. This foundation guarantees a smooth installation process.
Preparing the installation area is crucial when hanging a pendant light with a cord. A well-prepared space ensures safety and efficiency. Follow these steps to create a smooth installation process.Turning Off Power
Safety first. Switch off the power at the circuit breaker. Confirm the power is off with a voltage tester. This prevents electric shock.Clearing The Workspace
Remove any furniture or objects from the area. This gives you ample space to work. Lay down a drop cloth to catch any debris. Keep tools within reach for convenience.Locating The Ceiling Joist
Find the ceiling joist to secure the pendant light. Use a stud finder for accuracy. Mark the spot with a pencil for reference. This ensures a stable installation.
Credit: 100things2do.ca
Installing The Mounting Bracket
Installing the mounting bracket is a crucial step in hanging your pendant light with cord. This part holds the entire fixture in place, so it must be done carefully. Getting it right ensures your light stays secure and looks great.
Attaching The Bracket Securely
Start by turning off the power at the circuit breaker to stay safe. Locate the electrical box in your ceiling and align the mounting bracket with its screw holes. Use a screwdriver to tighten the screws firmly, but avoid overtightening which could damage the bracket or ceiling.
If your ceiling has wooden joists nearby, try to anchor the bracket into those for extra support. Sometimes, you might need to use wall anchors if the electrical box isn’t strong enough on its own. This small detail can make a big difference in how stable your pendant light feels.
Ensuring Stability
Once the bracket is attached, give it a gentle shake to check for any wobbling. A stable mounting bracket prevents your light from swinging or falling, which is especially important if you have kids or pets. If you notice any movement, double-check the screws or consider using longer screws for better grip.
Think about the weight of your pendant light. Heavier fixtures may require additional support, like a brace bar that spans between joists. Don’t skip this step just to save time—your safety depends on it.
Wiring The Pendant Light
Wiring the pendant light is a key part of the installation. Safe and correct wiring ensures the light works well and avoids hazards. This section explains how to connect wires properly, secure them, and test the connection before finalizing.
Connecting Wires Correctly
Start by turning off the power at the breaker. Identify the wires in the ceiling and the pendant cord. Usually, you will find a black (live), white (neutral), and green or copper (ground) wire.
Match the wires from the pendant light to the ceiling wires by color. Connect black to black, white to white, and green or copper to the ground wire. Use wire connectors to join them securely. Never twist wires without connectors.
Using Wire Nuts And Electrical Tape
Wire nuts hold wires tightly together. After twisting wires, screw on the wire nut until tight. Check that no bare wire is exposed outside the nut.
Wrap electrical tape around the wire nut and the wires. This adds extra safety and prevents the nut from loosening over time. Ensure the tape covers the metal parts fully.
Testing The Connection
Turn the power back on at the breaker. Use a voltage tester to check if power reaches the pendant wires. Switch on the light to verify it works properly.
If the light does not turn on, switch off the breaker and recheck all connections. Secure any loose wires and test again. Only finalize the installation when the light functions safely and correctly.
Credit: thediyplaybook.com
Adjusting The Cord Length
Adjusting the cord length of your pendant light is a crucial step that affects both the functionality and appearance of your space. Too long, and it might look messy or get in the way; too short, and it could limit the light’s effectiveness or style. Taking control of the cord length lets you customize the light exactly how you want it.
Measuring Desired Height
Start by deciding how low you want your pendant light to hang. Think about the room’s purpose—kitchen islands usually need lights hung about 30 to 36 inches above the surface, while dining areas might require a slightly different height.
Use a tape measure or a sturdy string to mark the ideal length from the ceiling to the bottom of the light. Double-check by standing back and imagining the space with the light at that height—does it feel balanced or awkward?
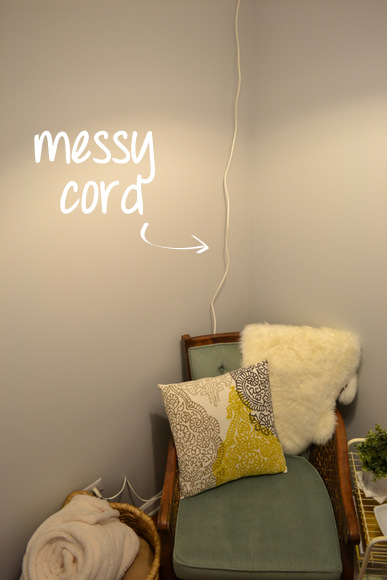
Securing Excess Cord
Once you know the perfect length, you’ll have some extra cord left over. Don’t just let it hang loosely; it can look untidy and even become a safety hazard. Instead, coil the excess cord neatly and secure it using zip ties or twist ties inside the ceiling canopy or a decorative cord cover.
If your pendant comes with a cord grip or strain relief, use it to hold the cord firmly in place. This keeps the cord from slipping and maintains the height you’ve set.
Creating A Clean Look
To achieve a polished finish, hide the cord excess inside the ceiling canopy whenever possible. If the cord is visible, try to arrange it so it follows a straight line or gentle curve rather than dangling randomly.
Consider using cord clips or adhesive hooks to guide the wire neatly along the ceiling or wall. This small effort makes a big difference in how professional and intentional your lighting installation appears.
Mounting The Pendant Light
Mounting your pendant light correctly ensures safety and style. It’s not just about hanging a fixture; it’s about creating the perfect focal point in your room. Understanding each part of the mounting process will help you avoid common mistakes and achieve a polished look.
Attaching The Light Fixture
Start by connecting the pendant light’s wires to your home’s electrical wiring. Match the colors carefully—usually black to black, white to white, and green or copper to the grounding wire. Use wire nuts to secure these connections tightly and wrap them with electrical tape for added safety.
Before you finalize, gently pull on the wires to ensure they’re fastened properly. Loose wiring can cause flickering or even electrical hazards. Remember, taking your time here can save you from costly repairs later.
Securing The Canopy
The canopy covers the electrical box and supports the pendant light’s weight. Slide it up the cord and align it with the mounting bracket attached to the ceiling. Use screws to fasten the canopy securely, making sure it sits flush against the ceiling without gaps.
If your canopy doesn’t sit evenly, check that the mounting bracket is level. An uneven canopy not only looks off but can strain the fixture’s wiring. Tighten the screws firmly, but avoid overtightening to prevent damage.
Final Positioning
Adjust the pendant cord length to your desired height. Most people find 28 to 34 inches above a table ideal, but it depends on your ceiling height and room layout. Use the cord grip or adjust the cord inside the canopy to secure the length.
Turn on the light to see how it illuminates the space. Does it highlight the area as you hoped? Adjusting the position now can make a big difference in both function and ambiance. Have you considered how the light’s placement affects your room’s mood?
Troubleshooting Common Issues
Installing a pendant light with a cord can bring charm to any room. Still, some common problems may occur during or after installation. Troubleshooting these issues helps keep your light safe and functional. Understanding these fixes saves time and effort.
Light Flickering
Flickering often means a loose bulb or poor connection. Check if the bulb is screwed in tightly. Replace the bulb with a new one to rule out bulb failure. Examine the switch and wiring for damage or wear. Using a compatible bulb type helps reduce flicker.
Uneven Hanging
Uneven pendant lights spoil the room’s look. Measure the cord length carefully before hanging. Adjust the cord grip or canopy to balance the light fixture. Ensure the mounting bracket is level on the ceiling. Use a spirit level to check the alignment.
Loose Connections
Loose wiring can cause safety hazards and light failure. Turn off power before inspecting connections. Tighten wire nuts and screws inside the ceiling box. Use electrical tape on wire nuts for extra security. Check the cord for any cuts or damage and replace if needed.
Enhancing Your Lighting Setup
Enhancing your lighting setup can transform any room’s atmosphere. Pendant lights with cords offer flexibility and style. Small changes create big effects in how your space feels and functions.
Adding Dimmer Switches
Dimmer switches let you control light brightness easily. Soft lighting sets a calm mood. Bright light helps with tasks. Installing a dimmer switch is simple and adds value. It works well with most pendant lights.
Combining Multiple Pendants
Grouping several pendant lights creates a stunning focal point. Use different heights for visual interest. Even spacing ensures balanced illumination. Multiple pendants improve light coverage in large areas. This style suits kitchens, dining rooms, and living spaces.
Using Decorative Bulbs
Decorative bulbs add charm and personality to your pendants. Choose bulbs with unique shapes or filaments. Warm light bulbs create cozy vibes. Clear bulbs show off the pendant design. Bulbs affect both look and light quality.
Frequently Asked Questions
How Do I Safely Hang A Pendant Light With Cord?
Turn off power before installation. Use a sturdy ceiling hook or bracket. Securely fasten the cord and connect wiring according to instructions. Always follow electrical codes and consider professional help for safety.
What Tools Are Needed To Hang A Pendant Light?
You’ll need a drill, screwdriver, wire strippers, voltage tester, ceiling hook or bracket, and wire nuts. These tools help ensure secure mounting and safe electrical connections for your pendant light installation.
How To Adjust The Length Of A Pendant Light Cord?
Measure the desired length and unplug the cord. Loosen the canopy screws and pull the cord to adjust. Trim excess wire if needed, then secure the cord inside the canopy before restoring power.
Can I Hang A Pendant Light Without Ceiling Support?
No, a pendant light requires a strong ceiling support to hold its weight safely. Use a ceiling joist or install a brace for secure mounting to avoid accidents.
Conclusion
Hanging a pendant light with a cord is simple and rewarding. Start by measuring the space carefully. Secure the cord tightly to avoid accidents. Choose the right height to suit your room’s style. Use basic tools and follow safety tips.
Take your time with each step. Enjoy the warm, cozy light it brings. A well-hung pendant can change your room’s feel. Try it yourself and see the difference. Small efforts create big improvements. Brighten your space with confidence today.


